Disclaimer and Social

This page may contain affiliate links. As an Amazon Associate I earn from qualifying purchases.

Thursday, December 20, 2018

Mimic Springs or Gravity in Fusion 360

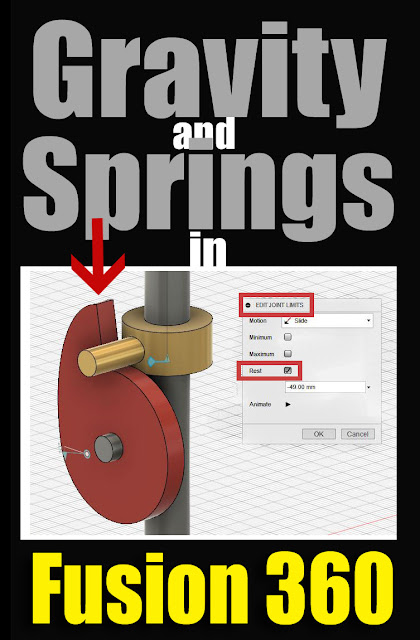
Use the REST option in combination with JOINTS and CONTACT SETS to mimic the effect of gravity or a spring-return action in your Fusion 360 designs. Now your cam-followers will actually follow the cam surface for the entire rotation, latches can snap back into position, and you can more accurately model the actions of your mechanisms.

WHY?
Sure, even without utilizing the REST option you can use contact sets and make one object push another object out of the way. But the moved object stays in the new location. It does not return to its original position. If a cam pushes a rod up, the rod stays up and never returns to its lower position. A latch pin can be pushed out of the slot, but it will not automatically slide into the locked position

But when the REST option is used, the object does return to its original position. The REST option basically tells Fusion to always return that object to its original resting position. The REST option works with all joint types, so you can create a self-centering joystick, a slide that returns to bottom, a spring-loaded pin or a combination.

I've always used this technique in combination with contact sets, but it does work with basic joints too. I use the contact sets to create the interaction between the objects, then create a resting position to make sure the moved object returns to the desired position when the contact set's influence ends. However, you can create a joint without contact sets, a simple pendulum for example, and the object will return to resting position when you release the mouse after moving it. (Note: This changes the way the "Capture Position" option works.)

gravity and springs in fusion 360 joints and contact sets
Use the "REST" option in the "Edit Joint Limits" menu along with contact sets to apply, or at least mimic, the effect of gravity or springs in Fusion 360 models and animations.


SETTING the REST POSITION:
  • Open the JOINTS folder in the object browser
  • Find the Joint you want to have a Resting Position
  • Start the "Edit Joint Limits" dialog by:
    a) Right-clicking and selecting from the menu
    b) or hover over the joint and select the icon to the right of the joint name.
  • Select the REST check box
  • When selected, an option to enter the location of the REST or "home" position appears
  • The type of value changes depending on the joint type (ex: sliders use a distance, rotating joints (revolutes) use degrees
  • I try to design the model so that the object's original or current position is the resting position. But you can enter any functional positive or negative value.
  • Notice that you can drag the object using the triangle-flag icon that appears
  • Click OK


Now, the "Rested" component will try to return to the home-position whenever the contact surface stops pushing it out of the way. The affect happens quickly, much like having a spring applied to it.

The REST option is an excellent way to model assembly joints, but it does have limits.
  • Objects do not bounce.
  • There is no decay, so pendulums return instantly to center instead of swinging in smaller arcs
  • There is no acceleration/deceleration.
  • There is no friction or speed options that I know of.
  • It does not deform modeled springs or levers.

So it's definitely not a full kinematics modeler and the interaction is very simple. But overall it's a very useful technique that is worth remembering.

Check out all of our Fusion 360 Tips, Tricks and Tutorials


As an Amazon Associate I earn from qualifying purchases.
Shop through our Amazon links to help support this site.

Also find me on:

Wednesday, December 12, 2018

DIY Passive Solar Snow Melter

I had some leftover aluminum cans that I had spray-painted black for my DIY passive solar heater projects. When an early snow storm hit I decoded to do some experiments, more out of boredom that hope for results.

To my surprise, the aluminum cans had a significant melting effect. The first day I just tossed one on the snow without plugging up the vent holes. It worked well enough that I gave the idea some more thought. The next day, I plugged the holes and the results were much better.

The cans melted the snow so well they almost disappeared into the snow, which probably blocked most of the sun and decreased their effectiveness.

Melting an extra inch to 1-1/2" of snow on a 40 degree day seems like enough of a success that I might explore the idea even further.
black spray painted aluminum cans used to melt snow with a passive solar heater
With just three aluminum cans spray-painted black and plugged up with a napkin, you can melt an extra inch of snow on a 40f day. Might be worth exploring the concept a little further.
I didn't invent the beer-can solar collector, there are lots of tutorials on Instructables. But I haven't found any information about using them to melt snow. So my ideas need to be tested before I write any kind of tutorials.

First, I will need a lot more than three cans to melt much snow. Think hundreds of black aluminum cans.

Second, I need to cover the top so I don't lose so much heat back to the atmosphere.

I need a way to quickly deploy them and then put them back in storage. But enough cans to clear a walkway would take up my entire shop.

So right now, I'm thinking it might be better to duct the heated air from a traditional solar collector box and direct it under the walk or porch or driveway. That seems like a lot of work though.

But what if I knew the snow was coming and could attach a flexible plastic duct, almost like one of those dancing air-filled figures at the car lots but with internal bumps like bubble wrap to insure separation of the membranes and some air circulation.

I'm too tired from shoveling the driveway right now to give it much thought. But I am intrigued.

If you've got any ideas feel free to drop me a comment.


Also find me on:

Saturday, November 24, 2018

10 Gifts Under $10 for Makers and Crafters

Here are ten, inexpensive stocking stuffers that will please any tinkerer or maker. They are all small but very useful, the kind of thoughtful gifts everyone needs but not everyone would buy for themselves. Better yet, they are the kinds of items every maker would be grateful to have duplicates - one at each workstation.
top 10 gifts under less than $10 stocking stuffer for makers crafters
A guide of the top ten inexpensive gifts for makers and crafters. All these stocking stuffers are under $10 and all are the types of useful, thoughtful presents that every tinkerer needs at least one of, and would not mind a duplicate.


Monday, November 19, 2018

Putty, Primer or Paint - Finishing 3d Prints

I am learning how to smooth and finish 3d prints so I can cast molds from them. With single use prints I never needed to do more than a light sanding and maybe some paint. But when you start making expensive silicone molds from them, and then making multiple copies, well you want the printed object to look good. Having a hundred copies of a defective print isn't cool.

I did a lot of research and got lots of conflicting advice about what is the best way to finish prints. So I tried a lot of different materials and came to my own conclusions. I decided there is no one best solution, and I need to use the appropriate tool for the job. Jeesh, I should have known that to begin with. I use different hammers and saws for jewelry, carpentry and demolition - why would post processing 3d prints be any different?

Most of my prints are in PLA. So I do a lot of sanding - a LOT of sanding - then more sanding. Unfortunately, the sanding process removes so much material it also changes the dimensions and contours of the object. So now I'm learning to put back material after I sand.

In fact, all of these materials seem to actually increase, not decrease, the amount of sanding I do.

I still don't know much about the finishing process, but I wanted to post a little about my current preferences in materials. I think of these materials as falling into three categories: Putty, Primer and Paint. Each has its advantages and disadvantages, and I'm starting to use more than one material on a print to get the results I want.

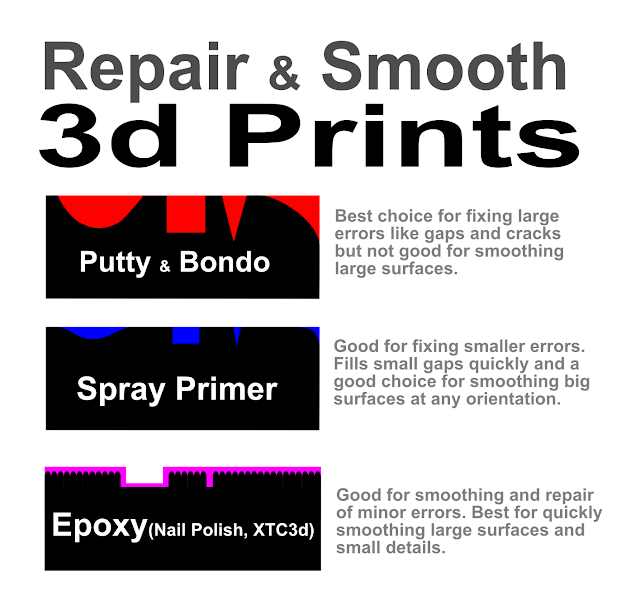
PUTTY: I call it putty if it is so thick that I have to spread with a trowel. Anything that sticks to PLA, does not shrink when it dries and is sandable to a smooth finish is okay for me. Bondo, epoxy putty, spackle, wood putty all seem to work. I mostly use putty to fill in large gaps, joints or depressions. I do not use it for smoothing large surfaces. It is also good for making detailed creases, folds and sharp edges. If you have lost the sharp corner due to sanding, putty can help get it back.

PRIMER: I mostly use spray primer. Regular, sandable auto-body primer is fine. It covers large areas quickly and can be sanded to a smooth finish. It can cover medium sized gaps and cracks. But it tends to float on top of small cracks, not sink into them. You can hide print lines quickly, but it does change the dimensions slightly. This is my favorite for large surfaces.

PAINT: On really good prints I can paint-sand-paint a good finish quickly. Auto body spray paint works well. However, I also use nail polish as paint, especially in highly detailed areas. And the XTC 3d product works very well. Even when I use putty or primer as the first coat, I often finish the print with a final coat of paint.

finish 3d prints with putty bondo spray primer paint epoxy nail polish xtc 3d
Every material has its own advantages and disadvantages. Putty fills big gaps but is bad for fine fishes. Spray primer covers large areas quickly but tends to ride on the surface without really filling the gaps. paints and epoxies like nail polish or XTC 3d are great for quickly covering print lines and for final finishes. Don't be afraid to combine the materials - and there is still going to be a lot of sanding involved.


No matter what you use there will still be a lot of sanding involved. And the techniques I use to make a master cast for molding might not be durable enough for something like a toy or case. But that's really why I'm starting to learn how to cast copies - durability and quick production.

I will post more about each of these materials as I learn how to use them better. I just wanted to post this to let people know you can use more than one material, there is not one perfect works-for-everything solution. Also, you can combine materials on the same project.

Right now, I'm experimenting with thinning nail polish and epoxies for "self leveling pours." I'm starting to get good results, and if I get it to work consistently I will definitely post about that.

Also find me on:
FACEBOOK -or- INSTRUCTABLES -or- YOUTUBE

Wednesday, November 7, 2018

Simple DIY Low Pass and High Pass Filters

I needed a simple way to filter some sound effects and pass the bass notes through to the next stage of the project. I could resample the sounds in software, or pass it through a through a commercial module. But I needed something small, simple and cheap - preferably something I could build myself and put on a breadboard as part of the project.

Found these two videos from Afrotechmods on YouTube. He always does a great job of explaining electronics, and these two videos gave me the info I needed to start designing and building my own low pass filters.


These are the simplest, passive style filters, But their simplicity is just what I needed, just cut off the treble and keep the bass, no need for an equalizer with sliders, no power supplies etc. Just two components per filter -  a resister and a capacitor - my kind of circuit.

 There are more detailed tutorials, like humanharddrive's, but these two videos gave me what I needed to start researching.

Also find me on:
FACEBOOK -or- INSTRUCTABLES -or- YOUTUBE

Friday, October 19, 2018

Luer Lock - Applicator Tips and Dispensers Have A Name

Those precision applicator tips for glue bottles, syringes and dispensers have a name. They are called LUER LOCK, or at least that's the famous brand name. (affiliate) Just searching for the name gets me better results for tips and bottles and syringes.


I used them all the time in college, but never knew their name until now. When I was making architectural models I used them to apply thin streams of glue to the foam-core walls and cardboard roofs. The precise tips let me get clean builds easily. Several shops in that town sold them in a variety of sizes. But it was a college town, so they sold hundreds every semester and the clerks knew what I was looking for when I described the tips or task that I needed them for.

When I moved to a non-college town, I could never find them. I asked for them, described them and offered to buy a case if the store could find them. But all I got was weird looks. Looking for "large bore syringes" or "applicator nozzles" on the net got me no closer. I thought I had Amazon, Ebay and Google trained well enough they would give craft-related items automatically, but no...

Then I forgot about them for years because I worked my way out of internship and because I also moved on to 3d printing and CNC. I no longer needed to do paper and foam mock-ups.

Recently however, I found Eric Strebel's excellent YouTube channel. He does wonderful tutorials on traditional model making and mock-up techniques. I started watching for the feel-good memories but kept watching because the techniques are still useful.

One of his videos described his favorite tools and LUER LOCK dispensers were one of them. (affiliate) So, I made a note of the name and wrote this blog post so I won't forget and because maybe you might find them useful also.

You can get adapters for existing syringes or as complete packages in a variety of sizes.


As an Amazon Associate, I earn from qualifying purchases.


Also find me on:
FACEBOOK -or- INSTRUCTABLES -or- YOUTUBE

Tuesday, October 16, 2018

Skin Safe Silicone Rubber for 3d Prints

I needed to find some skin-safe and food-safe silicone casting material for my projects. I knew about a food safe silicone putty for making chocolate molds, but it wasn't sturdy enough to make cases and jewelry with. If I wanted to make wearable electronic sensors and jewelry, then I needed to find a pourable liquid version that would be safe to wear next to the skin for hours.

Sure, I can design and 3d print a case - been doing it for a while. But the surfaces are rough, they aren't very flexible, and I don't trust the plastics. I've read too many stories about rashes and reactions to mystery plastics. I wanted something that I could wear and that I felt safe giving to other people to wear, something that wasn't rough or toxic or irritating to the skin.

Think of Fit-Bit cases, Swatch watchbands, Croc shoes or even that Cosplay costume that you wear to every convention. I'm okay with a few VOCs and weird plastics touching my skin occasionally. But if I'm going to wear a product all day, seven days a week then I want to know it's safe. And I want my customers to be safe. So, I did some research and wound up finding the same company I've used for years.

I've used Smooth-On casting plastics for years, (affiliate) but I found out they also make a huge line of other products including a wide selection of food and skin safe silicones. They all have special characteristics that make them good for wearing next to the skin and some for making food with. And they all make good molds for casting resin in, so I could always use them for producing other items.

So, I made a quick list of the various food/skin safe materials (NOTE: Food-safe and Skin-safe are not the same thing.)

Thursday, October 11, 2018

You Might Be An Old Drafter If

You might be an old drafter if: 
  • You remember the sounds of singing cables and pneumatics at crunch time
  • You can tell if it was a triangle or a compass being put down just by the sound
  • You nostrils still burn when you hear a vent fan come on
  • You remember dry fingers from folding binding strips for doc sets
  • You have scars from 2" staples from the same doc sets
  • Ever used a Sweets volume as a doorstop
  • Ever been tearfully grateful to both Ramsey and Sleeper
  • You still twirl your pencil
  • Still have a strong opinion about plastic vs paper
  • Saved your faulty Rapidographs for rendering
  • Felt both fear and joy when watching a large format plotter work for the first time

You might be an old drafter if

Also find me on:
FACEBOOK -or- INSTRUCTABLES -or- YOUTUBE

Friday, October 5, 2018

Find Retro Forrest Mims and 500-in-1 Manuals

Just found a great site that has the manuals from a lot of the 500-in-1 Electronics kits from Radio Shack. They bring back a lot of pleasant memories as well as frustrations.


I owned one of these kits twice, once as a very young child and then a second time after college. I was too young the first time and there was no one to help me troubleshoot the circuits. Anyone who has spent hours debugging a breadboarded circuit only to find out they have one resistor leg in the wrong slot or two leads touching can relate to my frustration.

I did learn a lot, but I would have learned more if I had been mentored in how to track down errors and correct them. The successes were sweet, but I had too many failures and I could not dependably make a circuit work, so the kit went into deep storage.

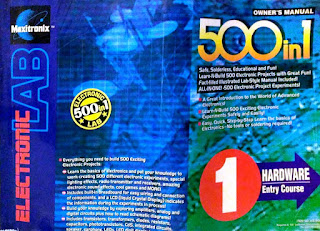
Radio Shack 500-in-1 electronics learnig lab kit manual
Yes I still have one of the manuals that came with my Radio Shack 500-in-1 Electronics Lab kit. I don't use it very often but the circuits are still valid today.


But the seeds for electronic tinkering had been planted. When the whole Arduino (and LEGO Mindstorms) thing exploded onto the scene I bought a second kit from Radio Shack. This time it went a lot better for me. I knew more about troubleshooting, both because of my experience with software design, and because I knew a few tinkerers who helped me identify the most common breadboarding errors.

I never went much beyond making basic sensors for my robots and UNOs, but exploring the wide variety of circuits helped cement some core concepts in my brain. These circuits are still fun and it's great to have them all in one place. Some days I don't feel like coding, so a nice, simple, all passives project might be fun.

They also have a lot of the Forrest Mims notebooks. These classic booklets started many a child's (or adult's) electronics journey. Still classics and still referenced by lots of people as inspiration. You might not know Mims work, but the people who run the companies you buy your kits from will know his name, and may (like me) still have an original booklet.


Also find me on:
FACEBOOK -or- INSTRUCTABLES -or- YOUTUBE

Wednesday, October 3, 2018

Tricked by Trigonometry

HYPOCRITE ALERT: I just wasted half a day of my life trying to code basic kinematics without making a single sketch, note-to-self or pseudocode. Bad idea!!!

Yet I blather on about planning and thinking ahead on this blog all the time. In my defense, I was figuring it out as I went along, watching YouTube and reviewing basic trig functions. I was doing okay until I hit a wall at the third joint and realized that I was still trying to base my calculations on the first joint because my brain was so muddy I was just blindly copying code instead of thinking about it.


I took a nice long break then came back and sketched it out complete with names and arrows and reminders. My brain might be mush, but paper and pencil are eternal.

Also find me on:

Tuesday, September 18, 2018

LEGO Mindstorms Motors with Arduino

Found a bunch of my old LEGO Mindstorms robotics stuff and realized that I could still use all the old motors and most of the sensors. The old versions of the motors (RCX 1 & 2) are just 9v DC motors so I can easily control them with an Arduino.

These old motors are super sturdy, reasonably powerful and the gearing makes them great for any hobby level robotics project. And of course, they fit into the entire LEGO ecosystem so they are easy to prototype with.

LEGO Mindstorms RCX motors can be used with an Arduino with Adafruit motor shield
Just a few leftover LEGO Mindstorms Technic motors. And I've got lots more Mindstorms and Technic parts, plus quite a few Bionicle sets. 

I stopped using the RCXs when the software and drivers stopped working on modern systems. I thought about buying the NXT or EV3 versions, but by that time I was already into Arduino or Raspberry Pi and couldn't justify buying another brain and motor/sensor package.

So the motors and other items languished in storage for years. But I wanted to find one of my robot chassis (still assembled after all these years) to use with some beginning roboticists. I was going to 3d print some adaptors for the cheap DC motors. But when I saw the old motors I realized I could just cut the LEGO connector wires and plug them directly into a motor driver.

Normally, I would just upgrade to newer equipment, but I have a dozen of these motors and several robot chassis and mechanical contraptions that are already designed ( and more importantly, already assembled) to work with this style of motor. Since the motors are designed to run on 9v (I remember running them at up to 12v without damage) so I knew they would work well with several of the Arduino motor drivers I already have. I decided to put these handy little motors back to work.

I chose to use Adafruit's Motor Shield. It can handle 9-12v easily and has handy screw terminals for attaching wires. And the well-written library makes it easy for new roboteers to program their creations. It gives you four DC motor outputs (or two stepper motors) as well as two servo ports. And it leaves the analog and digital inputs to use with sensors.


Put the shield on top of a UNO and they are about the same size as the old RCX, so they fit perfectly onto the existing robot chassis. Or use one of the new M4 powered UNO compatibles and have enough power and speed to run a full color touch screen display, Bluetooth, GPS and a 10 DOF sensor board. You could even get one of the smaller boards like a Feather or Teensy.

Compare LEGO Mindstorms RCX brick with the size of an Arduino and Motor Shield combo
The Arduino and Motor Shield are slightly smaller than the original RCX brick, so they can be substituted into any design that uses the old RCXs. And the motor shield gives you an extra motor port and the option to run the motors at higher voltages for that extra boot of power.

Hooking up the motors is simple. Just use one of the Mindstorms motor cable and cut the wire that runs between the two LEGO connectors. You will get two cables, one end with a LEFO connector and one with just wire. Strip a small amount of insulation off the wire. Attach the connector to the motor, then screw down the wires into any of the four ports on the motor shield. Use the LEGO motors like any other DC motor.

Just snip the wire between the connector blocks and attach them to the screw-terminals of the motor shield.

You could get fancy and tin the wire with solder, crimp a pin to the wire, or splice it into a breadboard style wire.

Now build a robot and code the Arduino using the library for the motor shield.

LEGO Mindstorms RCX motors running on an Arduino with Adafruit motor shield
You can run the old LEGO Mindstorms RCX motors using an Arduino and Adafruit's Motor Shield kit. The motors are simple 9v DC motors that are geared to be powerful and sturdy. Plus they fit into the LEGO and Technic universe, so you can build almost anything you can imagine.
For information about connecting to later LEGO Mindstorms kits check out:


As an Amazon Associate I earn from qualifying purchases.
Shop through our Amazon links to help support this site.

Also find me on:

Monday, September 17, 2018

Podcast Roundup 9-17-18

Here are some of my favorite podcasts found this week:


TRAPPED ON A SAND SPIT FOR YEARS
A reminder that perseverance and ingenuity can overcome almost anything... an amazing story.


JUST SOME MAKERS CHATTING
It's good to see (or hear) how other groups of Makers interact. Hint: it's not always about making.


THE SCARIEST MONSTER MIGHT BE US
A funny, irreverent look at the myth and story of Frankenstein, plus what it means to us as now.


Also find me on:
FACEBOOK -or- INSTRUCTABLES -or- YOUTUBE

Wednesday, September 5, 2018

Creepy Baby Head with Remote Contol

Dolls are creepy in general, and disembodied heads with fluttering long-lashed eyes give me nightmares. So what could be better to create a Halloween prop? Add some cheap remote control units and wait for the trick-or-treaters to arrive.

I was looking for hackable electronic toys at the local thrift store. The dolls were nearby. I couldn't avoid them. There were hundreds of them, strange limbless torsos and disheveled Barbies lying in twisted entangled piles.

One bald head --- just the head --- sat alone on the top shelf.

As I walked past it the doll's eyes fluttered, then suddenly snapped open in an unfocused stare. I freaked out... until I realized the vibrations from the nearby pillaging children were causing the eyes to operate. I was relieved and decided I had to have it. For 50 cents, how could I resist?

It turns out that the eyelids are on a pivot. A metal weight holds them shut or opens them depending on the head's orientation. However, the weights are so delicately balanced that any small vibration (or magnetic field) can cause them to flutter, or even snap open unexpectedly.

I needed to learn to control this frightening phenomenon. If I can control it, I take away its power over me. (And can frighten other people instead). A cheap RF remote-control, some motors and LEDs gave me some ideas.

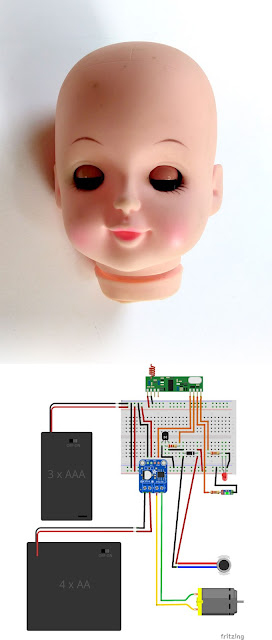
Creepy remote control glowing doll head
Schematic circuit diagram for making a creepy Halloween doll head prop with cheap RF remote controls. The LEDs cause the skull to glow. The small vibrator causes the eyes to flutter. The big motor was intended to make the head spin on a spiked pedestal, but I might replace it with an electromagnet to pull on the metal weights and make the eyes snap open suddenly.


I have posted about how easy these cheap RC units are to work with, but didn't include any real examples. So I worked up a quick breadboard example in Fritzing last night. I haven't hooked it up yet, so there are probably errors in the circuits (I just did the diagram to help me think about how to do the project). But it gives you a good idea of the kinds of things you can do with a $10 radio remote control.

The items used in the schematic are available from Amazon.


The doll-head's pale, unnaturally pink skin is partially translucent, so an LED causes the skill to glow eerily from within. I'm using red and green LEDs for a nicely diffused sick glow. I pull the power directly off the RC receiver's pins with a current-limiting resistor placed inline.

The small vibrator also pulls power from a receiver pin. I used an NPN transistor and protective diode to form a basic motor driver circuit. It causes the eyes to flutter (but not open) and is startling because, well, doll heads don't typically buzz and vibrate. (Or maybe they do, how would I know)

The big motor needed a driver board and extra batteries. I was originally going to put the head on a pedestal and have it spin. (Fun, fun, fun) But after working on a gearing system and stand, I started to think of other options.

Right now, I'm thinking about using an electromagnet to pull on the metal weights of the eyes. They should snap open quickly to great emotional effect. And the small ones only need about 5v, so the extra batteries and driver-board might not be needed.

I'll work on this and put an example out for some of my friends to experience. I'll let you know what happens.


As an Amazon Associate I earn from qualifying purchases.

Also find me on:
FACEBOOK -or- INSTRUCTABLES -or- YOUTUBE

Sunday, September 2, 2018

Simple RF Remote Control for Motor and Lights

Control a motor or lights just by clicking a button --- no microcontroller needed, no Arduino or programming required.

Sometimes you just want to keep things simple. Not everyone wants to learn how to code and configure an Arduino. With these handy little boards you simply press a button on the remote and the receiver module turns on an output to power your light or motor.

I have already found them useful for several types of DIY projects and am dreaming up more:

COSTUMES: Placing and wiring switches into your costume can be a real pain. With these you can turn on lights, trigger the smoke effects and start the radar dish turning with the click of a button.

GAG PROPS: Make a chair vibrate, cause the creepy doll head to rotate and eyes light up, or make the fake rat run around the table.

SUPER SOLAR YARD LIGHTS: Make a simple security or decorative lighting system that only operates when you want them to. No more coming home to solar lights that have run out of power when you really need them.

I even did a Creepy Remote Control Doll Head for Halloween... it glows and vibrates and its eyes snap open... all at the click of a button.

Adafruit 433 RF remote control transmitter receiver for DIY motor light prop costume gag
Adafruit's four-button RF transmitter (key-fob) and one of their four-output-line receivers. For about $10 for the pair you can control up to four different outputs with the press of a button. The receiver puts out about 5v on each of the outputs. With a few more components, you can easily control LEDs or even motors. Add an Arduino and you have an easy RF remote control for all kinds of projects.


If you know how to install a button and an LED or motor, you can get started for under $5. For a few dollars more you can get a four-output versions with a preassembled remote transmitter. For a few more you can get one to control 12-24 volt circuits or even 110/220 AC.

You can get 10x pairs of single-output receivers for $12. These are just the raw boards. You will need to put a trigger (like a button) on the transmitter and wire a light or motor to the output of the receiver. But for about a buck each, that's a cheap way to start.

For a little more money, you can get four-output versions with premade key-fob style transmitters. That way you can control multiple lights and motors from a single remote.

While these tiny RF modules are cheap and easy to use, they do have significant limitations.

Most of the cheaper versions are "non discriminating" transmitter/receiver pairs. You cannot assign a specific transmitter to a specific receiver. So you can simultaneously operate 10 receivers with a single remote. But if two people have a transmitter, both people can operate all the receivers.

They send simple on/off signals to the transmitter to toggle the output lines. You can control one or all of those four outputs. You can wire the outputs up to an Arduino and have it take other actions based on the state of the output. However, you cannot send complex data like serial text commands with them. You will need a more expensive RF transmitter receiver to do that.

Some only work from a few feet away, others have a decent range (several yards) under ideal circumstances, all certainly good enough for costumes, props and gags. But you won't be turning on your porchlight from a mile away like with the expensive models. I found that fiddling with the coiled antenna can give me a little extra range (or limit it to a few inches).

The receivers may have different ways of responding to the transmitter signals. Some only turn on while the button is pressed, then turn off once the button is released. Others turn on with the first press, then remain on until the same button is pressed. Others cycle through, they turn on a channel when the button is pressed while also turning off all the other channels.

My recommendation?
Adafruit has a good selection of key-fob style transmitters (1,2 or 4 button) and receivers (momentary, latching and toggling).

While Adafruit's versions are more expensive than knockoffs, they might be worth it to you. You know exactly how the transmitters and receivers work together, all the transmitters work with all the receivers, and as usual with Adafruit, you get excellent tutorials on how to wire, install and operate the equipment.

Plus, you can order some LEDs, motors and driver boards all from the same place. They even have a sound effects board that can be controlled with these remotes.

Both the cheap versions and the Adafruit boards are also available from Amazon


If you know how to read digital inputs on an Arduino, then your options expand exponentially. You can control the speed and direction of motors, change the color of LEDs and even control NeoPixel animations. With some MOSFETs, a driver boards or some relays you can control valves, pumps, fans, solenoids and servos ---- basically anything you normally control with your Arduino.

But this post is about keeping it simple and using only basic hardware and the simplest of electrical circuits. So pick up one these RF units and start building your own props and costumes.


Also find me on:
FACEBOOK -or- INSTRUCTABLES -or- YOUTUBE

Tuesday, August 28, 2018

Messy Mixed Media Landscape

Mixed media mess... but I like it. I tried to recreate a color study I had done earlier. But the recreation lacked something. It was dull and lifeless, probably because I had a preconceived idea of what it should look like instead of painting from inspiration in the moment. So I set it aside. 

I was playing with pastels a few days later so I hit it with pastels and it started to look better. That gave me courage to keep going. 


Later, I found some scrap remains of abstract paper and glued that to the foliage. Add some raw watercolor and anything else I found and it started to look okay, But when I took a photo of it the texture and color washed out, So I hit it with some Photoshop as well. It's not what I intended, but I'm tired of looking at it and working on it so I'm declaring it finished Baahaahaa… my typical work cycle.

(BTW, the trees really are planted in a grid in real life. It's an artificial commercially planted grove with all the trees the same age and shape, not the typical random forest. I didn't capture the rhythmic pattern very well, but the one "natural" tree at the edge of the grove proves I can see and paint a gnarly tree also LOL... just so you know)


Also find me on:
FACEBOOK -or- INSTRUCTABLES -or- YOUTUBE

Sunday, August 19, 2018

Post-Apocalypse Cosplay Dust Mask

In honor of all my NorCal peeps who are wearing their N-95 dust masks because of the wildfires. Also appropriate for anyone still procrastinating on their Burning Man costumes.

Post apocalypse cosplay mask and goggles
I know it's bad in Northern California, but when my friend said they were wearing masks to go shopping I decided to make a costume version. Not to make light of the danger and or impact of the fires. But if you have to wear a mask you can also make it a design project. Post-apocalypse seemed all too appropriate.

Whipped up a quick and dirty post-apocalypse covering for an old N-95 mask. Great way to get rid of some bits-and-bobs from my scavenging.

Not the best and it's held together with hot glue, but good enough to keep parts from for a serious cosplay session.


Also find me on:
FACEBOOK -or- INSTRUCTABLES -or- YOUTUBE

Thursday, August 16, 2018

Do People Still Flowchart Their Code

Just wondering if anyone still flowcharts their code? Does anyone write pseudocode anymore? Does anyone sketch and take notes about their ideas before diving into writing the actual code? Do schools still teach these skills and this way of thinking.

I work with new programmers on occasion. People know I can code so they ask me for help with their projects. I'm happy to do it, but sometimes it's difficult for me to  understand what the new coders want to accomplish. I don't mean the details, I'm talking about the most basic tasks the code needs to perform.

When I ask them to sketch the logic flow or write some pseudocode they... well... they are completely stymied and confused. In fact, they seem genuinely insulted. How dare I imply that they are so dumb and their projects so simple that it needs to be thought about or sketched out before they start typing.

I don't really know how to respond because I always sketch, pseudocode and flowchart anything more complex than the most basic of programs. But I'm a very visual thinker and I see the code-flow as blocks, objects and streams. I see those visual images in my mind. So putting those ideas onto paper seems natural to me.

And when I was learning to code, the professors often used graphics and pseudocode to explain concepts and communicate their intention. It was the way technique they used to outline the tasks and express their expectations.

These techniques made specifying functionality much easier (for me) and helped abstract the tasks to a level where I could concentrate on the underlying requirements before I began typing. Since all the teachers used them, and there were predefined shapes and symbols to represent universal tasks,  I just assumed that this was a normal way of operating for coders
Okay, so this is way overdone... but it's a good example.
I work with hobbyists, not computer science or tech students. These folks are just normal people that want to make LEDs light up or control a motor. We hang out for an hour or so every few weeks. So maybe my perception is skewed and, in the science or trade schools, they still use decision charts and diagrams and such

But it's been years since I've met a coder that bothers to use these methods. When I try to explain a process using (to me) standard symbols, people totally freak out. They have never seen diagrams used and they think I'm making it up. I've tried to explain that it's a time-tested way of communication, part shorthand and part map.

Even if you can hold the entire program in your brain, charts and diagrams are a good way to explain the program to people who do not have direct brain-to-brain access to you mind. Although the new coders seem to appreciate the diagrams I draw to explain actions and concepts, not one single new coder has ever even tried to learn or use the techniques. So I've given up - maybe I'm just weird or too old or not very smart..

However, I've noticed that the new coders take a lot longer to get the hang of basic programming structures. They bang away at the keyboard, frantically changing words without (so it seems to me) understanding the basic tasks they are trying to describe with all that typing. Any new language completely confuses them. It's like they see no similarity between the languages because they concentrate on memorizing syntax rather than structure.

I've tried to explain that the flow-charts and pseudocode work for any language. You can code the same functionality shown in the pseudocode or diagram using C-Arduino, Java, Python, Basic or PHP. But that concept, that abstracted flow and process, is foreign to them.

I've admitted I'm not very smart and explained how diagrams help me keep the program organized. Maybe I should take the opposite approach and tell them only the really smart people know how to use pseudocode and diagrams, we just keep it hidden from mere mortals - make the process more appealing and less a sign of weakness.

Maybe it's because all the movies and TV-shows featuring coders always show the hackers typing furiously and magically knowing the structure of massive chunks of code. The media never shows people charting and diagramming, that's just boring. And they never show people learning to code, only the genius wizards. Well I'm not a genius or a wizard, so I still sketch programs on a regular basis.

Also, none of the tutorials on YouTube use sketching, pseudocode, flows or any other visual communication methods. All those really smart teachers just start typing without ever planning anything in advance. I'm skilled enough to follow them. But I still have to literally "draw myself a picture" before I start any complex coding task of my own design.

Don't get the wrong idea. My flowcharts are just a bunch of lines and squiggles - definitely not the standards defined in the plastic templates with all the shapes and line types. My pseudo-code is sparse and unreadable to most people. But it helps me get results quickly and helps me find errors in my logic more easily.

The drag-and-drop programming environments are super popular (MakeCode, AppInventor, Scratch to name a few) so the visual tradition is definitely still alive. The "Hello world" introductory projects are becoming increasingly spectacular. Amazing hardware and software libraries make basic tasks very easy to accomplish. Everyone loves that instant success and I love to see how many people are willing to start. But so many people drop out when they are required to conceptualize and create a program from scratch.

Yet somehow, the new coders I work with never make the connection between structure and words. They can all set up a simple loop and a couple of test conditions. But anything more complex and they bog down and drop out. It just seems too complicated and they can't keep it all straight in their head - but they won't sketch it out either. If they just keep typing and changing stuff the larger structure will magically start working just like it does in the movies. I laugh and cry at the same time.

So I'm just wondering if maybe teaching the old fashioned methods of flowcharting and pseudocode could still help new programmers succeed, stay interested and stay motivated. I don't have the answer. I only get a couple of hours per month with the group, maybe five minutes a month with any individual. I'm not a teacher or a mentor, but it still bothers me when I see people struggling and know their are tools that have been proven to help people in their situation.

Maybe if there were more examples of smart people using diagrams and pseudocode, some alternate coder heroes for me to point to, maybe I could guide new programmers towards the time-tested tool set that helped become a better programmer.


Also find me on:
FACEBOOK -or- INSTRUCTABLES -or- YOUTUBE

Sunday, August 12, 2018

Blacklight (UV) NeoPixel LEDs

Adafruit just released UV Blacklight NeoPixels. I've been waiting on something like this for a while. I had figured the UV light would be added to the RGB configuration like their RGBW versions. But this is really cool because all three LEDs are blacklights so you have a lot of control over their intensity.

Now you can make your costumes and festival clothing glow in the dark. Your Halloween props or stage backdrops can really pop. And your model spaceships can emit eerie lights.


LEGO Bionicle glows with UV blacklight from Adafruit's Neopixels
Add some extra pizazz to your LEGO Bionicle or other models with Adafruit's new UV Blacklight NeoPixels.

I just finished making my own portable UV Blacklight out of an old flashlight (my INSTRUCTABLE), so I remembered how much fun blacklights really are.


Make those neon mesh costumes really glow in the dark at your next music festival.


And since they are Neopixels, you can control individual LEDS and create moving patterns. Combine these with traditional RGB NeoPixels and you've got quite a light show.

Also find me on:
FACEBOOK -or- INSTRUCTABLES -or- YOUTUBE

Thursday, August 9, 2018

Using Fusion 360 for Technical Illustration

Found another way to (mis)use Fusion 360... making quick technical sketches. Fusion is incredibly powerful and I use it to create complex structures. Most get 3d printed or sent to the CNC. But this time I just needed to illustrate a simple repair project.

The illustrations were for my How to Fix Venetian Blinds tutorial over on Instructables. Nothing needed to be 3d printed, machined or manufactured. I just needed a way to show what the existing objects looked like and illustrate some hand-done repairs..

In the past I would have used a graphic design software like Illustrator or Inkscape. But as I was thinking about how I could do the drawing, I realized something... I could do it quicker and easier in Fusion 360. (Especially the screw threads)

This might not seem like a big deal, but it's the first time a 3d modeling program was easier to use than a vector drawing program. It always bugged me that I could do incredibly complex things with 3d software, but the simplest drawings worked better in an artists software. I often had to redraw a 3d design in 2d to illustrate a point.


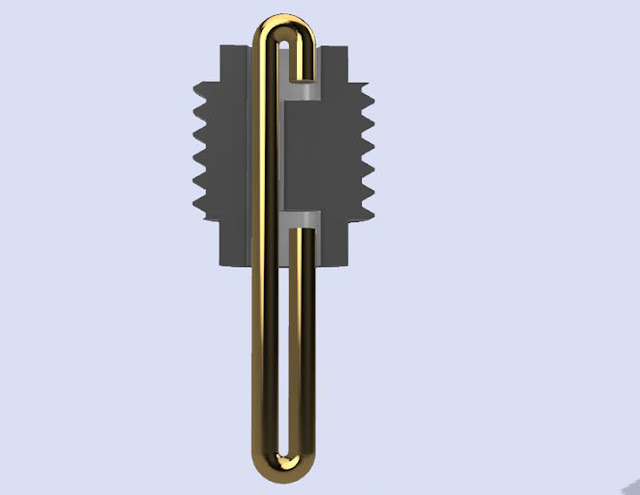
Technical sketch drawing with Fusion 360 complete with threads and bent metal wires
Drawing this design, complete with threads and bent metal wire, only took a few minutes. Making a section through the solid 3d object took mere seconds. Getting this quality in a drawing using Illustrator would have taken me an hour or more.

I think the drawing illustrates the concept a lot better than a photograph of the real object.

With Fusion, I could draw complex geometry like screw threads, apply materials and textures, create a perspective view and a cutaway... all in a matter of minutes. I could explore lots of different views in seconds instead of doing a separate drawing for each view. It would have taken me an hour to do a single drawing in Illustrator, a full day to do multiple drawings. With Fusion, I basically drew one object and "looked at it differently" to create several new drawings. Fusion was a huge time saver.. 


This illustration took a few minutes and has a perspective view of a screw thread and multiple material textures.


But I think a simple photograph illustrated the concept and process just as well as the drawing.

Some of the drawings really helped clarify the process and relationships. Other drawings were not significantly better than a photo of the actual object or process. But having the option to choose (or to include both) with just a few minutes extra work made the entire project simpler.

Fusion 360 will never replace Illustrator or even Inkscape for most applications. But I'm really happy that I have free access to a program that allows me to create sophisticated technical sketches so quickly. And when you combine the powers of Fusion and Illustrator you could do some very helpful drawings. So I'm really happy.


Check out all of our Fusion 360 Tips, Tricks and Tutorials


Also find me on:
FACEBOOK -or- INSTRUCTABLES -or- YOUTUBE

Tuesday, July 31, 2018

Thanks Old Man, I Put It To Good Use

An old man died recently. For a brief period in my childhood, measured easily in hours, I interacted with him and his family. They changed the course of my life. It was a small influence, barely more than the butterfly effect. But it mattered and I will always be grateful to them.

An early influence had showed me that you could be a skilled machinist/welder/cabinet maker and still revere beauty and practice creativity. When that influence ended I was left in a culture that did not value artistic creativity, especially in males. No guidance or instruction was available for visual artists between the finger painting stage and the high school drafting class. In between, you were completely on your own.

Without an adult to encourage me I was soon convinced there was something seriously wrong with me for wanting to create beauty or simply to draw. I understood the local social rules (universal as far as I knew) and the costs of breaking them. I never stopped drawing, but I did keep my drawings secret. It sucked.

Then one day this bearded, long-haired wild man showed up (think Willie and Waylon meets Page and Plant). I guess I hadn't hidden my drawings well enough after all because an adult said, "He draws too." That was amazing news, unprecedented and a little scary. There were two of us out there.

Except for the hair and the drawing, this person appeared completely normal. He could build and fix and operate machinery like other high-valued local people - and he could draw. Men liked him, the ladies loved him. He also painted and played musical instruments. He had been to far away places and hung out with famous people yet still fit in where I grew up... and he could draw - like me, he could draw.

Eventually I worked up the courage to show him one of my drawings. And do you know what he did? It wasn't what I expected, not what other adults did.

He did not praise me, he did not patronize me and he definitely did not pity me. He did not fawn over my pitiful attempts at drawing, he did not ridicule their childish character, and he did not caution me about wasting my life in such pursuits.

He showed me how to make a better line.

He taught me that you could lay the pencil on its side and vary the pressure or speed to create different effects. He explained that, no matter how hard I tried, I would never get dark values with a 2H pencil  - that it wasn't my fault, that I had to go get myself a 6B because it was the appropriate tool. He did it all without making me feel like a child or stupid in any way. Not like a peer exactly, but like drawing was normal.

Maybe I wasn't as malformed as I had been led to believe.

A few days later he showed me hatching and cross-hatching techniques. Yes, a grown man sat down with a kid and took the time to cover several sheets of paper with different hatching techniques -- kind of like I did but with a lot more skill and confidence. He explained that it only took a few hundred hours to learn how to do it that well. Wait, a grown man had used all those hours just to get good at drawing and had survived? This was in direct contradiction to the local belief that drawing was a waste of time. I wasn't sure what to think by that point, but maybe there was hope for me after all.

Those two experiences (30 minutes total) would have been enough to make a difference in my life. Just knowing that there was one other flesh-and-blood person out there who drew for their own edification would have helped me. Getting confirmation that there were physical techniques to create visual and emotional impact validated all my previous efforts. Luckily for me, this man's entire family was like that. They were all skilled creators, artisans and crafters who worked in a variety of materials and fields - yet were otherwise totally normal.

Eventually, I wound up hanging out at the family's luthier shop. I didn't realize it at the time, but their work was kind of semi famous. Unless you are an aficionado, you may no longer recognize their name. But most of you would definitely still recognize the names of the people who do know about them.

None of that mattered to me. What mattered to me was that they worked to create beauty and they treated me like I was normal. Drawing was apparently just the tip of a huge creative iceberg. There were all kinds of ways to create.

In fact, the shop was filled with other men I recognized from the community. Well respected, upstanding members of society. But while they were in the shop they talked freely about shapes and curves and contours and tone and timbre. They worked hard, even struggled, to get materials to behave and adopt the shapes they wanted. The shop had specialized tools to make all those shapes - seemingly hundreds of specialty tools hanging from every wall and ceiling along with the half-completed skeletons of instruments and the stacks of raw wood in every corner.

It was a secret society that I had never known existed. I was smack in the middle of it and happy to be there. I was barely tall enough to see the top of the work table but I felt at home. And just like the bearded wild man, those men explained the tools to me and told me how they were used. Each tool had a name and a specific purpose. They all agreed that you needed to put the time in to learn how to use each tool to get the results you wanted. As they told me about the tools and how to use them they also told me about the men who had taught them how to use those tools.

Apparently, this process had been going on for generations. I was not alone and had never been alone.

When these normal looking men were finished with the sawing, planing, scraping, gluing, clamping inlay and staining (and so much more) they had a working musical instrument that was beautiful to look at, to hold and to play. If you could pick it, pluck it, bow it or thump it - one of the people in that shop could probably make one. They would often gather in a group and play music. The music made people feel something. Even the onlookers tapped their feet, danced or sang along. The men caused people to feel something using the very same instruments that they had just constructed out of raw wood. And strangely enough, they seemed to earn a living making and selling beautiful objects that  made people feel things.

These men never bragged about it, maybe they didn't think of themselves as creative in the modern egotistical sense. But even as a child I realized that people wanted their work, would pay for the privilege of owning and using it, precisely because the creators cared so much about those shapes and curves and contours and tone and timbre. It was also the reward for putting in all that work to learn tools and techniques over the course of hundreds and hundreds of hours... or years... or even decades.

Today we would probably call it craftmanship. They just called it work. It's just what they did because that's how they did it. They did it that way because that's how they were taught. Sure, they made up new techniques and invented new tools. But that work ethic and attitude has proven to be eternal and universal among all the successful crafters and artists I have met.

For a variety of reasons, I lost access to the bearded Wildman along with his family and their studio soon afterwards. In total, I knew them for oh, maybe the equivalent of a single 40 hour semester. But in that short time I gained a knowledge that has served me well my entire life.

Reacting to beauty and wanting to create it does not make you strange or malformed. Everyone craves beauty. A lot of people want to create beauty. Few are willing to do the required work. People will pay you to create beauty for them. Creating beauty does not make you important. Having a good character is important. You are not the first and you should not be the last to create beauty. Learn from the elders. Teach the young ones. Teach the young ones about the elders. Learn your tools and take care of them. Be kind to each other.

That's a pretty good set of lessons for such a short time. The world wasn't exactly how it had so often been described to me. I had seen and met creators twice now, they all told me the same thing, and they all seemed to live good happy lives. That early influence was correct, the booster shot from the Wildman and luthiers worked and I never doubted the power of beauty again.

I made good use of those lessons and have made my living in a range of "creative professions." I had not given those early experiences much thought until I heard the old man had died. I felt a little guilty because I never properly expressed my thanks to him or his family. Then I learned that my experience was not a singular event. The Wildman's descendants could fill a small crafts fair all by themselves. The family's progeny could fill a large one. Throw in the shop's interns, students and kids who were lucky enough to hang around the work tables and you could fill a small town.

Now, when I work with kids or new creators I try to emulate the Wildman and his family even though social attitudes are very different. YouTube and the entire advertising industry are currently trying to convince everyone that they are already creators before they start the work. But I've noticed something... the kids who respond well to the ways of the Wildman and the luthiers often go on to successful creative careers. The ones who fear work drop away quickly. The ones who dig in and ask for more challenges stay and grow and become better at their chosen craft.

The old man and every creator like him lives on. The tradition continues, the elders pass on their knowledge and leave. The young ones who paid attention and took the lessons to heart live happy creative lives. Eventually, they too grow old and realize it's time to pass on the knowledge from and about their elders. The cycle continues and everyone is better for it. I am grateful to have been a part of it.
Also find me on:
FACEBOOK -or- INSTRUCTABLES -or- YOUTUBE