Disclaimer and Social

This page may contain affiliate links. As an Amazon Associate I earn from qualifying purchases.

Showing posts with label cosplay. Show all posts

Sunday, September 2, 2018

Simple RF Remote Control for Motor and Lights

Control a motor or lights just by clicking a button --- no microcontroller needed, no Arduino or programming required.

Sometimes you just want to keep things simple. Not everyone wants to learn how to code and configure an Arduino. With these handy little boards you simply press a button on the remote and the receiver module turns on an output to power your light or motor.

I have already found them useful for several types of DIY projects and am dreaming up more:

COSTUMES: Placing and wiring switches into your costume can be a real pain. With these you can turn on lights, trigger the smoke effects and start the radar dish turning with the click of a button.

GAG PROPS: Make a chair vibrate, cause the creepy doll head to rotate and eyes light up, or make the fake rat run around the table.

SUPER SOLAR YARD LIGHTS: Make a simple security or decorative lighting system that only operates when you want them to. No more coming home to solar lights that have run out of power when you really need them.

I even did a Creepy Remote Control Doll Head for Halloween... it glows and vibrates and its eyes snap open... all at the click of a button.

Adafruit 433 RF remote control transmitter receiver for DIY motor light prop costume gag
Adafruit's four-button RF transmitter (key-fob) and one of their four-output-line receivers. For about $10 for the pair you can control up to four different outputs with the press of a button. The receiver puts out about 5v on each of the outputs. With a few more components, you can easily control LEDs or even motors. Add an Arduino and you have an easy RF remote control for all kinds of projects.


If you know how to install a button and an LED or motor, you can get started for under $5. For a few dollars more you can get a four-output versions with a preassembled remote transmitter. For a few more you can get one to control 12-24 volt circuits or even 110/220 AC.

You can get 10x pairs of single-output receivers for $12. These are just the raw boards. You will need to put a trigger (like a button) on the transmitter and wire a light or motor to the output of the receiver. But for about a buck each, that's a cheap way to start.

For a little more money, you can get four-output versions with premade key-fob style transmitters. That way you can control multiple lights and motors from a single remote.

While these tiny RF modules are cheap and easy to use, they do have significant limitations.

Most of the cheaper versions are "non discriminating" transmitter/receiver pairs. You cannot assign a specific transmitter to a specific receiver. So you can simultaneously operate 10 receivers with a single remote. But if two people have a transmitter, both people can operate all the receivers.

They send simple on/off signals to the transmitter to toggle the output lines. You can control one or all of those four outputs. You can wire the outputs up to an Arduino and have it take other actions based on the state of the output. However, you cannot send complex data like serial text commands with them. You will need a more expensive RF transmitter receiver to do that.

Some only work from a few feet away, others have a decent range (several yards) under ideal circumstances, all certainly good enough for costumes, props and gags. But you won't be turning on your porchlight from a mile away like with the expensive models. I found that fiddling with the coiled antenna can give me a little extra range (or limit it to a few inches).

The receivers may have different ways of responding to the transmitter signals. Some only turn on while the button is pressed, then turn off once the button is released. Others turn on with the first press, then remain on until the same button is pressed. Others cycle through, they turn on a channel when the button is pressed while also turning off all the other channels.

My recommendation?
Adafruit has a good selection of key-fob style transmitters (1,2 or 4 button) and receivers (momentary, latching and toggling).

While Adafruit's versions are more expensive than knockoffs, they might be worth it to you. You know exactly how the transmitters and receivers work together, all the transmitters work with all the receivers, and as usual with Adafruit, you get excellent tutorials on how to wire, install and operate the equipment.

Plus, you can order some LEDs, motors and driver boards all from the same place. They even have a sound effects board that can be controlled with these remotes.

Both the cheap versions and the Adafruit boards are also available from Amazon


If you know how to read digital inputs on an Arduino, then your options expand exponentially. You can control the speed and direction of motors, change the color of LEDs and even control NeoPixel animations. With some MOSFETs, a driver boards or some relays you can control valves, pumps, fans, solenoids and servos ---- basically anything you normally control with your Arduino.

But this post is about keeping it simple and using only basic hardware and the simplest of electrical circuits. So pick up one these RF units and start building your own props and costumes.

Also find me on:
FACEBOOK -or- INSTRUCTABLES -or- YOUTUBE

Sunday, August 19, 2018

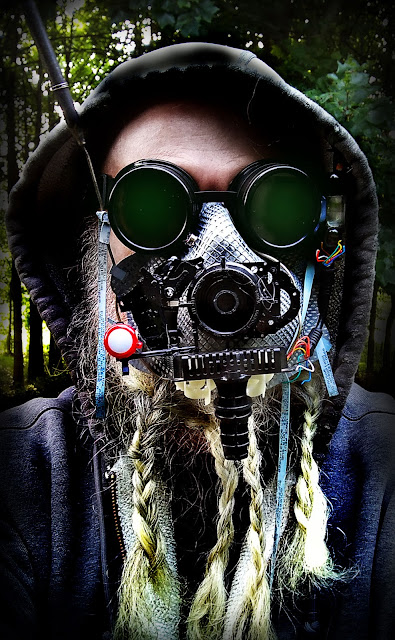
Post-Apocalypse Cosplay Dust Mask

In honor of all my NorCal peeps who are wearing their N-95 dust masks because of the wildfires. Also appropriate for anyone still procrastinating on their Burning Man costumes.

Post apocalypse cosplay mask and goggles
I know it's bad in Northern California, but when my friend said they were wearing masks to go shopping I decided to make a costume version. Not to make light of the danger and or impact of the fires. But if you have to wear a mask you can also make it a design project. Post-apocalypse seemed all too appropriate.

Whipped up a quick and dirty post-apocalypse covering for an old N-95 mask. Great way to get rid of some bits-and-bobs from my scavenging.

Not the best and it's held together with hot glue, but good enough to keep parts from for a serious cosplay session.


Also find me on:
FACEBOOK -or- INSTRUCTABLES -or- YOUTUBE

Sunday, August 12, 2018

Blacklight (UV) NeoPixel LEDs

Adafruit just released UV Blacklight NeoPixels. I've been waiting on something like this for a while. I had figured the UV light would be added to the RGB configuration like their RGBW versions. But this is really cool because all three LEDs are blacklights so you have a lot of control over their intensity.

Now you can make your costumes and festival clothing glow in the dark. Your Halloween props or stage backdrops can really pop. And your model spaceships can emit eerie lights.


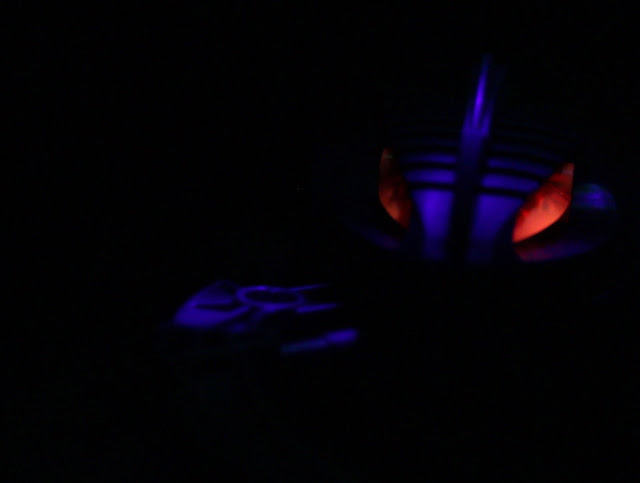
LEGO Bionicle glows with UV blacklight from Adafruit's Neopixels
Add some extra pizazz to your LEGO Bionicle or other models with Adafruit's new UV Blacklight NeoPixels.

I just finished making my own portable UV Blacklight out of an old flashlight (my INSTRUCTABLE), so I remembered how much fun blacklights really are.


Make those neon mesh costumes really glow in the dark at your next music festival.


And since they are Neopixels, you can control individual LEDS and create moving patterns. Combine these with traditional RGB NeoPixels and you've got quite a light show.

Also find me on:
FACEBOOK -or- INSTRUCTABLES -or- YOUTUBE

Sunday, February 25, 2018

My Cup Runneth Over - 3d Printed Bra v1

Support your local makers - I'm doing my part with this 3d printed bra. Yes, that's right... a custom bikini top bra cup designed in Fusion 360 and printed on a hobby level 3d printer.

Okay, so the project started as a hat. Think "fascinator" base or mesh ball-caps. I wanted to see how different types of French curves joined together when bent. I knew different curves could result in any shape from a cone to a perfect sphere, or onion domes to flattened rounded-corner cylinders. But I had never really designed something with a variable curving shape. Hats looked like a good item to test with. Little did I know.

So I started experimenting with curves and shapes and bending --- and voila, I had my first piece of 3d printed lingerie instead. It not only  turned out better than I expected, I decided a 3d printed bikini top is way more useful and fun than a hat anyways - pretty happy with this failure discovery.

3d printed heat formed mesh bikini bra cup
Bright pink bikini bra cup printed on a 3d printer and designed in Fusion 360. It's a bit of over designing, but it sure was fun.
I've been experimenting with heat-shaping 3d printed panels recently. Sure, I can print the model pre-shaped, an all in one standalone print. I could have easily printed this object pre-bent and ready to wear. But as I discovered when printing my mini-terrarium greenhouse, it's sometimes a lot quicker to print flat objects and assemble them.

My first experiment with heat-forming 3d-prints was a simple bowl made from a flat 3d-printed sheet, which turned out okay. Good enough that I wanted to try something more complex.

The bowl shaping experiment relied on the patterns within the perforations to allow deformation when heated. The corners in the pattern are arranged so that the surface can bend in three dimensions without significantly changing the structure. That technique worked fine, so I wanted to add a second variable to better control the shape.

I know a little about traditional pattern making for clothes. I also have some experience shaping and heat-forming foam panels into costumes and props for cosplay. So I figured heat shaping PLA wouldn't be that much different.


I also wanted to use this series of tests to better understand just how curves affect the final shape. I have Fusion 360 and Meshmixer and several other programs that could take the final shape and create a cutting pattern for me.

(I had to print a couple of quick failed experiments before I remembered that I needed to use those traditional pattern making skills though. Not always the smartest cookie on the shelf.)

But the software makes most of the decisions when I use those techniques, and I really wanted to understand how to do it manually. I think when I understand pattern making better I can probably force or at least suggest settings for the programs to give me better patterns.

This is the first experiment that gave me the smoothly varying curves I was after. It was a very simple pattern, but it was also the first time I used splines (aka French curves) instead of simple arcs. The result is a lot closer to a single, flowing shape and less like the segmented domes I got when I used simple arcs and lines.

That's when I decided to declare, "This is now officially a bra." Well, half a bra... okay just one cup. But still, it's a much more body-friendly form than anything I had created before.

3d printed heat formed mesh bikini bra cup


Also notice that the decorative-infill pattern is simple. It is NOT designed to flex and deform. That means this sheet of plastic reacts to bending in a manner very similar to that of paper or non-stretchy cloth. It's really just the way the two curves join that makes the final shape so much smoother.

If I combined the deformable-mesh technique from the bowl experiment with the spline-curve edges from this experiment, the plastic sheet should begin to behave more like cosplay-foam or stretchy cloth. Then... print it in flexible filament to actually make it comfortable to wear. That's the next phase of experiments.

And yes, there should be more experiments with 3d-printed fabric and clothing coming soon. But understanding the traditional methods of pattern making is still an essential skill. For instance, my 3d-printed chainmail is pretty flexible. But to get it to fit properly at any large scale, like a vest or corset, I will still need to create differently shaped pieces of the mail just like you would with old-fashioned cloth.

pattern for 3d printed heat formed mesh bikini bra cup
The pattern in Fusion 360. You can see the different types of curves on every edge. Sure, it's 3d, but the principles are the same as used in traditional clothing patterns.


So no matter which direction I go, I must get better at pattern making. Right now, I have my hands full just with this, but I can already tell it's going to be a fun journey.


As an Amazon Associate I earn from qualifying purchases.
Shop through our Amazon links to help support this site.

Also find me on:

Saturday, February 10, 2018

What's Inside an Old Humidifier

What's inside an old ultrasonic humidifier, and is there anything worth salvaging? The short answer is YES, lot's of fun stuff in there.

Someone donated this old ultrasonic humidifier for us to tear down. I hoped we could get the speed control and maybe a fan out if it. But I didn't know if everything would be on a single PCB and therefore difficult to salvage. Luckily, all the main components were separate and the PCB only supplied the power.

So we wound up getting a bunch of good components that we can re-use. We also got some nifty tidbits that will be good for prop building. Check out the short video to see what we found...


It looks like the humidifier had gotten hit with a power surge. But this thing was sturdy and it still sort of worked, if very weakly. There was almost no mist or air coming out of it. Once we cracked the case we could see why. The surge had run in and fried the AC components. It's surprising that it still worked at all, but it made it easy for us to decide to salvage it instead of repairing it.

We tested the salvaged components and they all worked fine. My two favorites are:
  • An all-in-one power switch with speed control and LED indicator complete with housing
  • And a magnetic reed switch type sensor along with a floating circular trigger magnet.
Both of these still worked perfectly. We also got some nice heat-sinks, some JST connectors, a small cage fan and several oddly shaped items perfect for use in cosplay or prop building,


Knob and Controls
The speed control is perfect for an Arduino project. It has three completely separate circuits going into the same housing to control three functions. There's a high current circuit to the on/off switch, a mid current to potentiometer, and a light-duty circuit to the LED.

I also noticed that they were using the potentiometer more like what I think as a rheostat. Even though the potentiometer has three tabs, they were only using two. But the tabs are accessible, so we can always add the traditional third line of the circuit.

With this configuration, you can turn the project on, then control an analog input with a single knob. The LED can be pulsed or blinked to give visual feedback.

And it's in a great housing that's really easy to mount into any project. It's circular and flat, so no weird shapes and curves to match. Just cut a hole, a big hole, into any enclosure and you have a very nice control panel - sweet!

Water Level Sensor
My other favorite find was the magnetic reed switch and magnet combo. This sensor is already on a slim PCB with a handy JST connector. And the floating ring-magnet is already sized to trigger the switch.

That's going to make using this as a water level sensor so much easier. These sensors and magnets are cheap to buy, but configuring them can be a hassle. When they come pre-matched and sold for use in fountains the price goes way up. So to get these for free was a pleasant surprise.

Overall, I'm very happy with the haul from this old humidifier. And the video was fun to make so I might start recording more teardowns. We have a room full of donated items, a huge random collection of semi-junk to tear apart and explore - loads of fun for the whole family - and much better than experimenting with items that still work.


Also find me on: FACEBOOK 


Thursday, February 8, 2018

Making a 3d Printed Bowl with a Hairdryer

Fun 3d printed project with none of the technical hassles. People sometimes shy away from 3d printing because it looks so complicated. I wanted to make something simple that people could play with and easily customize, a little something that they could hold in their hands and shape with nothing but a hair dryer and some light pressure.

Plus, if people can touch it and control it, shape it with heat and get comfortable with the material, then they might be more interested in learning about 3d printing. It's not so scary once you realize it's just regular plastic that has been heated up until it can be bent and sculpted. That's why they call it "thermos plastic" after all.


Expando changoooo...  take a simple home hair dryer a to a thin PLA 3d print and you can shape it and bend it into any form you want. The best (and worst) of both worlds.


So you can see where the lines started to string and the lip got deformed, but that's mostly from a lack of control with the hair dryers.


I knew that thin 3d prints could be reshaped with a common hair dryer, so I designed a simple lattice that I could print really quickly.

I have played around with these types of lattice structures before. I've made them out of paper and craft-foam and even cloth. So I knew a few shapes and cutting patterns that expand nicely when they get deformed


I hoped that the 3d prints would expand and shape nicely, and more importantly, I hoped that they would hold there shape and remain sturdy once they cooled back down.

The paper and foam versions are fun to play with,  but they don't hold their shape when released. They collapse back into a flat sheet. It's fun to make accordion shapes that you can stretch and twist and bounce, but I wanted the lattice to keep it's shape.

So 3d printer plastic (specifically PLA) seemed like a good bet.


It started life as a flat sheet.


Then it got heated and pressed onto a sphere to deform the lattice.


And it worked really well. The PLA did stretch and expand much like the craft-foam, but it held it's shape perfectly when it cooled down.

There are some issues I want to work on. You'll notice that the print became "stringy" and the edges are warped. I printed the lattice so thin that the individual "print lines" acted as strings and I turned the hair dryer on high, so the strings became so flexible they actually got blown around by the air. I wanted them to separate and expand uniformly, not like a wild hair day. Even the edges got softened and deformed.

The fix should be easy. I can print the lattice thicker, I can use a lower heat and blower setting - or I can even put the lattice into a toaster oven and let it gently drape over a form from the force of gravity.

And I could make a simple frame to hold the edges so that they don't deform while the center of the lattice gets all rubbery and stretchy. Lots of ideas to play with.


This is just a simple bowl. But the same technique can be used to create jewelry like bracelets and necklaces. A more advanced maker could create hats and other fashion accessories. Those 3d printed arm and leg braces that you've seen, well they are often heat formed for the final fit.

And individual parts can be "welded" together to form larger pieces. So the brim and bowl of a hat could be printed separately, formed to the user's liking, then be combined into a finished hat.

More importantly, most people are comfortable drawing a flat 2d design. And they have bent various materials for years with their bare hands.

With this technique anyone can draw a simple 2d pattern, print it out in minutes, then heat form it into the shape they want. Once they do that, maybe they will want to start doing the same thing in 3d.

Just another way to gently introduce people to 3d design... muhahahaaaaa.

Also made a bra, or maybe a hat, with this technique.


Also find me on: FACEBOOK 


Sunday, December 17, 2017

New Side Light NeoPixels make Complex Effects Easier

Adafruit just released a new "Side Light" style of NeoPixels with the LEDs perpendicular to the ribbon instead of parallel. This might seem like a simple thing to some folks. But for anyone who has tried to illuminate a circular or tubular object with a wash or raking style of light, this is amazing stuff.

Oh so simple, but so very helpful. Adafruit now has a 90 degree side light version of their Neopixels.


Until now, the LED strips always projected light away from the curved surface. The light went toward the viewer, not along the surface of the curve. So for the most part, we were limited to having bright strips of light shining at the viewer but not on the object. Now, it's going to be so much simpler to gently illuminate the surface of an object without blinding the viewer or requiring additional, often complicated reflectors to disperse the light.


We can finally throw a wash along a curved surface (LEDs at bottom) instead of projecting all the light out into space (top). 

In fact, these new strips negate years of my work (slight exaggeration) where I created reflectors and deflectors to control the light and bend it to go opposite the curve of the LED ribbon. And I'm not the only one, lots of makers have come up with their own solutions. After all, that's what makers do - we create solutions and have a lot of fun doing it. But I think we all knew there was a better way, we just never got around to creating it.

With cosplay and illuminated, glowing fashion becoming trendy and popular it was only a matter of time before someone came out with a manufactured solution. Adafruit popularized the addressable LED and made it simple enough to use that regular people could create with it. They named it NeoPixel and the world was never the same

Luckily for us, Adafruit is now working closely with Erin St Blaine, a professional costumer and performer. According to Lady Ada, the new Side Light style was initiated by St Blaine. While we amateurs tinkered and fussed to overcome the limitations of the basic NeoPixels, St Blaine spoke up for us and let the company know that she and other pros needed a simpler pre-made solution. And Adafruit responded. We amateurs also reap the benefits, yay us.

Right now, there are only a few configurations available in the side lit style, but if there is a good response I'm guessing Adafruit will expand the line. So come on folks, grab yourself a few of these strips and make something cool so we all get more options to choose from.

My project list for these new lights include:
  • Hat with the with a side-lit crown taper
  • Hat with a down light brim
  • Bracelet that throws patterned light on the arm
  • Skirt with a true down light
  • Cropped sweater with a real down light
Did you notice that all of these projects involve the human body as the subject of illumination? Well that's because the human body is basically a series of vertical tubes, Until now. we could wrap lights around the body so that the illumination projected AWAY from the surface of the body - basically creating a brightly outlined stick figure. But it was very difficult to illuminate the surfaces of the body without a lot of tricky workarounds. The always lights pointed away simply because that's how they were made.


I tried to work with illuminated clothes a few times with very limited and mixed success. After a lot of work and tears and carefully sewing in reflectors, the clothes still looked like they belonged on a Vegas stage. I had grand visions of creating decorative reflectors that looked like attractive and intentional embellishments, but only succeeded in making awkward boxes that looked like they were tacked on to hide the LEDs.

I love creating diffusers and reflectors for NeoPixels. ten hours of measuring, designing, printing and installing later and you've got yourself a nice project. But hey, now you can do a lot of the same thing just by using the appropriate strip of NeoPixels.

I, like so many others, defaulted back to EL-wire for light-up fashion. It's a lot less complicated, but much more limited than LEDs.

That's why I decided to stick to jewelry where it was easier to hide reflectors and such.  So I'm excited to re-try some of these failed fashion projects.

Other people seem really excited about making light-up signs and displays. It will certainly make that easier too. I'm also eager to try out mixing the two configurations to create a wall wash of one color with a center strip of another color.

Conclusion:
This is a face-palm simple upgrade that just required a large enough community plus a dedicated creator to speak-up to a responsive company. Now we all have a fantastic new set of lighting tools to use. I can't wait to see what everyone comes up with,


Also find me on: FACEBOOK 


Tuesday, November 21, 2017

Light-up Cosplay Boots may be happening

Both my hiking-boots and my work-boots completely wore out this summer. Cracked soles, popped rivets and split seams now make them useless for their intended tasks. However, their well-worn look gives them a lot of character and makes them good candidates for some sci-fi cosplay modifications.


I think it's time to revisit light-up shoe projects. Slap some LEDs or some EL-wire on those suckers and call the space-bound. I've already done lighting projects with tennis shoes and with high heels. But this time, it's going to be a little more industrial looking.

I might just add some glowing EL-wire panels to the boots and call it done,


I might keep it simple and just use some simple EL-wire or maybe some EL-panels. That's certainly easy to do. But of curse I have grand ideas about controllable light shows like in the summer blockbuster movies. I have some spare microcontrollers and extra LEDs in the shop that are taunting me from their dusty shelf.

And new products like the sensor laden Circuit Playground and the Bluetooth or LORA Feather boards suddenly make real interactive and controllable light shows possible for a reasonable price. My previous projects were limited to a few pre-set, repetitive light sequences and simple pressure-switches.

I haven't done any real designs yet, not even a single sketch - so I don't have anything to show you for now. However, I've done acceleration projects and sound based projects with the Playground, and my Bluetooth skills are coming along nicely. If I combine these with my old Neopixel controller code I might have a good start on some off-world footwear.

I still needed to refresh my memory on how these things are done - so I went back and re-found some of my favorite inspirational projects and tutorials. This time I decided to take notes and make an easy to use collection of helpful links and I thought I would share them here..


Most of the tutorials and guides I knew of all revolve around either sneakers or high heels. You know, normal everyday footwear - not the stuff of exo-planet explorers. But it's all I could find, so here's a list of my favorites to get you started:.

Sneakers and Tennis-shoes


Heels


Above and Beyond


Right now, I'm thinking some rack-mount headlights, some basic running lights and some sound reactive and acceleration reactive lights. Since these are boots, I can add some clunky control panels without destroying the lines of the shoe - big and clunky work well with boots.

If you have any ideas, images or tips to share for cosplay boots, please send them my way. I'll try to post up some progress pics soon.

Also find me on: FACEBOOK