Disclaimer and Social

This page may contain affiliate links. As an Amazon Associate I earn from qualifying purchases.

Showing posts with label jewelry. Show all posts

Wednesday, February 13, 2019

Fusing Glass with a Home Microwave

I need to clarify something. I do NOT create the glass in my illuminated glass jewelry. A friend does the glass, I just do the special effects. So, I hand write all the code from scratch as well as assemble the electronics along with most of the bindings, frames and mountings. But the glass, the real center-point, is done by someone else.

microwave kiln fused glass with LCD LED animated lights jewelry
The glass was done by a friend, all I did was add the lights and code.
However, I do know something about the process and would highly recommend it as a fun craft, whether you intend to animate it, light it, or just play to the glass.

My friend uses a budget friendly version of glass fusing that uses a microwave safe kiln to melt the glass, not an expensive specialized kiln. Yes, that's right - you heat up glass to the melting point in your basic home microwave oven. The process itself is simple and easy to get started with, but the fun comes from learning all the tricks and techniques for getting the look you want.


Tuesday, July 3, 2018

NeoPixels Behind Air Dry Clay

Tried a new material for diffusing NeoPixels and making jewelry - air dry clay. It didn't work out like I hoped, but the experiments were successful enough that I will continue to play with it.

Air-dry clay is very easy to work with. I think it handles more like real clay than polymer-clays like Sculpey. And you don't have to bake it, just let it dry (a real plus during the summer months).

I also use it to make quick molds and impressions.

I had some white clay (from Polyform) left over from another project, and I don't like to mix partially dried clay back into the main blob. So I decided to press some gears and cogs into the leftover clay to make a quick Steampunk jewelry pendant. With some paint and embellishments, this is a good technique to get a fun surface texture for jewelry.

I thought it would be translucent enough to make a good diffuser for a NeoPixel pendant. But the clay is actually fairly opaque at anything more than a millimeter thickness. That is way too thin to make jewelry with because air-dry clay is brittle and breaks easily (a backer board or thick parts are best for jewelry).


Steampunk jewelry pendant made with air dy clay and NeoPixels
You can see that the NeoPixel lights only show through where the clay is very thin. Luckily, the rest of the pendant is thick and makes for a strurdy piece of Steampunk jewelry.


But I had accidently made some of the impressions from the gear so deep that the light from the NeoPixels shined through quite nicely. A few even poked all the way through. The rest of the piece are very thick however, so the pendant is sturdy. Overall, it creates a nice effect.

I need to paint the surfaces to make it prettier, but somehow leave the indentions unpainted. It might take a few tries to get something attractive. But air-dry clay is cheap and quick to work with. So I can try a lot of different techniques cheaply and quickly.

Also, I know that polymer clays have a wide variety of translucency. And my diffusing experiment with 3d printed NeoPixel jewelry proves that even PLA has different light transmitting qualities. So there might be other air-dry clay brands that work much better with technique. I'll keep you updated.

Also find me on:
FACEBOOK -or- INSTRUCTABLES -or- YOUTUBE

Tuesday, June 26, 2018

EL-Wire plus 3d Printed Bracelet Project

Found some pics of an early jewelry experiment combining EL-Wire and 3d printing. This bangle, or maybe a bracelet, has got to be one of the simplest designs I've done with this combination of technologies, but it's still effective.

There is very little non-structural plastic in the design. That's not usually an important consideration in my jewelry making ---  in fact, I get way too elaborate with both structure and decoration.

EL-wire and sine wave 3d printed jewelry bracelett
The EL-wire loses some of linear appearance thanks to the undulating repeating pattern

But when I design something as a 3d print I tend to think more like an engineer. So the simple design is pleasing to me because it means I found a basic concept that works. I like it when the most basic form works with no extra parts or decoration needed.

Or maybe I'm just happy because I like it even without a single gear or wing or key or even an antiqued brass raven skull. Not everything has to be Steampunk.

This first-test version is a simple sine-wave-shaped 3d print. The EL-wire runs through a series of holes in the center of the wave faces. This holds the EL-wire in place with friction. And it breaks up the linear shape of EL-wire visually.

EL-wire and sine wave 3d printed jewelry bracelet
The EL-wire runs down the center of the sine wave shaped 3d-printed bracelet.

It's also textured and bright enough (bright pink plastic) to look fun and read well in daylight. It's comfortable to wear and durable. Not bad for a first test of concept.

(Also check out my EL-wire party night light project)

I know these early devstage pics aren't the best, so I'll try to find the actual objects again and grab some better images soon.

Also find me on:
FACEBOOK -or- INSTRUCTABLES -or- YOUTUBE

Friday, May 11, 2018

8-Bar plus 24-Ring equals NeoPixel Belt Buckle

Sometimes being slightly disorganized works in your favor. I keep a tray filled with every size and shape of NeoPixels. The tray lives near my electronics work station. When I find a nifty part and want to see if a NeoPixel will fit that part, I simply reach into the tray and grab an example to test.

The collection comes in very handy so I leave the LEDs in the tray at all times. I know I should put them back in their anti-static bags and put the protected LEDs back in the main collection. But I don't because, well... because I'm kind of lazy.

This week, I started playing with electronics again after taking several months off for other project types. And when I pulled out some NeoPixels to test fit onto a part I got a pleasant surprise.

Neopixel 8 bar and 24 ring as jewelry
Notice how perfectly the 8-pixel bar and the 24-pixel ring fit together


The 8-pixel bar and the 24-pixel ring had stuck together and came out of the tray as a pair. The combination created a perfect shape for a belt buckle, or broach, or maybe a hair ornament. I'll have to cover them of course, and hook them up to an Arduino. I just finished playing with decorative round covers exactly for this purpose.

Finding this combination by accident is funny. I have tested all the ring sizes in various combinations. There are enough different sizes of NeoPixel rings that you can make many combinations of concentric rings - including an LED clock with 60 pixels for the second hand.


But for some reason I had never combined or even tested the bar together with the rings. I felt silly, but happy because the universe had gifted me a new combination without me even searching for it. I think maybe I'm supposed to make a few pieces of light-up jewelry as my transition back into my electronics hobby.

Find out more about NeoPixels at Adafruit. (the 8-bar and 24-ring are two of my favorites). By now, Adafruit has the same configurations in RGB, RGB plus white (in several Kelvin colors) and even a version with faster refresh rates called DotStars.

If you've never hooked them up to your Arduino before, grab yourself some NeoPixels and start lighting up your world.


As an Amazon Associate I earn from qualifying purchases.
Shop through our Amazon links to help support this site.

Also find me on:

Thursday, May 10, 2018

Paper on Metal Washer Jewelry

I am putting some of my "paper on metal" jewelry back onto the sales tables for craft shows. I had saturated the market for this style last year. But after a recent show, I remembered that although a piece of jewelry might be a year old to me, it will be brand new to someone else. Plus I like some of these pieces, so they're going back on display.

Paper from Silhouette cameo craft cutter on metal washer jewelry necklace

I did a completely different style of jewelry this year (I even did a quick Instructable on the process). I can't stick with one style for very long. I know that's not very professional of me, but this jewelry making thing is just a way to blow off some creative energy when I get bogged down in my other projects. I like making jewelry, but I think it might be because I have no real stake in it.

In fact, jewelry is an area where I have no expectations of myself or the outcome. Most of my other projects are carefully conceived, extensively researched and planned. I have very precise expectations of the outcome. When I tried combining the two parts of my brain, I got poor results (check out the experiments I did with 3d printing, Arduino and jewelry - the detailed three-part series turned into

Will It Go Round in Circles - The Wash(er) Cycle

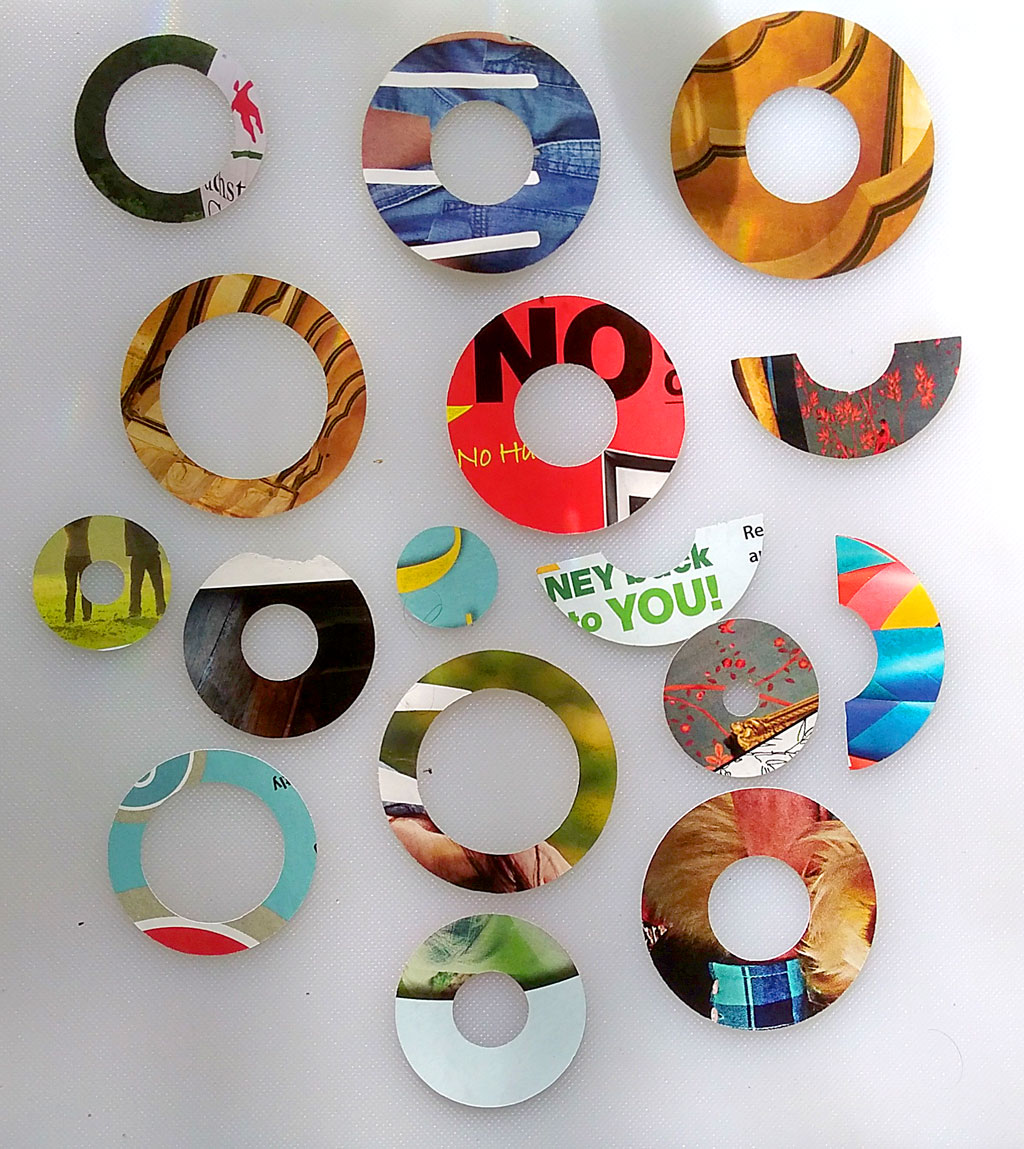
In the previous post I showed some of the paper-on-metal jewelry I've made. This post is about the process I used to create them. It's a pretty basic concept, but I like the results. I haven't played with it this year, but I just found some left-overs from last year and remembered how fun it can be.

Steampunk Paper from Silhouette cameo craft cutter on metal washer jewelry necklace
I started using random pages from magazines. I would just pick a page that had an interesting color, pattern or composition - then just slap it onto the Cameo's cutting pad and cut away. As you can see, the results are varied and fun. Artistically, they are more difficult to work with than my early experiments with scrapbooking paper. The colors and shapes and random hints of words make it a challenge to create a cohesive piece of jewelry with them. And that's why they are so much fun.

I started using washers in jewelry projects because they are perfect sizes to cover NeoPixel rings. I started putting the bright NeoPixel LEDs into jewelry before I had a 3d printer. I liked the results and even published an Instructable on how I made one. As you can tell from the photos, I needed something to cover the NeoPixels with since they are so bright.


(I've also used washers in other non-jewelry projects like my welded washer bowl.)

Finding square and rectangular covers is easy, you can make attractive jewelry with a variety of materials. Squares and rectangles are also easy to cut or fabricate. But making perfect circles, especially concentric circles - well that's harder and often very tedious and time consuming. That's why I defaulted to washers at first.


I spray painted a few and used nail polish on others. When I added some bling the washers kind of worked as jewelry. But I still wanted something else, that little something extra. I kept seeing paper and cloth that I likes and kept wishing I could somehow get them onto the washer. But cutting them to fit would be a pain.

Then I remembered I had a craft cutter -Duh!!! - that's why I got the Silhouette Cameo in the first place.

Steampunk Paper from Silhouette cameo craft cutter on metal washer jewelry necklace
The Silhouette design software made it easy to create a template. Notice that I also included some half-rounds, insets and off-center parts. This gave me a lot of options to work with.


Steampunk Paper from Silhouette cameo craft cutter on metal washer jewelry necklace
I started by cutting decorative paper from the scrapbooking section of the craft store. This made it easy to design because the colors and motifs were modern and already geared towards the craft market. Later, I started using random pages from magazines and that forced me to really work to find a color scheme and composition that worked.


So I decided to make some paper circles with a Silhouette Cameo craft cutter machine (I so smart). I measured the washers and used those dimensions to draw circles in the Silhouette design software. I drew circles for several of the washer sizes. And I added some half-rounds, some offset and off-center versions as well. That way I have a variety of shapes to play with and overlay on top of each other.


It worked, a few minutes later I had a large selection of paper circles to use. I played with them for days. And of course I had to add bling, extra paint and glitter to some of them.

One thing I liked about this technique is the randomness of the result. You can use the design software to place the cuts exactly where you want. But letting the cuts fall wherever all random and weird, that gave me a treasure trove of chaotic suggestions.

Steampunk Paper from Silhouette cameo craft cutter on metal washer jewelry necklace
This os one of the offset (inset?) rings. See how it's smaller than the washer and forms a decorative stripe instead of covering the entire washer. I hit the edges of the paper with some ink from a stamp pad to make it stand out. The washer was painted with some nail polish. And I covered the entire surface with a finishing seal coat of glitter polish.

I have a least several hundred paper circles left. I'm not sure how many more pieces of jewelry I'll create with this technique (at least for this year). But I wanted to document and share the technique before it got buried and forgotten somewhere in the studio.

Plus, now that I have a 3d printer I've started to play with creating custom shells for the jewelry, so I might not get back to this technique for quite a while.


Also find me on:
FACEBOOK -or- INSTRUCTABLES -or- YOUTUBE

Monday, April 30, 2018

Jewlery Making Tutorial on Instructables

Just published a short tutorial on Instructables about using salvaged parts and e-waste to make jewelry. You've seen some of the projects here on the blog, but I go into more depth about the process and techniques used.

It's also the first time I reference my previous work. In this tutorial I point back to one of the simple tear-down videos. I've spent several months making a series of very basic how-to videos and tutorials. I now have a set of foundational guides I can refer back to. That way, I don't have to make every tutorial really long and detailed. I can just point back to one of the foundation series.

upcycle repurpose e-waste jewelry

Check it out and let me know what you think (or any of my Instructables). I feel the need to go do some coding and welding now, so this might be the last jewelry based post for a few months. The 3d printer is also sitting in the corner taunting me for not playing with it for at least a month.

I've also got plans for more projects that use all the items from the foundation series. Drop me a note if you've seen any ideas proposed in the basic guides that you want to see turned into actual projects.

Then again, I might 3d print some jewelry to weld, so.....

Also find me on:
FACEBOOK -or- INSTRUCTABLES -or- YOUTUBE

Tuesday, April 17, 2018

Jewelry in Progress - Two More Experiments

Last time, I shared a piece of Goth jewelry I'm working on. That's not my usual style, as I noted in that post. Here's a couple more pieces I'm developing. One is a neutral tone antique look, the other is a high tech version of Steampunk.

Washer art steampunk antique circuit board jewlery
A piece of antique random washer art and some hi-tech Steampunk - or at least the foundation for them.


Neither piece is finished, they're really just the base layer.

The round piece is a washer that I covered with paper that I cut to size with my old craft cutter machine. It's from a series of experiments I was doing - sort of forcing myself into randomness. I would slap some tear-outs from various magazines onto the cutting mat and cut randomly, then try to make something pretty from the results. It was meant to be an antidote to the precise, overly planned activities that my coding and 3d design require. And it sure was fun, so I might do that again.

The other piece is a scavenged PCB (circuit board) with a bright gold frame. I didn't realize it until too late, but I'm probably the only person who knows that the board is nearly flat and all the other stuff is added on. Only an electro-geek would know that... jeesh, what was I thinking. So I added an antique frame and stamp to steer it towards the Steampunk realm. I like the balance and rhythm of the objects, but no one will know that they came from me.

I didn't touch them today. I needed to cogitate and agitate a little first. I think I've got a plan now, but we'll see how it works out.


It seems that I'm trying to develop a new style, whether I really want to or not. I hesitate to even call it that, but that's what I get for trying new things. Normal people are starting tp create the types of stuff I did years ago, so now I'm trying to move beyond that. When I started doing Steampunk it was weird and people looked at it slightly askance. And I was okay with that. Now everyone is doing it and I've got to move on.

So I'm forced to try new things again... and I'm okay with that. And sure, my new stuff looks odd even to me. I haven't found a dependable visual vocabulary yet. I don't even know what the pieces are about, what their narrative is. I don't see other people doing it yet, so I don't really have anyone to steal from or prop my decisions against for surety. Basically I don't know what I'm doing yet.

It does seem, at least to me, that I'm repeatedly trying to marry different materials and time periods. The "style" hasn't congealed into anything coherent yet, though. I feel like I'm treading water, like I'm just slapping stuff together with no plan. And I'm okay with that. Sometimes things turn out well, even better than expected.

If you're trying something new, or want to, then that's what usually happens. I've been here before, so I'm comfortable. Just thought I would leave a note here for anyone else that's struggling to find their new thing... you're not alone ( and it's really kind of fun travelling without a map.)


Also find me on:
FACEBOOK -or- INSTRUCTABLES -or- YOUTUBE

Saturday, April 14, 2018

Friday the 13th Jewelry

Missed posting this on Friday the 13th but going to show it now. Starting to make some new jewelry for an upcoming show. Not even sure if I'll be in the show, but it's a good excuse to try some new techniques.


The skull matched the dark depths of the scavenged LCD screen. I thought a silver clock face and a spot of red were good accents.


This isn't my usual style, but I needed something to offset the black square and a skull worked nicely. For some reason I felt all goth that day. Maybe it's just my attempt to balance the "natural tones" pieces that I'm making at the same time.

This piece is comprised of an upcycled LCD screen I scavenged from a teardown. It had a spooky, dark depth to it. And the screen becomes semi-transparent when a strong backlight is put behind it. I thought the black-and-white skull looked like it was floating on a pool of darkness.

I could never find a use for the silvery chrome clock faces before since most of my jewelry has a kind of antique or steampunk look. But the silver seemed to match the theme well.

And I had some old buttons I had scavenged from

Tuesday, January 2, 2018

Jewelry that Flickers and Flits with Pictures

Here's another way to add beautiful lighting effects to your jewelry. Tiny, inexpensive graphic screens are easy to embed in your projects. They aren't as bright and showy as LEDs like Neopixels, but they give you the ability to craft very customized light and color effects. You can animate them and even display images. And of course you can control them with an Arduino.


A really simple pattern adds a lot of visual interest to this millefiori piece. The pattern changes slowly over time to give the pendant a constantly transforming appearance. The light really helps draw the eye in dim lighting. If you don't want that, simply turn off the screen. You can create any pattern, animation or even image that you want and change them as slowy or quickly as you desire.

I'm going to use fused glass as an example again. I like to work with fused glass because it poses so many challenges and can have so many different forms. Each piece is unique and calls for a careful pairing of light.

And because fused glass is pretty all by itself, it's also challenging not to overpower the innate beauty of the material. Last week I posted about using a simple LCD light valve to add interest. That works well with semi-transparent glass.You can also use these tiny graphics screens to add patterns and lights to the same piece of glass.

However, I have struggled to find something that woks well with clear glass pieces. Nothing ever worked well in pieces that had areas of transparent glass. So I hauled out my LCD screen collection and tried some of them. I think this technique has some definite possibilities.


Both Adafruit and Sparkfun have a wide range of sizes and form factors for these types of screens. For jewelry, the "deck of cards" size is probably the biggest you would need for your largest statement pendant. I prefer the matchbook sized ones. I have played with the tiny thumbnail sized versions, but after getting diffused there isn't that much difference between them and a much cheaper LED.

Here are just a few of the screen sizes available. (That's a US quarter for scale)


There are a few things to remember when choosing a screen:

If you want to display actual images then you need to make sure the screen comes with an SD card slot so you can store the image or images.

Don't forget about the monochrome black-and-white versions if all you need is a gentle flicker. There are also versions where the entire screen can be any single color and you can draw in black.

The faster your microprocessor is the faster you can change the screen display. This might not be important to you. I can code and design animations well enough to get small chips to do what I need. But if you want to do fancy animations consider using a more powerful chip like the M0. With the Pi Zero, you could even play videos using the same screens.

You can use traditional tools like Photoshop or Illustrator to create your patterns and images. For people who don't code, this makes this technique much more accessible. You an also use code to draw over and manipulate images, so it offers the best of both worlds.


I will keep using the LEDs and NeoPixels for jewel based. big bling style projects. And the 3d printed jewelry actually needs all the brightness NeoPixels provide just to show through the plastic during daytime.

But the more I play with LCD graphic screens and glass the more possibilities I see. I've got several ideas, and the really neat thing about his technique is that you can leave the screen off to emphasize the beauty of the glass itself - or you can show any solid color, pattern, animation or image on the exact same piece.

In fact, the same piece of glass can be given a completely new "look" by changing what's on the display.

I'll post more images of my experiments soon, and I think I might need to start doing video just to better demonstrate the effects possible with this combo.


Also find me on: FACEBOOK 


Friday, December 29, 2017

Adding Some Dark Yin Yang to my Jewelry

I'm about to put some serious yin yang into a jewelry project. For years, I've put lights into jewelry, now it's time to put some darkness into the mix. Say what... ???

Well, not darkness exactly. But I can now block light on command thanks to new "light valves" from Adafruit. These light valves are thin glass sheets that can be darkened on command with a standard Arduino... think LCD screen or welding helmet, except the whole sheet darkens.

Why would I want to darken something, especially jewelry? I've put bright colorful LEDs onto every hat, scarf, shoe and bracelet I could find to make them sparkly. Why would I suddenly want to block light? It took me a while to find a problem for this solution, but I think I've found an interesting use case. What if you are working with objects that already have a beautiful quality of light?


Adding a dark background (upper half) completely changes to look of this piece of fused glass. The glass is so beautiful on its own that it doesn't need and LEDs in it. But changing how much light gets through the glass can affect the look of the entire piece. Imagine the background fluttering or pulsing between dark and light.  

A maker-friend creates lovely fused glass jewelry. The glass does amazing, wonderful things with light. It bends it and scatters it and refracts it. I've put lights behind these pieces of glass to great effect. But some of the pieces, especially the clear or nearly transparent pieces didn't work as well as I had hoped.

Translucent or heavily tinted glass diffuses the LEDs and creates a wonderful glow. But the nearly transparent glass always looked like I had just stuck some LEDs behind it, there was no magic or artistry. They looked cheap and tacky, a sad disservice to the beautiful glass work.

And the transparent glass really changes depending on the light that hits it, Some pieces look dark and nearly opaque in dim light, then turn crystalline and bright in sunlight. On a light background they look one way, on a dark background they look completely different.

What if I cold control the background, change it from dark to light, flicker it, fade it and pulse it? Well now I have a way to do that thanks to these new "light valves" from Adafruit. It's not as dramatic as an LED, but that subtlety is precisely the point. I've been developing ways to tone down LEDs for a long time, trying to make something a little less Vegas and more LBD evening gown-ish. Maybe the solution is to control the lighting effects from the opposite end of the scale instead. 

I just started this experiment, but I like some of the effects I'm getting so I'll post some of my successes and failures as I go akong (plus more about the light valves).

Stay tuned for updates.


As an Amazon Associate I earn from qualifying purchases.
Shop through our Amazon links to help support this site.

Also find me on:

Monday, December 11, 2017

New Line of Steampunk Jewelry and Accessories

I am trying to create a new feel for my line of Steampunk jewelry and accessories. Commercial Fashion has finally caught up with me and I need to up my game to come up with a new aesthetic - something that really catches the eye and stands out from the crowd - but doesn't frighten the average customer.

Anyone that has been involved with Steampunk for a while probably knows my pain. We scavenged parts and cleaned gears and old lace, then combined them into odd collections that were too new for anyone but the hard-core geeks to be seen wearing. We created an aesthetic and a standardized compositional vocabulary, then watched as it slowly caught on to the point that normal people would wear them.


Yes, there are plenty of pre-made craft store items in these pieces. But they also use old PCBs, computer memory as well as real gears and hardware from old machines. I didn't copy anyone or steal a design to meet market expectations. But a few still sold so I'm doubly happy to be experimenting again and still have people like them enough to wear them. It's a good start.

Eventually, you could find clean, pre-made gears and bits from a regular crafts store. And it was awesome, so much easier just to assemble without needing power tools and a soldering gun to take apart old machines. And the sales soared - suddenly everyone wanted a piece of Steampunk in their jewelry boxes.

Fast forward a few more years and you can now buy pre-assembled clusters of steamy goodness for cheaper than you can buy the individual parts. Now, we take apart these massive collections to re-assemble them into something unique enough that it can't be found on the Tim Hotz aisle of the craft store.

But somehow, that doesn't feel right to me. I'm buying a fake Chinese gear meant to evoke an antique European history for American mall shoppers who have never read Steampunk and know nothing of its history or the socio-political underpinnings of the genre. It's just something else to consume.

I'm not saying I will never use Vintaj or Holtz items again (they are just way too convenient) but I do want to start using something a little more authentic, something that was actually used for another purpose before being turned into jewelry.

This is a sample of what I came up with. It's representative of the items I slammed together at the last minute before a recent craft show. I just couldn't create anything that distinguished itself from any other vendor. All my stuff looked like everybody else's stuff and I was getting frustrated. So I forced the issue and made these, um, things - let's call them accessories.


They are different and I was happy about them being different. But I was also afraid, because I remember the early days and waiting for another experimental soul to wander by the booth and choose to be adventurous with their hard earned cash. new is good, really new is bad - at least for sales.

I did sell a few pieces, more than I expected to be honest. Others didn't sell and, at the moment, I've decided to push them even further into the unknown (think working electronic displays). I'll post more about the pieces that sold and how they were created. And I will also post any successes as I continue working on the unsold items.

And you know what, it felt pretty good to once again be selling something experimental and somewhat challenging. Meeting the market demand for an acceptable product certainly has its place (the wallet) but if I'm going to call myself a creator then I need to keep pushing the boundaries a little or risk withering away into the chasm of simple retail.  Of course a couple of sales makes it easier to think that way too.


Also find me on: FACEBOOK 


Friday, December 8, 2017

Fancy Filigree Rings a Definite NoGo

Made these delicate filigree finger rings thinking they would sell quickly. Customers always ask for rings, and with Game of Thrones and Steampunk being all the rage they should be very popular right? Wrong!!! Not a single one sold, and they barely got a look.

I like these rings, though. They are both subtle and expressive and they could work with a lot of different looks. They range from "finger-length" to a tiny single gear - something for every need. I wasn't totally sure if there was a local market for this style so I only made a few. I didn't expect to sell them all at one show, but I was a little shocked that not a single one sold... crickets

The rings ranged in size from a full finger=length to a tiny one with a single gear.

There are a lot of customers who want a simple, inexpensive gift that isn't a cliché trinket. I wanted to offer something inexpensive, and these rings are simple to make, so I could offer them at a very low price. They were (I thought) perfect for "small gift for a friend" add-ons, bundles and kids who have a limited budget. Just a little something to complete a package or the equivalent of an impulse buy. Apparently, I completely misjudged the market, but I'll give it another try or two before I abandon them. I might even add items to the line.


Before the show, people told me they liked the rings. But they were seeing them in isolation with nothing else competing for attention. The only ring I sold was a huge ring the size of a mini-donut, one I really expected to have a limited audience.

And every other sale was also huge and unusual - all my personal work. And I sold nothing that I made specifically to sell to the anticipated audience (commercial). Either I totally misjudged the audience for this show, or my personal work is beginning to find a market. Whichever it was, it got me to thinking...

There are several other possible reasons the small rings didn't sell. They could have been in the wrong place on the table. Maybe people didn't realize they were a third of the price of the other pieces. The rings might have been too delicate and small to compete visually with the other jewelry, all of which are bold and big and bright. It would be easy for people to overlook a few small items scattered amongst a huge wall of bold statement pieces

So I'm thinking I need to make enough of these small items to create an entire section for them. Maybe a separate case so that the entire collection is big enough to grab peoples attention and get them to shift the "scale" of their thinking.

I don't have any more shows scheduled until Spring, but the theme for the next show is Fantasy and Fairies,,, so these delicate rings, being fit for a princess, might be popular at that show. Fingers crossed and I'll keep you updated.


Also find me on: FACEBOOK 


Monday, November 27, 2017

SteamPunk Pendant with Round PCB

Made another Steampunk pendant necklace using upcycled parts scavenged from broken items around the house. This one uses a repurposed PCB. That's not very unusual in my projects, but this PCB is round with a hole in the center, which is very unusual.

The round PCB had a pretty green color, and I added some broken bling to it along with some scavenged bits from old jewelry and a faux gear from the craft store just to validate the Steampunk theme/ When it's all put together I think it works as a pendant quite well.

I don't remember where the board came from, maybe an old mouse or an old radio knob assembly. But I do remember having it sitting in the collection and taunting me for a long time until I finally decided to use it whether the project turned out nice or not.

See, I have a hard time using unusual parts because I'm always afraid I will fail and waste the one unique chance to ever use such a part. If it's a common, standard part then I'll take chances and use it quickly because I can always get another chance with another copy. But this is the first round PCB I had ever found and I waited and waited and waited.


Then inspiration struck, and after a year or more of hesitation, the entire piece came together in a matter of minutes - and I like it. I even found a way to decorate the back side so that it's at least not ugly or distracting if it spins around while being worn..


I even decorated the back of the pendant because necklaces tend to flip around when they are being worn. The back of the PCB was a dull brown, so I covered it with a large fake gear for the steampunk look and even added an oh-so-popular wing to complete the composition. It's not pretty enough for the featured front, but I think it's good enough for the hidden back.


But I waited a while to post it. I wanted to see if I still liked the final product after a few days, or maybe I was just so relieved to be rid of the teasing piece of electronic scrap that I had convinced myself it was attractive.

Well, it's been a few days and I still kind of like it so I decided to post it.

Unfortunately, in the same burst of creation, I also made a really ugly project from a unique part. I kept adding pieces and colors and sparkly things to that project hoping it would "come together" as a composition - and it remained ugly with every added part - at least to me.


I'll also give this failed project a few days and see if it grows on me. Or maybe I will decide that some people might actually like the large clunky thing. Or, I might just keep adding things to it until I can pretend that I had always intended for it to be one of those monstrous accretions you sometimes see in vintage stores.

Meanwhile. I'm working on another project that seems to be holding together as I add the parts. If I don't blow it, I might have a completely different style of PCB jewelry to share in a few days.


Also find me on: FACEBOOK 

Monday, May 22, 2017

Glowing Pendant - First Enamel Experiment


Trying to create a pendant necklace that glows during the day as well as at night. Finally found some basic techniques that work with my 3d printer and regular filament. It's far from perfect, but the first, quickly printed piece looks good enough that I will continue to experiment and refine the idea.

This is what the pendant looks like during the day. The NeoPixels light up the thinner areas quite well and show up even in bright, outdoor light. The "stringing" doesn't show up as much in real life, but it is present. I printed this at high speed with a thick layer height. If I print a more hi-rez version the stripes should be a lot less noticeable.


This first piece has a lot of experiments built in: How does thickness affect the amount of light transmitted, how does thinning the front, back or both affect the look, can I "trap" the light in the thinned areas, and how do two lights show up within one thinned recess?


I learned a lot on this first iteration. I won't bore you with the details, but I will note that the difference between a nice glow, a stringy mess and nearly opaque can be a matter of 0.01 mm. That's a pretty tight tolerance.

As you can see below, even at night, the thicker areas block the light quickly.

I will need to try out other filaments to see if they give me more latitude in thicknesses while maintaining the diffuse look.

Glowing pendant with Adafruit Circuit Playground inside a E-sun PLA cover
And here is what the pendant looks like at night with the LEDs at full strength. I think it's pretty, but you can also dim the lights easily. And since these LEDs are on board the Circuit Playground board, you could also get the lights to react to sound, movement, heat or just randomly.

You might have noticed the curving incised lines. They are very deeply cut, so they transmit more of the light. I wanted to see what they looked like. I had hoped they would create a gradient as they carried the colored light from multiple LEDs. It kind of works.

But there was also a second reason for them. I wanted to try embedding wire in them, then pour enamel paint (okay, cheap nail polish - same thing) in between the wires like a cheap, faux cloisonné.


I did a first, tentative experiment with the nail polish. I selected different colors, styles and brands to see how they affected the light. I did not select the colors for a pleasing composition - and boy, did it turn out ugly in the daylight.

But the nail polish does affect the quality of the transmitted light. Once again, the results didn't adhere to my predictions. Chalky does not block more light and sparkly daylight posihs does not sparkle at night, even when lit.

This shows the pendant at night after I added some enamel paint (aka nail polish). It does affect the colors and somewhat smooth's out the stripes. Some colors and thickness kills a lot of the light, so I will have to learn which brands of nail polish work for this project. Even though it's the dimmest area, the red dot at the lower left is closest to the affect I wanted to achieve.

The thickness of the nail polish does affect how much light gets through. But I was happy to see that almost all the paint can be applied thickly with no significant negative affects. That's great, because I really want to just pour the paint into the recesses and not have to struggle to get an even coat with a brush.

All in all, I'm very happy with this first try. Expect to see more about this technique in the near future.

I used the Circuit Playground board from Adafruit - get  it at Amazon.


Also find me on:
FACEBOOK -or- INSTRUCTABLES -or- YOUTUBE


Sunday, May 7, 2017

Well... So My Jewlery is For Sale


Some of my jewelry pieces are now officially for sale in a friend's online shop: Vintage Viewpoints. Check it out, and be sure to visit their Facebook page to see their newest pieces.


You all know that I don't normally sell my personal projects - for a variety of reasons.


Washer with dark blue and reddish purple enamel paints and metal filigree applied. Center is a lavender rose and traditional bells hung from beneath.


Usually, my projects are total experiments, really only meant to solve a specific problem or learn a technique that I can use in commercial projects. The jewelry pieces were simply proof-of-concept experiments for a totally different type of project.

However, when I shared them with a friend, they claimed to like them - and even offered to put them in their shop. Luckily, the shop owner creates in almost as many styles as I do. They understood that there will probably never be anything similar coming out of my studio ever again. and were okay with that. They finally convinced me to put some of these oddball pieces into their shop.


Another piece with a washer base. Tis one has a gradient spray painted undersurface of rose and new stem colors. I used a Silhouette Cameo craft cutter to make some rings out of Victorian scrapbook paper. A turquoise lozenge is applied to the back and peeks out from the center. A narrow metal decoration caps the piece. 


Wanted a tribal boho look for this, so I tried a few new items and techniques. The enamel paint is applied in raised dots. The filigree is bent and only present on the lower half to give it a little visual interest. The cross is upcycled from and old computer drive. But it still didn't look finished, so I added some scruffed multi-hue twine for a dramatic tail.


Since I don't do jewelry design commercially, I figured there would be no harm in letting these trinkets out into the wild.


And now that I've moved on to new problems, I'm can see them as standalone objects. I'm still somewhat underwhelmed, but there are certainly a variety of styles in this batch.

Got to have some Steampunk in your life. This is a mix of store-bought Tim Holts style gears with parts actually scavenged from old electronics for the authentic upcycled look. I popped a couple jewels and metallic shafts to add a little texture. All of it applied to a 70s era belt buckle.


I had solved the design problems I was addressing, and I had no more real use for the projects. They sort of worked for their intended purpose, and I understood how to change them to make them more effective the next time.


And I have to admit, having another creator say they like your work enough to sell it - well it was a real ego boost. I still see the projects as experiments, works in progress - but to hear that someone who creates objects that I admire actually likes the projects just as they are, well that was even better than solving an abstract problem.

Another semi-Steampunk piece featuring copper parts upcycled from an old electric motor. The jewels were mostly from various sets of broken earrings. The wings were bought new, failed at their original purpose, but found a new home in this project.


While it's unlikely I will put more projects up for sale, it's always nice when a fellow creator asks to feature some of my work. So support your local makers and crafters and artists, especially if you also create something.

And don't forget to visit the Vintage Viewpoints shop for all kinds of beautiful jewelry from a real crafter - the shop owner.