Disclaimer and Social

This page may contain affiliate links. As an Amazon Associate I earn from qualifying purchases.

Saturday, March 25, 2017

Terrarium Frame - First Tests

Been designing a 3D-printed frame for a small terrarium. For the first test I used a clear plastic holiday ornament that is 100mm diameter. I went through a few iterations with the basic design

Some lessons learned:
  1. Flat pack, assembled designs print much quicker than monolithic, one-piece designs
  2. Tolerances are very important in assembled designs
  3. The simpler the joints the easier it is to control tolerances
  4. Test-fit one sample joints before printing multiples
  5. No shame in sanding-to-fit


I am playing with variations of this concept - different shapes, sizes and styles. I will share more details about all the designs and the design-process soon, but I also need to digest the lessons-learned before I can articulate them. (Update: Painted the frame with a faux antique bronze)

3D printed Terrarium frame


Also find me on: FACEBOOK 


Friday, March 17, 2017

Throwing Light #2 - Channel Size & Angled Reflector


Learned a lot about the basics of throwing and controlling light from NeoPixels in Part-1 of this series. But I wasn't getting the amount of light I wanted, probably because I was using a 3v board instead of a 5v - the LEDs are simply not as bright as I'm used to.

I decided to see if bigger "channels" would allow more light to be output, and whether adding a 45 degree "reflector" over the NeoPixels would help project more light.

The answer to both questions is YES: larger light channels do help, and an angled reflector helps (especially when silvered). And painting the channel with silver paint makes a huge differences at both sizes.


The design of the medallion remains essentially the same except for the increased depth of the channels.


Do Bigger Channels Make Brighter Light Rays

Yes, more light escapes from bigger channels. But to make a noticeable difference, I had to make the much larger. So much larger that it makes the pendant slightly bulky, almost 8mm total thickness. And, it is so large I could now put a strip of NeoPixels "on edge" and project the light directly down the channel instead of bouncing it 90 degrees.

To test, I printed the thinnest pendant I could, with the channel's top only about 1mm above the face of the LED. Then I printed another one with roof about 4mm above the NeoPixel. You can see the results below.

With the raw black PLA the difference is noticeable, but not extreme (blue light). The difference is much more pronounced when the interior of the channels is painted with silver paint (shown in red at bottom of page)


A comparison of the amount of light coming out of a 1x4mm channel (top) and a larger 4x4mm channel (bottom). Notice that there is a distinct difference in the amount of light emitted from the two channels. This is the raw black PLA print. Even more light is emitted when the interior of the channel is painted with reflective paint.

Do Angled Reflector Surfaces Really Work
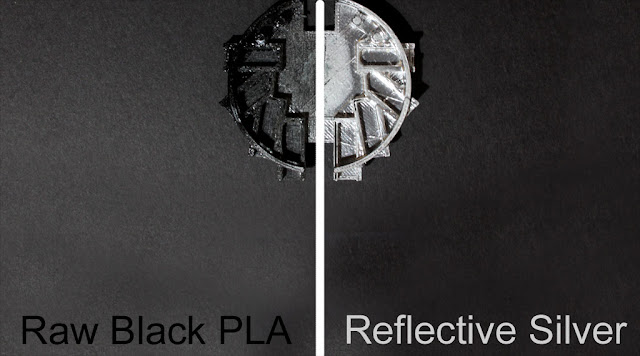
Yes, especially if the reflector-panel is painted with silver paint. The raw black PLA does reflect some additional light from the angled surface (blue image). But if the angled surface is painted silver, then the effect is much more pronounced. Unfortunately, the silver also scatters the light in all direction, making the "ray" shape less pronounced.

I wonder if only painting the angled surface, but not the rest of the channel would be "the best of both worlds" - bouncing more light, but scattering it less. Or maybe a tiny mosaic mirror would be ideal for reflecting and directing light. But as noted, at this thickness, the NeoPixels could be mounted vertically, negating the need for any reflector altogether.

An angled surface (shown at right above) was added to one half of the medallion. I wanted to see if the angled surface would reflect more light from the LEDs (shown as the red boxes).

Even the raw black PLA shoes a small increase in the amount of light when using an angled surface.


When the interior surfaces of the channels are painted silver, the
amount of light reflected off the angled surfaces increases dramatically.


Next, in Part 3, I experiment with gobos and patterns to throw shapes with the light rays


Also find me on:
FACEBOOK -or- INSTRUCTABLES -or- YOUTUBE

Saturday, March 4, 2017

Throwing Light #1

How to Throw and Channel Light with 3D Prints

Part 1 - Part 2 - Part 3 

I am learning how to sculpt light using 3D printed shapes, but understanding how to create specific effects is sometimes difficult. I can't always predict what is going to happen. So I started doing methodical experiments to find out what affects light's behavior, and more specifically, how I can control light to achieve the effects reliably. This post documents one of a series of ongoing experiments.

Notice how the right-side is brighter, but the light is more scattered. The left side has much more defined "rays" but isn't as bright. Also notice how some of the colors get absorbed (are dimmer) on the left side.

Questions I wanted to explore:
  • How does the type 3D material affect the light?
  • Does a reflective surface increase distance and brightness?
  • How far can I throw the light?
  • How does the shape, length or size of the channel affect the light?
  • Does the shape, length etc. affect how quickly the light cone expands
  • Can I shape the light with gobos, masks and cut-outs?
  • Can I throw light sideways as well as forwards?

Right now, I'm back on a jewelry making kick - embedding lights and sensors into decorative wearables. So I used jewelry-based designs to explore these questions. I wanted to move beyond a simple glowing or twinkling effect - I wanted to be able to cast shaped rays of light.

My new favorite toy for illuminating jewelry is the "Circuit Playground" board from Adafruit - it's the board used in this experiment. This little board comes with 10 Neopixels, plus built-in buttons and sensors. How about a 3-axis motion sensor, a light, color sensor, temperature sensor and a built-in microphone and speaker, all on one slim convenient board. (An even more powerful M0-based board is now available)


I designed a simple cover to fit over the top of the Circuit Playground board. There are square "channels" that fit over the NeoPixels and reflect the light out to the side of the medallion cover. The channels ranged from about 12mm to 20mm in length and about 4mm in width (the LEDs are 3.5). The top of the channel is about 2mm above the surface of the LED and 3mm total height.

For this experiment I wanted to throw light out of the side of a medallion, but not the front. I had already played with non-opaque and semi-translucent materials to create glowing objects. So I used black, standard PLA from Hatchbox. It is slightly shiny when printed and totally opaque to light at thicknesses over 0.7mm.

I painted half of the medallion's inside surface with "metallic silver" paint and left the other half raw black PLA. I also scuffed some of the raw PLA channels to see if a matte finish made a difference in the amount of light transmitted.


 What I Discovered in The First Test
  • YES - The choice of 3D printing material does affect the quality of light. The PLA seems to absorb some colors while leaving other colors unchanged.
  • YES - The shiny, printed PLA does reflect some of the light. Sanding the surface to a matte finish does have an affect on the amount of light that is emitted, but it is a minimal difference.
  • YES - Painting the inside of the light-channel with silver or white paint increases the amount of light emitted - increases it significantly. It also increases the distance the light travels away from the medallion.
  • HOWEVER - The reflectively painted channels also disperse the light much more quickly. This causes the "rays" to be much less defined. The light scatters so quickly that the ray-effect is lost after only a few millimeters.
  • AND - The silver/white paint has almost no affect on the color rendition of the light
  • NO - The length of the channel did not seem to affect the amount of light emitted. But the variance of 8mm between shortest and longest channel might not be enough to give a true indication. Without a channel the LEDs simply glow and do not create a ray. And longer channels may affect the amount of light more significantly.
  • ADJACENT SURFACES - The surface that the light gets projected onto can affect the appearance of the rays. Dark materials and matte surfaces create shorter visible rays. Light surfaces and reflective surfaces create much longer rays.
  • VERTICAL SURFACES - Although a parallel surface stops showing significant amounts of light after a few millimeters, a surface perpendicular to the light can be illuminated when it's several feet away.
  • BEHIND THE MEDALLION - The light rays expand in all directions, so the rays can also illuminate surfaces that are behind the medallion. This effect increases with the distance from the "mouth" of the light channel. So if the medallion is set an inch away from the wall, the rays will only begin shining on the wall surface after they travel several millimeters away from the medallion.
  • ALSO NOTE: The 3v Circuit Playground board does not put out nearly as much light as a 5v board. The LEDs are still blindingly bright, but the 3v version does not cast the light nearly as far as my older 5v experiments.


Future Experiments
  • Does the height of the light channel affect the distance the light rays travel?
  • Does an angled surface near the LED affect the amount or quality of light emitted? 
  • Can the channel surfaces be painted "selectively" to increase the amount of light while keeping the light more tightly focused and avoid scattering?
  • Does "reflective safety" paint act differently than "metallic silver" paint used here.
  • How well do gobos, masks and grills work to create shapes within the light rays.
  • Do these findings hold true for LEDs placed parallel to the light channels instead of perpendicular like in this experiment?
  • What are the minimum and maximum lengths of the light channels for specific effects?
More experimentation: Part 2 - Part 3 


Also find me on:
FACEBOOK -or- INSTRUCTABLES -or- YOUTUBE


As an Amazon Associate I earn from qualifying purchases.
Shop through our Amazon links to help support this site.

Also find me on: