Disclaimer and Social

This page may contain affiliate links. As an Amazon Associate I earn from qualifying purchases.

Showing posts with label LED. Show all posts

Saturday, November 23, 2019

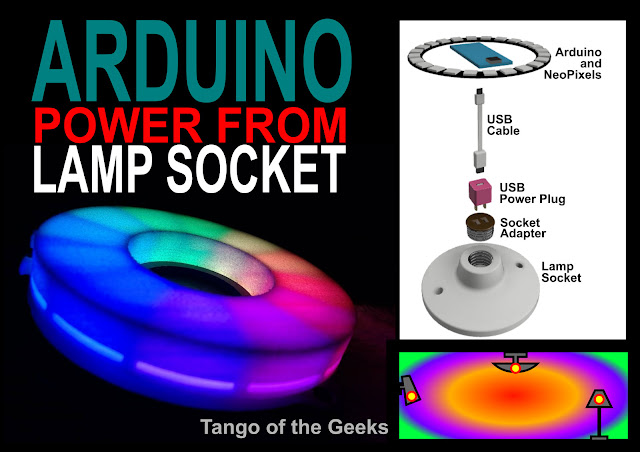
Lamp Adapter for USB Arduino Projects

How can I power an Arduino from a light socket? Can I retrofit an old lamp for a USB power supply? And can I adapt exiting screw-in fixtures to power my NeoPixel light shows without rewiring the lamp?

I thought this would be a simple, inexpensive purchase so I looked online for an existing solution. They have all kinds of plug-in USB adapters for wall outlets so surely they must make a version that screws into a light bulb socket. Something that I could just replace the bulb with, then plug my Arduino with NeoPixels into the shiny new USB port and have instant power for my project. Surely I'm not the only one who wants to make a light show for an old lamp.

power arduino from screw in lamp light socket
You can easily provide 5v USB power for your Arduino project from a screw in lamp or light socket.

But I could not find a version like I wanted. They do have big, bulky awkward looking versions, but not the simple, small ones like I was envisioning. They also have pre-made remote control adapters that turn the light bulbs on and off with WiFi, Bluetooth and even LORA. Then there are the popular HUE and other RGB light bulb systems.

But I wanted to make my own custom light show, so none of these commercial solutions worked for me. All I wanted was to change the screw-in socket to a USB power supply.

adapyt retrofit screw-in lamp light bulb socket for USB power and arduino
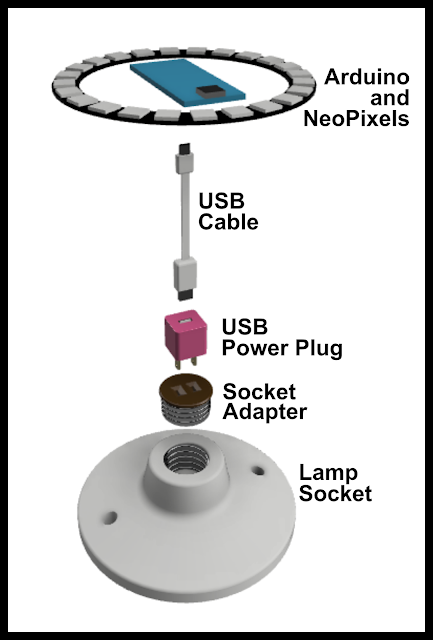
Had to resort to some antique technology to adapt an existing light fixture for USB power. I wanted to turn a screw-in light bulb socket, the kind you see in any lamp or ceiling light, to provide USB power for an Arduino. I wanted to use the Arduino and some RGB LED neopixels with Bluetooth or WiFi to make the lamp into a remote control light show. I finally had to use an ancient light socket to wall socket adapter and one of those tiny USB wall chargers to create a workable power system.


Luckily, I still have lots of electrical adapters from my days of being a budget-sensitive-photographer.

Wednesday, September 5, 2018

Creepy Baby Head with Remote Contol

Dolls are creepy in general, and disembodied heads with fluttering long-lashed eyes give me nightmares. So what could be better to create a Halloween prop? Add some cheap remote control units and wait for the trick-or-treaters to arrive.

I was looking for hackable electronic toys at the local thrift store. The dolls were nearby. I couldn't avoid them. There were hundreds of them, strange limbless torsos and disheveled Barbies lying in twisted entangled piles.

One bald head --- just the head --- sat alone on the top shelf.

As I walked past it the doll's eyes fluttered, then suddenly snapped open in an unfocused stare. I freaked out... until I realized the vibrations from the nearby pillaging children were causing the eyes to operate. I was relieved and decided I had to have it. For 50 cents, how could I resist?

It turns out that the eyelids are on a pivot. A metal weight holds them shut or opens them depending on the head's orientation. However, the weights are so delicately balanced that any small vibration (or magnetic field) can cause them to flutter, or even snap open unexpectedly.

I needed to learn to control this frightening phenomenon. If I can control it, I take away its power over me. (And can frighten other people instead). A cheap RF remote-control, some motors and LEDs gave me some ideas.

Creepy remote control glowing doll head
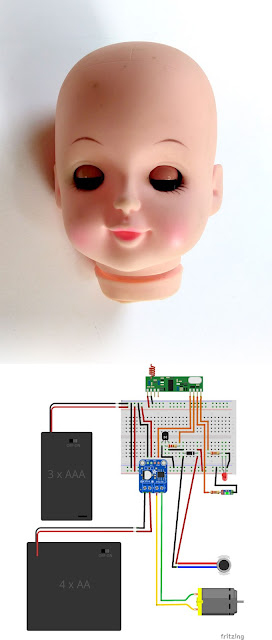
Schematic circuit diagram for making a creepy Halloween doll head prop with cheap RF remote controls. The LEDs cause the skull to glow. The small vibrator causes the eyes to flutter. The big motor was intended to make the head spin on a spiked pedestal, but I might replace it with an electromagnet to pull on the metal weights and make the eyes snap open suddenly.


I have posted about how easy these cheap RC units are to work with, but didn't include any real examples. So I worked up a quick breadboard example in Fritzing last night. I haven't hooked it up yet, so there are probably errors in the circuits (I just did the diagram to help me think about how to do the project). But it gives you a good idea of the kinds of things you can do with a $10 radio remote control.

The items used in the schematic are available from Amazon.


The doll-head's pale, unnaturally pink skin is partially translucent, so an LED causes the skill to glow eerily from within. I'm using red and green LEDs for a nicely diffused sick glow. I pull the power directly off the RC receiver's pins with a current-limiting resistor placed inline.

The small vibrator also pulls power from a receiver pin. I used an NPN transistor and protective diode to form a basic motor driver circuit. It causes the eyes to flutter (but not open) and is startling because, well, doll heads don't typically buzz and vibrate. (Or maybe they do, how would I know)

The big motor needed a driver board and extra batteries. I was originally going to put the head on a pedestal and have it spin. (Fun, fun, fun) But after working on a gearing system and stand, I started to think of other options.

Right now, I'm thinking about using an electromagnet to pull on the metal weights of the eyes. They should snap open quickly to great emotional effect. And the small ones only need about 5v, so the extra batteries and driver-board might not be needed.

I'll work on this and put an example out for some of my friends to experience. I'll let you know what happens.


As an Amazon Associate I earn from qualifying purchases.

Also find me on:
FACEBOOK -or- INSTRUCTABLES -or- YOUTUBE

Sunday, September 2, 2018

Simple RF Remote Control for Motor and Lights

Control a motor or lights just by clicking a button --- no microcontroller needed, no Arduino or programming required.

Sometimes you just want to keep things simple. Not everyone wants to learn how to code and configure an Arduino. With these handy little boards you simply press a button on the remote and the receiver module turns on an output to power your light or motor.

I have already found them useful for several types of DIY projects and am dreaming up more:

COSTUMES: Placing and wiring switches into your costume can be a real pain. With these you can turn on lights, trigger the smoke effects and start the radar dish turning with the click of a button.

GAG PROPS: Make a chair vibrate, cause the creepy doll head to rotate and eyes light up, or make the fake rat run around the table.

SUPER SOLAR YARD LIGHTS: Make a simple security or decorative lighting system that only operates when you want them to. No more coming home to solar lights that have run out of power when you really need them.

I even did a Creepy Remote Control Doll Head for Halloween... it glows and vibrates and its eyes snap open... all at the click of a button.

Adafruit 433 RF remote control transmitter receiver for DIY motor light prop costume gag
Adafruit's four-button RF transmitter (key-fob) and one of their four-output-line receivers. For about $10 for the pair you can control up to four different outputs with the press of a button. The receiver puts out about 5v on each of the outputs. With a few more components, you can easily control LEDs or even motors. Add an Arduino and you have an easy RF remote control for all kinds of projects.


If you know how to install a button and an LED or motor, you can get started for under $5. For a few dollars more you can get a four-output versions with a preassembled remote transmitter. For a few more you can get one to control 12-24 volt circuits or even 110/220 AC.

You can get 10x pairs of single-output receivers for $12. These are just the raw boards. You will need to put a trigger (like a button) on the transmitter and wire a light or motor to the output of the receiver. But for about a buck each, that's a cheap way to start.

For a little more money, you can get four-output versions with premade key-fob style transmitters. That way you can control multiple lights and motors from a single remote.

While these tiny RF modules are cheap and easy to use, they do have significant limitations.

Most of the cheaper versions are "non discriminating" transmitter/receiver pairs. You cannot assign a specific transmitter to a specific receiver. So you can simultaneously operate 10 receivers with a single remote. But if two people have a transmitter, both people can operate all the receivers.

They send simple on/off signals to the transmitter to toggle the output lines. You can control one or all of those four outputs. You can wire the outputs up to an Arduino and have it take other actions based on the state of the output. However, you cannot send complex data like serial text commands with them. You will need a more expensive RF transmitter receiver to do that.

Some only work from a few feet away, others have a decent range (several yards) under ideal circumstances, all certainly good enough for costumes, props and gags. But you won't be turning on your porchlight from a mile away like with the expensive models. I found that fiddling with the coiled antenna can give me a little extra range (or limit it to a few inches).

The receivers may have different ways of responding to the transmitter signals. Some only turn on while the button is pressed, then turn off once the button is released. Others turn on with the first press, then remain on until the same button is pressed. Others cycle through, they turn on a channel when the button is pressed while also turning off all the other channels.

My recommendation?
Adafruit has a good selection of key-fob style transmitters (1,2 or 4 button) and receivers (momentary, latching and toggling).

While Adafruit's versions are more expensive than knockoffs, they might be worth it to you. You know exactly how the transmitters and receivers work together, all the transmitters work with all the receivers, and as usual with Adafruit, you get excellent tutorials on how to wire, install and operate the equipment.

Plus, you can order some LEDs, motors and driver boards all from the same place. They even have a sound effects board that can be controlled with these remotes.

Both the cheap versions and the Adafruit boards are also available from Amazon


If you know how to read digital inputs on an Arduino, then your options expand exponentially. You can control the speed and direction of motors, change the color of LEDs and even control NeoPixel animations. With some MOSFETs, a driver boards or some relays you can control valves, pumps, fans, solenoids and servos ---- basically anything you normally control with your Arduino.

But this post is about keeping it simple and using only basic hardware and the simplest of electrical circuits. So pick up one these RF units and start building your own props and costumes.
Also find me on:
FACEBOOK -or- INSTRUCTABLES -or- YOUTUBE

Sunday, August 12, 2018

Blacklight (UV) NeoPixel LEDs

Adafruit just released UV Blacklight NeoPixels. I've been waiting on something like this for a while. I had figured the UV light would be added to the RGB configuration like their RGBW versions. But this is really cool because all three LEDs are blacklights so you have a lot of control over their intensity.

Now you can make your costumes and festival clothing glow in the dark. Your Halloween props or stage backdrops can really pop. And your model spaceships can emit eerie lights.


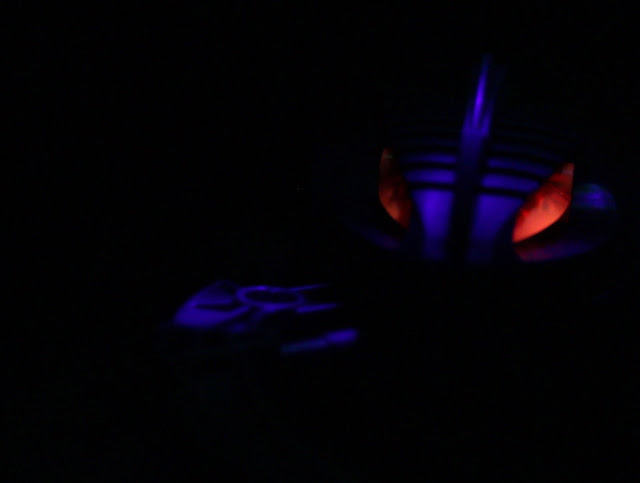
LEGO Bionicle glows with UV blacklight from Adafruit's Neopixels
Add some extra pizazz to your LEGO Bionicle or other models with Adafruit's new UV Blacklight NeoPixels.

I just finished making my own portable UV Blacklight out of an old flashlight (my INSTRUCTABLE), so I remembered how much fun blacklights really are.


Make those neon mesh costumes really glow in the dark at your next music festival.


And since they are Neopixels, you can control individual LEDS and create moving patterns. Combine these with traditional RGB NeoPixels and you've got quite a light show.

Also find me on:
FACEBOOK -or- INSTRUCTABLES -or- YOUTUBE

Monday, July 16, 2018

Color-Wheel for HSB and NeoPixels

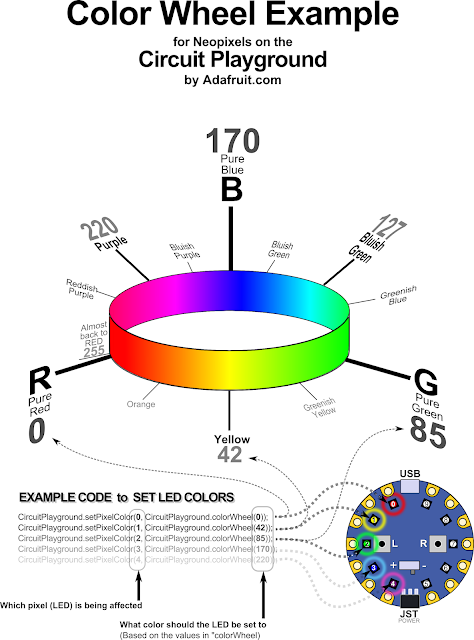
Here is a helpful color-wheel for using NeoPixels with the HSB color mode. I had to make a printable version when I switched from the RGB to HSB mode and thought I would share it here. I go into more detail on my Instructable for a visual tone piano.

HSB stands for HUE---SATURATION---BRILLIANCE and is just another way to represent the colors for NeoPixel code. I have used the RGB (red, green, blue) mode for so long the HSB mode threw me for a loop until I drew myself a picture of how it works.

I would have probably never used HSB unless Adafruit's amazing Circuit Playground board started using HSB as its beginner-friendly color mode. Now, Microsoft's MakeCode visual programming platform also offers HSB as an alternative to RGB. So I had to learn it.


HSB vs RGB color wheel space mode for Arduino Circuit Playground NeoPixels
Here's a helpful color-wheel showing how the HSB color space mode works with NeoPixels. The image also shows the basic code used to set the color on Adafruit's wonderful Circuit Playground Arduino board.


I have used RGB, CMYK and even LAB color spaces in Photoshop and Illustrator, but had always avoided HSB for some reason. So I originally felt that HSB didn't give me the precise control I was used to. However, after using it for a while I have come to like it.

Being able to set a basic color with a single number, and modify its intensity with a second (and third) number is a quick and slick method. I might not be able to get the perfect sick-acid-green or a eye-popping-pink-gold with a single color number, but honestly, I don't need to for most of my applications. The 256 mixtures of primary color duos gives me enough choices for most basic applications. And it's certainly simpler for beginners.


HSB neopixel color in Makecode for Circuit Playground
The free MakeCode online programming environment lets you play with HSB color mode. The model (upper left) shows the result of changing the values. It's a great way to try switching from RGB to HSB without even owning a board.

I was so used to mixing color in RGB and CMYK modes that I thought it was simple. Then I watched some new users struggle to make the color they wanted. It was painful just to watch and I remembered how confusing and complicated it really is. Suddenly, the HSB mode made perfect sense to use as the default color mode.

Basically, the HSB model mixes from:
  • pure red, 
  • adds some green to make yellow, 
  • then subtracts red to get pure green,
  • adds some blue to get blue-green,
  • subtracts green to get pure blue,
  • adds red to get purple,
  • and subtracts blue to return to pure red
The result is 256 hues and that's enough for most NeoPixel projects. The MakeCode environment exposes all three elemnts of HSB, so its a great way to quickly learn how to manipulate colors and intensity - you don't even need an Arduino, just used to online model and play with the values in code.


As an Amazon Associate I earn from qualifying purchases.
Shop through our Amazon links to help support this site.

Also find me on:

Sunday, March 18, 2018

DIY Blacklight made from a Flashlight

Remember how much fun blacklights are? I had totally forgotten until I made my own UV blacklight out of an old flashlight and some cheap LEDs. Now I'm running around shining the purplish UV beam onto every surface I can find.

At the same time, I modified another flashlight into a red spectrum night-vision-safe flashlight. Now I can see at night without blinding myself. It's great for night photography, stargazing and camping.

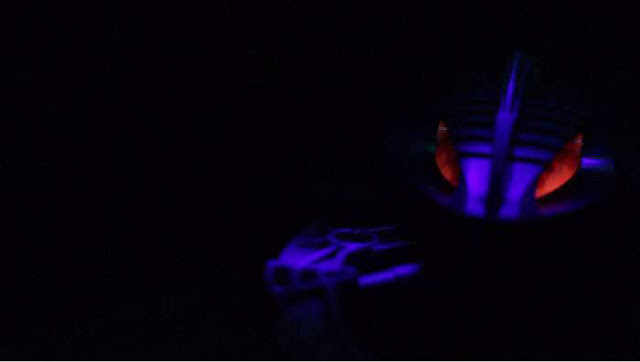
UV blacklight flashlight hack mod on LEGO
The UV blacklight really made the orange florescent eyes of this LEGO creation glow - and the silvery body looked pretty cool too.

The red LEDs created a handy night-vision saving glow. You can see what you are doing, even walk around on a moonless night without blinding yourself.


This turned out to be a very simple project, only about ten minutes of actual work per light. But it wasn't a straight path to the final product. Deciding what to make and how to do it took me a week, and filming it took a half day plus another hour after the sun set to get example shots.

I had a bunch of those pillbox style flashlights that are so popular right now. They're everywhere and you can get ones with dead batteries for a buck each. They have one big 20+ LED array of lights on the flat side and another, smaller 3-4 LED light on the skinny end. They use one button to toggle between on/off and the bright/dim settings.

These rounded box lights are super handy and I already have at least one of them at every work station, car and backpack. Then I got several more in a donation box and I started to get the itch to modify some of these excess ones into... into... well something.

My original idea was to use these new ones as light sources for my macro videos, like my teardown or jewelry-making tutorials. I hoped that I could combine several of the LED arrays into a single larger light-panel - maybe even put a dimmer circuit into the combined array to make a "real" video light.

But I noticed that each of the flashlights had a slightly different brightness level, or color (temperature) or a different coverage pattern. I thought maybe I was imagining it. But after opening a few of them I realized they were all different. They had different wiring and PCBs and different LEDs.

All that is no big deal if you're just using it for a flashlight. But using them as a video-light would create a blotchy, random light source - not what I was hoping for. I want a smooth, even and color correct light for my videos, not a random quilt of illumination.

I also realized that, even though they are blindingly bright as a flashlight, they were both too dim and too harsh for my needs. Even four of them combined didn't provide enough light to make a difference in videos except in the most close-up shots. It's astonishing how much light you need for high quality video.

With large, high quality, dimmable video lights available for less than $50 I couldn't justify making a version that wouldn't work well. If I'm serious about improving my videos I should just buy a good pre-made one and keep filming.

But I had opened all these cases and I needed to make something so I could feel better. I thought about making an IR version so I could use my phone camera as a night-vision scope. I have a few IR LEDs that I use for remote control projects. But when I tested them they were all too dim for the camera to see (unless pointed directly at the camera.) I can get the powerful illuminating versions of the IR LEDs very cheap, but I wanted to make something right now.

I do. however, have lots of red LEDs and some UV (blacklight) LEDs left over from previous projects. And I knew these LEDs were all 5v safe so they would work with the flashlight's 4.5v (with inline resister) without further modifications. I decided to replace the small 4xLED strip with my own LEDs. That way, I still had the big 20xLED white light to use as a flashlight. And the four LEDs for something else.


I cut out the existing strip of LEDs and arranged the new LEDs into a parallel circuit, then soldered them together using the long leads already on the LEDs. It's one of the simplest and oldest ways of making a circuit.

And it worked!!! In fact, it worked really well. The blacklight makes objects glow from several feet away and the red LED version is bright enough to see the ground well on a moonless night, but is dim enough not to night-blind me.

I'm very happy with the results. I have several more of these flashlights and I'm thinking of buying some of those strong IR LEDs to make a true night-vision illuminator (torch). And there is plenty of room in the case to include a small Arduino microcontroller. How about a variable speed strobe light, or maybe some RGB LEDs for making a custom light show.

I think I've found a great, inexpensive platform for experimenting with portable light sources, so stay tuned for more projects with these handy little flashlights.


As an Amazon Associate I earn from qualifying purchases.
Shop through our Amazon links to help support this site.

Also find me on:

Tuesday, January 2, 2018

Jewelry that Flickers and Flits with Pictures

Here's another way to add beautiful lighting effects to your jewelry. Tiny, inexpensive graphic screens are easy to embed in your projects. They aren't as bright and showy as LEDs like Neopixels, but they give you the ability to craft very customized light and color effects. You can animate them and even display images. And of course you can control them with an Arduino.


A really simple pattern adds a lot of visual interest to this millefiori piece. The pattern changes slowly over time to give the pendant a constantly transforming appearance. The light really helps draw the eye in dim lighting. If you don't want that, simply turn off the screen. You can create any pattern, animation or even image that you want and change them as slowy or quickly as you desire.

I'm going to use fused glass as an example again. I like to work with fused glass because it poses so many challenges and can have so many different forms. Each piece is unique and calls for a careful pairing of light.

And because fused glass is pretty all by itself, it's also challenging not to overpower the innate beauty of the material. Last week I posted about using a simple LCD light valve to add interest. That works well with semi-transparent glass.You can also use these tiny graphics screens to add patterns and lights to the same piece of glass.

However, I have struggled to find something that woks well with clear glass pieces. Nothing ever worked well in pieces that had areas of transparent glass. So I hauled out my LCD screen collection and tried some of them. I think this technique has some definite possibilities.


Both Adafruit and Sparkfun have a wide range of sizes and form factors for these types of screens. For jewelry, the "deck of cards" size is probably the biggest you would need for your largest statement pendant. I prefer the matchbook sized ones. I have played with the tiny thumbnail sized versions, but after getting diffused there isn't that much difference between them and a much cheaper LED.

Here are just a few of the screen sizes available. (That's a US quarter for scale)


There are a few things to remember when choosing a screen:

If you want to display actual images then you need to make sure the screen comes with an SD card slot so you can store the image or images.

Don't forget about the monochrome black-and-white versions if all you need is a gentle flicker. There are also versions where the entire screen can be any single color and you can draw in black.

The faster your microprocessor is the faster you can change the screen display. This might not be important to you. I can code and design animations well enough to get small chips to do what I need. But if you want to do fancy animations consider using a more powerful chip like the M0. With the Pi Zero, you could even play videos using the same screens.

You can use traditional tools like Photoshop or Illustrator to create your patterns and images. For people who don't code, this makes this technique much more accessible. You an also use code to draw over and manipulate images, so it offers the best of both worlds.


I will keep using the LEDs and NeoPixels for jewel based. big bling style projects. And the 3d printed jewelry actually needs all the brightness NeoPixels provide just to show through the plastic during daytime.

But the more I play with LCD graphic screens and glass the more possibilities I see. I've got several ideas, and the really neat thing about his technique is that you can leave the screen off to emphasize the beauty of the glass itself - or you can show any solid color, pattern, animation or image on the exact same piece.

In fact, the same piece of glass can be given a completely new "look" by changing what's on the display.

I'll post more images of my experiments soon, and I think I might need to start doing video just to better demonstrate the effects possible with this combo.


Also find me on: FACEBOOK 


Friday, December 29, 2017

Adding Some Dark Yin Yang to my Jewelry

I'm about to put some serious yin yang into a jewelry project. For years, I've put lights into jewelry, now it's time to put some darkness into the mix. Say what... ???

Well, not darkness exactly. But I can now block light on command thanks to new "light valves" from Adafruit. These light valves are thin glass sheets that can be darkened on command with a standard Arduino... think LCD screen or welding helmet, except the whole sheet darkens.

Why would I want to darken something, especially jewelry? I've put bright colorful LEDs onto every hat, scarf, shoe and bracelet I could find to make them sparkly. Why would I suddenly want to block light? It took me a while to find a problem for this solution, but I think I've found an interesting use case. What if you are working with objects that already have a beautiful quality of light?


Adding a dark background (upper half) completely changes to look of this piece of fused glass. The glass is so beautiful on its own that it doesn't need and LEDs in it. But changing how much light gets through the glass can affect the look of the entire piece. Imagine the background fluttering or pulsing between dark and light.  

A maker-friend creates lovely fused glass jewelry. The glass does amazing, wonderful things with light. It bends it and scatters it and refracts it. I've put lights behind these pieces of glass to great effect. But some of the pieces, especially the clear or nearly transparent pieces didn't work as well as I had hoped.

Translucent or heavily tinted glass diffuses the LEDs and creates a wonderful glow. But the nearly transparent glass always looked like I had just stuck some LEDs behind it, there was no magic or artistry. They looked cheap and tacky, a sad disservice to the beautiful glass work.

And the transparent glass really changes depending on the light that hits it, Some pieces look dark and nearly opaque in dim light, then turn crystalline and bright in sunlight. On a light background they look one way, on a dark background they look completely different.

What if I cold control the background, change it from dark to light, flicker it, fade it and pulse it? Well now I have a way to do that thanks to these new "light valves" from Adafruit. It's not as dramatic as an LED, but that subtlety is precisely the point. I've been developing ways to tone down LEDs for a long time, trying to make something a little less Vegas and more LBD evening gown-ish. Maybe the solution is to control the lighting effects from the opposite end of the scale instead. 

I just started this experiment, but I like some of the effects I'm getting so I'll post some of my successes and failures as I go akong (plus more about the light valves).

Stay tuned for updates.


As an Amazon Associate I earn from qualifying purchases.
Shop through our Amazon links to help support this site.

Also find me on:

Sunday, December 17, 2017

New Side Light NeoPixels make Complex Effects Easier

Adafruit just released a new "Side Light" style of NeoPixels with the LEDs perpendicular to the ribbon instead of parallel. This might seem like a simple thing to some folks. But for anyone who has tried to illuminate a circular or tubular object with a wash or raking style of light, this is amazing stuff.

Oh so simple, but so very helpful. Adafruit now has a 90 degree side light version of their Neopixels.


Until now, the LED strips always projected light away from the curved surface. The light went toward the viewer, not along the surface of the curve. So for the most part, we were limited to having bright strips of light shining at the viewer but not on the object. Now, it's going to be so much simpler to gently illuminate the surface of an object without blinding the viewer or requiring additional, often complicated reflectors to disperse the light.


We can finally throw a wash along a curved surface (LEDs at bottom) instead of projecting all the light out into space (top). 

In fact, these new strips negate years of my work (slight exaggeration) where I created reflectors and deflectors to control the light and bend it to go opposite the curve of the LED ribbon. And I'm not the only one, lots of makers have come up with their own solutions. After all, that's what makers do - we create solutions and have a lot of fun doing it. But I think we all knew there was a better way, we just never got around to creating it.

With cosplay and illuminated, glowing fashion becoming trendy and popular it was only a matter of time before someone came out with a manufactured solution. Adafruit popularized the addressable LED and made it simple enough to use that regular people could create with it. They named it NeoPixel and the world was never the same

Luckily for us, Adafruit is now working closely with Erin St Blaine, a professional costumer and performer. According to Lady Ada, the new Side Light style was initiated by St Blaine. While we amateurs tinkered and fussed to overcome the limitations of the basic NeoPixels, St Blaine spoke up for us and let the company know that she and other pros needed a simpler pre-made solution. And Adafruit responded. We amateurs also reap the benefits, yay us.

Right now, there are only a few configurations available in the side lit style, but if there is a good response I'm guessing Adafruit will expand the line. So come on folks, grab yourself a few of these strips and make something cool so we all get more options to choose from.

My project list for these new lights include:
  • Hat with the with a side-lit crown taper
  • Hat with a down light brim
  • Bracelet that throws patterned light on the arm
  • Skirt with a true down light
  • Cropped sweater with a real down light
Did you notice that all of these projects involve the human body as the subject of illumination? Well that's because the human body is basically a series of vertical tubes, Until now. we could wrap lights around the body so that the illumination projected AWAY from the surface of the body - basically creating a brightly outlined stick figure. But it was very difficult to illuminate the surfaces of the body without a lot of tricky workarounds. The always lights pointed away simply because that's how they were made.


I tried to work with illuminated clothes a few times with very limited and mixed success. After a lot of work and tears and carefully sewing in reflectors, the clothes still looked like they belonged on a Vegas stage. I had grand visions of creating decorative reflectors that looked like attractive and intentional embellishments, but only succeeded in making awkward boxes that looked like they were tacked on to hide the LEDs.

I love creating diffusers and reflectors for NeoPixels. ten hours of measuring, designing, printing and installing later and you've got yourself a nice project. But hey, now you can do a lot of the same thing just by using the appropriate strip of NeoPixels.

I, like so many others, defaulted back to EL-wire for light-up fashion. It's a lot less complicated, but much more limited than LEDs.

That's why I decided to stick to jewelry where it was easier to hide reflectors and such.  So I'm excited to re-try some of these failed fashion projects.

Other people seem really excited about making light-up signs and displays. It will certainly make that easier too. I'm also eager to try out mixing the two configurations to create a wall wash of one color with a center strip of another color.

Conclusion:
This is a face-palm simple upgrade that just required a large enough community plus a dedicated creator to speak-up to a responsive company. Now we all have a fantastic new set of lighting tools to use. I can't wait to see what everyone comes up with,


Also find me on: FACEBOOK 


Tuesday, November 21, 2017

Light-up Cosplay Boots may be happening

Both my hiking-boots and my work-boots completely wore out this summer. Cracked soles, popped rivets and split seams now make them useless for their intended tasks. However, their well-worn look gives them a lot of character and makes them good candidates for some sci-fi cosplay modifications.


I think it's time to revisit light-up shoe projects. Slap some LEDs or some EL-wire on those suckers and call the space-bound. I've already done lighting projects with tennis shoes and with high heels. But this time, it's going to be a little more industrial looking.

I might just add some glowing EL-wire panels to the boots and call it done,


I might keep it simple and just use some simple EL-wire or maybe some EL-panels. That's certainly easy to do. But of curse I have grand ideas about controllable light shows like in the summer blockbuster movies. I have some spare microcontrollers and extra LEDs in the shop that are taunting me from their dusty shelf.

And new products like the sensor laden Circuit Playground and the Bluetooth or LORA Feather boards suddenly make real interactive and controllable light shows possible for a reasonable price. My previous projects were limited to a few pre-set, repetitive light sequences and simple pressure-switches.

I haven't done any real designs yet, not even a single sketch - so I don't have anything to show you for now. However, I've done acceleration projects and sound based projects with the Playground, and my Bluetooth skills are coming along nicely. If I combine these with my old Neopixel controller code I might have a good start on some off-world footwear.

I still needed to refresh my memory on how these things are done - so I went back and re-found some of my favorite inspirational projects and tutorials. This time I decided to take notes and make an easy to use collection of helpful links and I thought I would share them here..


Most of the tutorials and guides I knew of all revolve around either sneakers or high heels. You know, normal everyday footwear - not the stuff of exo-planet explorers. But it's all I could find, so here's a list of my favorites to get you started:.

Sneakers and Tennis-shoes


Heels


Above and Beyond


Right now, I'm thinking some rack-mount headlights, some basic running lights and some sound reactive and acceleration reactive lights. Since these are boots, I can add some clunky control panels without destroying the lines of the shoe - big and clunky work well with boots.

If you have any ideas, images or tips to share for cosplay boots, please send them my way. I'll try to post up some progress pics soon.

Also find me on: FACEBOOK


Monday, May 22, 2017

Glowing Pendant - First Enamel Experiment


Trying to create a pendant necklace that glows during the day as well as at night. Finally found some basic techniques that work with my 3d printer and regular filament. It's far from perfect, but the first, quickly printed piece looks good enough that I will continue to experiment and refine the idea.

This is what the pendant looks like during the day. The NeoPixels light up the thinner areas quite well and show up even in bright, outdoor light. The "stringing" doesn't show up as much in real life, but it is present. I printed this at high speed with a thick layer height. If I print a more hi-rez version the stripes should be a lot less noticeable.


This first piece has a lot of experiments built in: How does thickness affect the amount of light transmitted, how does thinning the front, back or both affect the look, can I "trap" the light in the thinned areas, and how do two lights show up within one thinned recess?


I learned a lot on this first iteration. I won't bore you with the details, but I will note that the difference between a nice glow, a stringy mess and nearly opaque can be a matter of 0.01 mm. That's a pretty tight tolerance.

As you can see below, even at night, the thicker areas block the light quickly.

I will need to try out other filaments to see if they give me more latitude in thicknesses while maintaining the diffuse look.

Glowing pendant with Adafruit Circuit Playground inside a E-sun PLA cover
And here is what the pendant looks like at night with the LEDs at full strength. I think it's pretty, but you can also dim the lights easily. And since these LEDs are on board the Circuit Playground board, you could also get the lights to react to sound, movement, heat or just randomly.

You might have noticed the curving incised lines. They are very deeply cut, so they transmit more of the light. I wanted to see what they looked like. I had hoped they would create a gradient as they carried the colored light from multiple LEDs. It kind of works.

But there was also a second reason for them. I wanted to try embedding wire in them, then pour enamel paint (okay, cheap nail polish - same thing) in between the wires like a cheap, faux cloisonné.


I did a first, tentative experiment with the nail polish. I selected different colors, styles and brands to see how they affected the light. I did not select the colors for a pleasing composition - and boy, did it turn out ugly in the daylight.

But the nail polish does affect the quality of the transmitted light. Once again, the results didn't adhere to my predictions. Chalky does not block more light and sparkly daylight posihs does not sparkle at night, even when lit.

This shows the pendant at night after I added some enamel paint (aka nail polish). It does affect the colors and somewhat smooth's out the stripes. Some colors and thickness kills a lot of the light, so I will have to learn which brands of nail polish work for this project. Even though it's the dimmest area, the red dot at the lower left is closest to the affect I wanted to achieve.

The thickness of the nail polish does affect how much light gets through. But I was happy to see that almost all the paint can be applied thickly with no significant negative affects. That's great, because I really want to just pour the paint into the recesses and not have to struggle to get an even coat with a brush.

All in all, I'm very happy with this first try. Expect to see more about this technique in the near future.

I used the Circuit Playground board from Adafruit - get  it at Amazon.


Also find me on:
FACEBOOK -or- INSTRUCTABLES -or- YOUTUBE


Saturday, May 13, 2017

Throwing Light #3 - Masks and Gobos


Now that I know some basic ways to "throw" light (see Part 1 and Part 2 of the series), I wanted to explore how to shape the rays into specific patterns. To find out, I printed a quick (and sloppy) series of masks to test how they affected the shape and quality of light.

Like the previous experiments, I used the Circuit Playground board from Adafruit. I used the larger, deeper version of the 3D printed medallion I created in Part 2. The masks fit over the front of the openings in the light channels. I did not realize how much light would leak out from around the masks (as you can see in the photos) but the masks are enough to test some basic techniques.


The version of the medallion with a reflective interior (at right in the photo above) was not affected by the masks; it's almost useless. But the masks do have a pronounced affect on the raw black PLA version at the left.


The 3D printed set of masks (in red) sits under Circuit Playground board. The Medallion slips over the top of this assembly.
Surprises and Successes

I have played with masks and gobos for photography and stage lighting, so I sort of knew what to expect from the different shape. But the sizes and distances are so much smaller here that I expected some slight differences.

Most of the masks gave the expected results, but there were a few surprises:


The biggest surprise came with the "posts" mask. I printed one set of 1x1mm posts and a second set that was also 1mm wide but 4mm deep. I expected the deeper posts to cast the stronger shadow like it does in a large scale mask. Instead, the skinny 1x1 posts yielded the more precise shadows. I think this might be because of the small scale. The sides of the larger posts may reflect so much light that the shadow gets diffused from all the scattered light.

I was also hoping that the masks might be strong enough to shape the light from the reflectively painted version of the medallion. Unfortunately, the scattering overpowered the masks and there was negligible shaping from the masks.

SURPRISE!!! The skinny 1x1 posts actually created a stronger shadow that the deeper posts. I think the sides of the deep posts reflect and scatter too much light and negate the mask's shadow making. This is true even with the reflective version.

Bigger is better - sometimes. I wanted to see if a pinhole was large enough to create a visible ray -it was NOT!!! However, the larger round hole did emit a slightly shaped ray.


The vertical slot worked as expected, The diagonal slot worked sort of like I expected (a slight gradient) but it is the only shape that actually worked better with the reflective interior (see comparison photo above)

Aha, these worked exactly as expected. The "high slot" caused the beam to appear at a distance from the opening of the light channel.


Be sure to check out Part 1 and Part 2 of the series

Also find me on:
FACEBOOK -or- INSTRUCTABLES -or- YOUTUBE