Disclaimer and Social

This page may contain affiliate links. As an Amazon Associate I earn from qualifying purchases.

Tuesday, September 18, 2018

LEGO Mindstorms Motors with Arduino

Found a bunch of my old LEGO Mindstorms robotics stuff and realized that I could still use all the old motors and most of the sensors. The old versions of the motors (RCX 1 & 2) are just 9v DC motors so I can easily control them with an Arduino.

These old motors are super sturdy, reasonably powerful and the gearing makes them great for any hobby level robotics project. And of course, they fit into the entire LEGO ecosystem so they are easy to prototype with.

LEGO Mindstorms RCX motors can be used with an Arduino with Adafruit motor shield
Just a few leftover LEGO Mindstorms Technic motors. And I've got lots more Mindstorms and Technic parts, plus quite a few Bionicle sets. 

I stopped using the RCXs when the software and drivers stopped working on modern systems. I thought about buying the NXT or EV3 versions, but by that time I was already into Arduino or Raspberry Pi and couldn't justify buying another brain and motor/sensor package.

So the motors and other items languished in storage for years. But I wanted to find one of my robot chassis (still assembled after all these years) to use with some beginning roboticists. I was going to 3d print some adaptors for the cheap DC motors. But when I saw the old motors I realized I could just cut the LEGO connector wires and plug them directly into a motor driver.

Normally, I would just upgrade to newer equipment, but I have a dozen of these motors and several robot chassis and mechanical contraptions that are already designed ( and more importantly, already assembled) to work with this style of motor. Since the motors are designed to run on 9v (I remember running them at up to 12v without damage) so I knew they would work well with several of the Arduino motor drivers I already have. I decided to put these handy little motors back to work.

I chose to use Adafruit's Motor Shield. It can handle 9-12v easily and has handy screw terminals for attaching wires. And the well-written library makes it easy for new roboteers to program their creations. It gives you four DC motor outputs (or two stepper motors) as well as two servo ports. And it leaves the analog and digital inputs to use with sensors.


Put the shield on top of a UNO and they are about the same size as the old RCX, so they fit perfectly onto the existing robot chassis. Or use one of the new M4 powered UNO compatibles and have enough power and speed to run a full color touch screen display, Bluetooth, GPS and a 10 DOF sensor board. You could even get one of the smaller boards like a Feather or Teensy.

Compare LEGO Mindstorms RCX brick with the size of an Arduino and Motor Shield combo
The Arduino and Motor Shield are slightly smaller than the original RCX brick, so they can be substituted into any design that uses the old RCXs. And the motor shield gives you an extra motor port and the option to run the motors at higher voltages for that extra boot of power.

Hooking up the motors is simple. Just use one of the Mindstorms motor cable and cut the wire that runs between the two LEGO connectors. You will get two cables, one end with a LEFO connector and one with just wire. Strip a small amount of insulation off the wire. Attach the connector to the motor, then screw down the wires into any of the four ports on the motor shield. Use the LEGO motors like any other DC motor.

Just snip the wire between the connector blocks and attach them to the screw-terminals of the motor shield.

You could get fancy and tin the wire with solder, crimp a pin to the wire, or splice it into a breadboard style wire.

Now build a robot and code the Arduino using the library for the motor shield.

LEGO Mindstorms RCX motors running on an Arduino with Adafruit motor shield
You can run the old LEGO Mindstorms RCX motors using an Arduino and Adafruit's Motor Shield kit. The motors are simple 9v DC motors that are geared to be powerful and sturdy. Plus they fit into the LEGO and Technic universe, so you can build almost anything you can imagine.
For information about connecting to later LEGO Mindstorms kits check out:


As an Amazon Associate I earn from qualifying purchases.
Shop through our Amazon links to help support this site.

Also find me on:

Monday, September 17, 2018

Podcast Roundup 9-17-18

Here are some of my favorite podcasts found this week:


TRAPPED ON A SAND SPIT FOR YEARS
A reminder that perseverance and ingenuity can overcome almost anything... an amazing story.


JUST SOME MAKERS CHATTING
It's good to see (or hear) how other groups of Makers interact. Hint: it's not always about making.


THE SCARIEST MONSTER MIGHT BE US
A funny, irreverent look at the myth and story of Frankenstein, plus what it means to us as now.


Also find me on:
FACEBOOK -or- INSTRUCTABLES -or- YOUTUBE

Wednesday, September 5, 2018

Creepy Baby Head with Remote Contol

Dolls are creepy in general, and disembodied heads with fluttering long-lashed eyes give me nightmares. So what could be better to create a Halloween prop? Add some cheap remote control units and wait for the trick-or-treaters to arrive.

I was looking for hackable electronic toys at the local thrift store. The dolls were nearby. I couldn't avoid them. There were hundreds of them, strange limbless torsos and disheveled Barbies lying in twisted entangled piles.

One bald head --- just the head --- sat alone on the top shelf.

As I walked past it the doll's eyes fluttered, then suddenly snapped open in an unfocused stare. I freaked out... until I realized the vibrations from the nearby pillaging children were causing the eyes to operate. I was relieved and decided I had to have it. For 50 cents, how could I resist?

It turns out that the eyelids are on a pivot. A metal weight holds them shut or opens them depending on the head's orientation. However, the weights are so delicately balanced that any small vibration (or magnetic field) can cause them to flutter, or even snap open unexpectedly.

I needed to learn to control this frightening phenomenon. If I can control it, I take away its power over me. (And can frighten other people instead). A cheap RF remote-control, some motors and LEDs gave me some ideas.

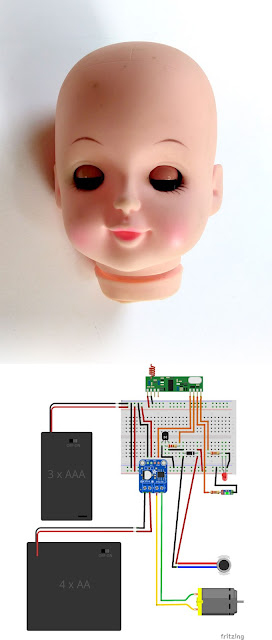
Creepy remote control glowing doll head
Schematic circuit diagram for making a creepy Halloween doll head prop with cheap RF remote controls. The LEDs cause the skull to glow. The small vibrator causes the eyes to flutter. The big motor was intended to make the head spin on a spiked pedestal, but I might replace it with an electromagnet to pull on the metal weights and make the eyes snap open suddenly.


I have posted about how easy these cheap RC units are to work with, but didn't include any real examples. So I worked up a quick breadboard example in Fritzing last night. I haven't hooked it up yet, so there are probably errors in the circuits (I just did the diagram to help me think about how to do the project). But it gives you a good idea of the kinds of things you can do with a $10 radio remote control.

The items used in the schematic are available from Amazon.


The doll-head's pale, unnaturally pink skin is partially translucent, so an LED causes the skill to glow eerily from within. I'm using red and green LEDs for a nicely diffused sick glow. I pull the power directly off the RC receiver's pins with a current-limiting resistor placed inline.

The small vibrator also pulls power from a receiver pin. I used an NPN transistor and protective diode to form a basic motor driver circuit. It causes the eyes to flutter (but not open) and is startling because, well, doll heads don't typically buzz and vibrate. (Or maybe they do, how would I know)

The big motor needed a driver board and extra batteries. I was originally going to put the head on a pedestal and have it spin. (Fun, fun, fun) But after working on a gearing system and stand, I started to think of other options.

Right now, I'm thinking about using an electromagnet to pull on the metal weights of the eyes. They should snap open quickly to great emotional effect. And the small ones only need about 5v, so the extra batteries and driver-board might not be needed.

I'll work on this and put an example out for some of my friends to experience. I'll let you know what happens.


As an Amazon Associate I earn from qualifying purchases.

Also find me on:
FACEBOOK -or- INSTRUCTABLES -or- YOUTUBE

Sunday, September 2, 2018

Simple RF Remote Control for Motor and Lights

Control a motor or lights just by clicking a button --- no microcontroller needed, no Arduino or programming required.

Sometimes you just want to keep things simple. Not everyone wants to learn how to code and configure an Arduino. With these handy little boards you simply press a button on the remote and the receiver module turns on an output to power your light or motor.

I have already found them useful for several types of DIY projects and am dreaming up more:

COSTUMES: Placing and wiring switches into your costume can be a real pain. With these you can turn on lights, trigger the smoke effects and start the radar dish turning with the click of a button.

GAG PROPS: Make a chair vibrate, cause the creepy doll head to rotate and eyes light up, or make the fake rat run around the table.

SUPER SOLAR YARD LIGHTS: Make a simple security or decorative lighting system that only operates when you want them to. No more coming home to solar lights that have run out of power when you really need them.

I even did a Creepy Remote Control Doll Head for Halloween... it glows and vibrates and its eyes snap open... all at the click of a button.

Adafruit 433 RF remote control transmitter receiver for DIY motor light prop costume gag
Adafruit's four-button RF transmitter (key-fob) and one of their four-output-line receivers. For about $10 for the pair you can control up to four different outputs with the press of a button. The receiver puts out about 5v on each of the outputs. With a few more components, you can easily control LEDs or even motors. Add an Arduino and you have an easy RF remote control for all kinds of projects.


If you know how to install a button and an LED or motor, you can get started for under $5. For a few dollars more you can get a four-output versions with a preassembled remote transmitter. For a few more you can get one to control 12-24 volt circuits or even 110/220 AC.

You can get 10x pairs of single-output receivers for $12. These are just the raw boards. You will need to put a trigger (like a button) on the transmitter and wire a light or motor to the output of the receiver. But for about a buck each, that's a cheap way to start.

For a little more money, you can get four-output versions with premade key-fob style transmitters. That way you can control multiple lights and motors from a single remote.

While these tiny RF modules are cheap and easy to use, they do have significant limitations.

Most of the cheaper versions are "non discriminating" transmitter/receiver pairs. You cannot assign a specific transmitter to a specific receiver. So you can simultaneously operate 10 receivers with a single remote. But if two people have a transmitter, both people can operate all the receivers.

They send simple on/off signals to the transmitter to toggle the output lines. You can control one or all of those four outputs. You can wire the outputs up to an Arduino and have it take other actions based on the state of the output. However, you cannot send complex data like serial text commands with them. You will need a more expensive RF transmitter receiver to do that.

Some only work from a few feet away, others have a decent range (several yards) under ideal circumstances, all certainly good enough for costumes, props and gags. But you won't be turning on your porchlight from a mile away like with the expensive models. I found that fiddling with the coiled antenna can give me a little extra range (or limit it to a few inches).

The receivers may have different ways of responding to the transmitter signals. Some only turn on while the button is pressed, then turn off once the button is released. Others turn on with the first press, then remain on until the same button is pressed. Others cycle through, they turn on a channel when the button is pressed while also turning off all the other channels.

My recommendation?
Adafruit has a good selection of key-fob style transmitters (1,2 or 4 button) and receivers (momentary, latching and toggling).

While Adafruit's versions are more expensive than knockoffs, they might be worth it to you. You know exactly how the transmitters and receivers work together, all the transmitters work with all the receivers, and as usual with Adafruit, you get excellent tutorials on how to wire, install and operate the equipment.

Plus, you can order some LEDs, motors and driver boards all from the same place. They even have a sound effects board that can be controlled with these remotes.

Both the cheap versions and the Adafruit boards are also available from Amazon


If you know how to read digital inputs on an Arduino, then your options expand exponentially. You can control the speed and direction of motors, change the color of LEDs and even control NeoPixel animations. With some MOSFETs, a driver boards or some relays you can control valves, pumps, fans, solenoids and servos ---- basically anything you normally control with your Arduino.

But this post is about keeping it simple and using only basic hardware and the simplest of electrical circuits. So pick up one these RF units and start building your own props and costumes.


Also find me on:
FACEBOOK -or- INSTRUCTABLES -or- YOUTUBE