I am putting some of my "paper on metal" jewelry back onto the sales tables for craft shows. I had saturated the market for this style last year. But after a recent show, I remembered that although a piece of jewelry might be a year old to me, it will be brand new to someone else. Plus I like some of these pieces, so they're going back on display.
I did a completely different style of jewelry this year (I even did a quick Instructable on the process). I can't stick with one style for very long. I know that's not very professional of me, but this jewelry making thing is just a way to blow off some creative energy when I get bogged down in my other projects. I like making jewelry, but I think it might be because I have no real stake in it.
In fact, jewelry is an area where I have no expectations of myself or the outcome. Most of my other projects are carefully conceived, extensively researched and planned. I have very precise expectations of the outcome. When I tried combining the two parts of my brain, I got poor results (check out the experiments I did with 3d printing, Arduino and jewelry - the detailed three-part series turned into
Disclaimer and Social
This page may contain affiliate links. As an Amazon Associate I earn from qualifying purchases.
Showing posts with label paper. Show all posts
Thursday, May 10, 2018
Will It Go Round in Circles - The Wash(er) Cycle
In the previous post I showed some of the paper-on-metal jewelry I've made. This post is about the process I used to create them. It's a pretty basic concept, but I like the results. I haven't played with it this year, but I just found some left-overs from last year and remembered how fun it can be.
I started using washers in jewelry projects because they are perfect sizes to cover NeoPixel rings. I started putting the bright NeoPixel LEDs into jewelry before I had a 3d printer. I liked the results and even published an Instructable on how I made one. As you can tell from the photos, I needed something to cover the NeoPixels with since they are so bright.
(I've also used washers in other non-jewelry projects like my welded washer bowl.)
Finding square and rectangular covers is easy, you can make attractive jewelry with a variety of materials. Squares and rectangles are also easy to cut or fabricate. But making perfect circles, especially concentric circles - well that's harder and often very tedious and time consuming. That's why I defaulted to washers at first.
I spray painted a few and used nail polish on others. When I added some bling the washers kind of worked as jewelry. But I still wanted something else, that little something extra. I kept seeing paper and cloth that I likes and kept wishing I could somehow get them onto the washer. But cutting them to fit would be a pain.
Then I remembered I had a craft cutter -Duh!!! - that's why I got the Silhouette Cameo in the first place.
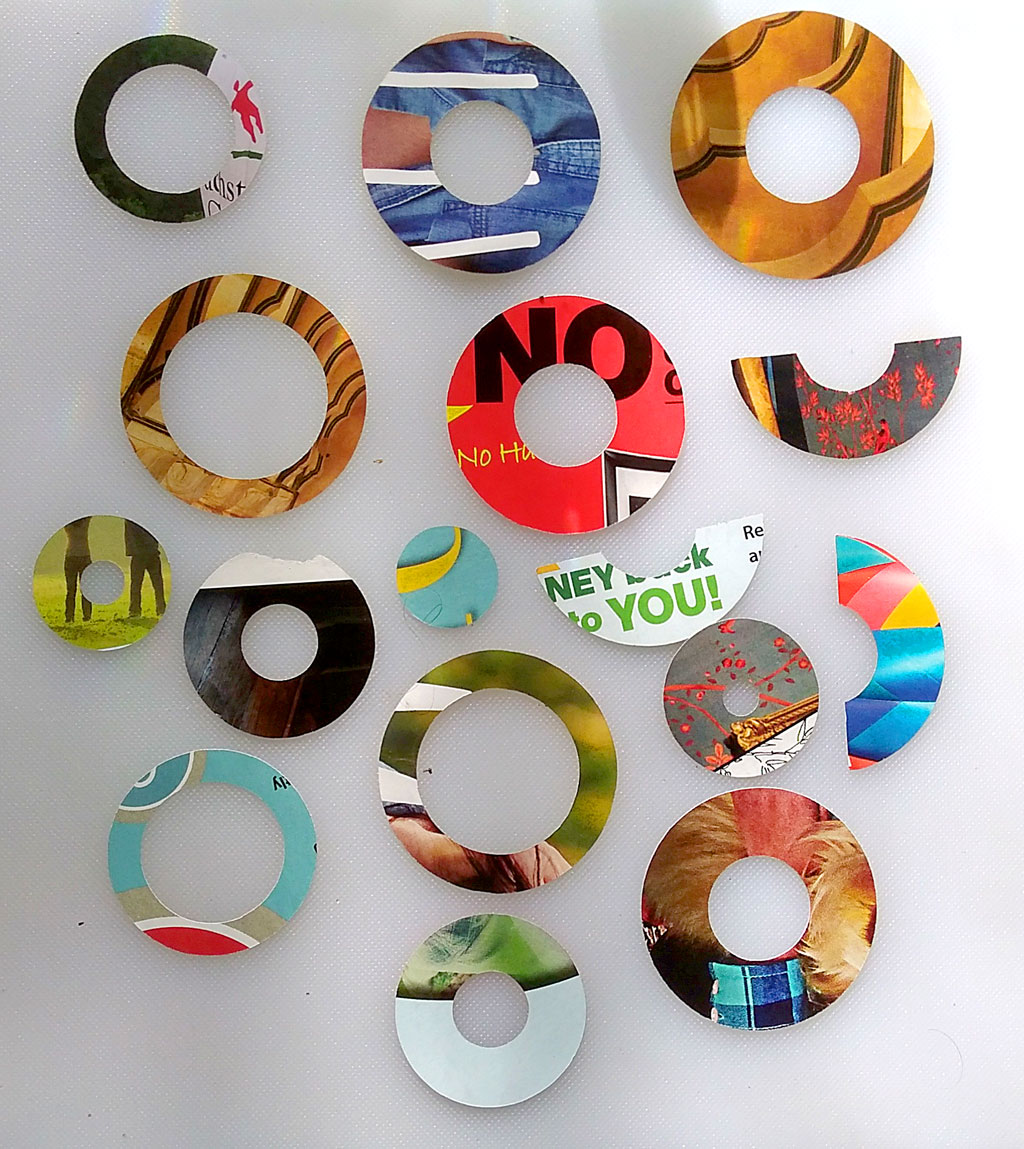
So I decided to make some paper circles with a Silhouette Cameo craft cutter machine (I so smart). I measured the washers and used those dimensions to draw circles in the Silhouette design software. I drew circles for several of the washer sizes. And I added some half-rounds, some offset and off-center versions as well. That way I have a variety of shapes to play with and overlay on top of each other.
It worked, a few minutes later I had a large selection of paper circles to use. I played with them for days. And of course I had to add bling, extra paint and glitter to some of them.
One thing I liked about this technique is the randomness of the result. You can use the design software to place the cuts exactly where you want. But letting the cuts fall wherever all random and weird, that gave me a treasure trove of chaotic suggestions.
I have a least several hundred paper circles left. I'm not sure how many more pieces of jewelry I'll create with this technique (at least for this year). But I wanted to document and share the technique before it got buried and forgotten somewhere in the studio.
Plus, now that I have a 3d printer I've started to play with creating custom shells for the jewelry, so I might not get back to this technique for quite a while.
I started using washers in jewelry projects because they are perfect sizes to cover NeoPixel rings. I started putting the bright NeoPixel LEDs into jewelry before I had a 3d printer. I liked the results and even published an Instructable on how I made one. As you can tell from the photos, I needed something to cover the NeoPixels with since they are so bright.
(I've also used washers in other non-jewelry projects like my welded washer bowl.)
Finding square and rectangular covers is easy, you can make attractive jewelry with a variety of materials. Squares and rectangles are also easy to cut or fabricate. But making perfect circles, especially concentric circles - well that's harder and often very tedious and time consuming. That's why I defaulted to washers at first.
I spray painted a few and used nail polish on others. When I added some bling the washers kind of worked as jewelry. But I still wanted something else, that little something extra. I kept seeing paper and cloth that I likes and kept wishing I could somehow get them onto the washer. But cutting them to fit would be a pain.
Then I remembered I had a craft cutter -Duh!!! - that's why I got the Silhouette Cameo in the first place.
| The Silhouette design software made it easy to create a template. Notice that I also included some half-rounds, insets and off-center parts. This gave me a lot of options to work with. |
So I decided to make some paper circles with a Silhouette Cameo craft cutter machine (I so smart). I measured the washers and used those dimensions to draw circles in the Silhouette design software. I drew circles for several of the washer sizes. And I added some half-rounds, some offset and off-center versions as well. That way I have a variety of shapes to play with and overlay on top of each other.
It worked, a few minutes later I had a large selection of paper circles to use. I played with them for days. And of course I had to add bling, extra paint and glitter to some of them.
One thing I liked about this technique is the randomness of the result. You can use the design software to place the cuts exactly where you want. But letting the cuts fall wherever all random and weird, that gave me a treasure trove of chaotic suggestions.
I have a least several hundred paper circles left. I'm not sure how many more pieces of jewelry I'll create with this technique (at least for this year). But I wanted to document and share the technique before it got buried and forgotten somewhere in the studio.
Plus, now that I have a 3d printer I've started to play with creating custom shells for the jewelry, so I might not get back to this technique for quite a while.
Sunday, May 14, 2017
(Cheap!!!) Grab-Bag Challenge: The Setup
"Make something cool from this $4 grab-bag of Michaels store discards, then blog about your results."
Now how could I turn down a offer like that, especially considering they both bought and delivered the bag of odd goodies for me?
I say it was "random" because the grab-bag was pre-made and sealed by the store employees. You couldn't tell what was inside the bag, but it weighed at least four pounds, so at $4 that works out to about a buck per pound of craft-store goodness.
The rules for the challenge are simple:--- Just make something, anything. As long as it uses stuff from the grab-bag. I accepted because, well, I am creative and artsy and all that... at least that's what I tell myself.
So I tore into the bag (literally, because I couldn't untie the knots) and discovered something shocking!!!
It was all... paper!!! Seriously, what can I make with paper products? There were no electronics, jewelry findings, metal, clay or anything else I usually work with. Oh, now I'm totally screwed, a failure, my feeble excuse for creativity exposed by the simplest of materials.
Luckily, my friend saw the look of dismay (terror?) on my face and, out of kindness, immediately amended the rules and added a clause that said I could add Electronics, 3d printing, CNC, lights, motors etc. - as long as I based the project on something from the grab-bag.
Whew, good save --- maybe I can do this after all.
As you can see, there was a lot, and I mean A LOT of stuff inside that bag. After the initial terror subsided, I even began to see some items I could use ---- maybe, sort of --- even if they were made of paper.
Within five minutes or so I had pretty much recovered and gleefully started sorting my free loot into separate piles for the projects that were vaguely starting to form in my brain.
I'm not ready to commit to any specific project(s) yet, but are the items I've set aside for the first round of play. I would say I've got more of a "good feeling" than any real "plans" for these items - like I can see an idea shaping around them, it's just not fully formed yet.
Stay tuned to see what I come up with. I'm seeing some goth black, some burlesque, several lanterns and lights, and a superhero saga. I will be as surprised as anyone if even one of the projects turn out okay.
Feel free to drop me ideas about projects. That's not really cheating, and all my ideas come about paper projects comes off Pinterest anyways.
AND!!! If I can get some of you folks to take the challenge (you know you have some scraps laying around) then my friend might join in and post her projects from her own grab-bag. I think that's only fair since this is much closer to their traditional medium than mine. So grab those boxes and bags of discards and start creating.
Till next time, keep on making.
Follow @tangoofthegeeks
Subscribe to:
Posts (Atom)