Disclaimer and Social

This page may contain affiliate links. As an Amazon Associate I earn from qualifying purchases.

Sunday, April 28, 2019

Lightning Detection with Arduino

Summer heat and those amazing afternoon thunderstorms are already starting, so I'm thinking of adding a lightning detector to my DIY weather station. I've wanted a lightning sensor for a while, but they have always been expensive, tricky to calibrate, and had a bad reputation for hobby level users.

However, two things have changed this year and both make it possible for even an amateur like myself to connect a reliable lightning sensor to my Arduino - all for around $30 USD.

Lightning sensor detectors for Arduino DIY Weather Station
My DIY weather-station needed a lightning detector sensor for my Arduino base unit. Luckily there are several good options that are easy and cheap to buy and install.


First, vendors have recently begun selling reliable, easy-to-use boards based on the AS3935 detector chip. Even better, the supporting code libraries and tutorials are finally understandable to mere mortals. With that combination, I expect to see more options like this coming onto the market.

Second, I now know enough to hack into those cheap commercial lightning sensors, take the alert/alarm signals and feed them into my microcontroller - all without destroying the sensor. That might be simple for you, but it's a big deal for me.

(If you just want to watch the lightning strikes visit Lightningmaps.org or Blitzortung.org or make your own node at en.blitzortung.org/cover_your_area.php.)

Sunday, March 31, 2019

DIY Dremel Accessories made From Scrap Electronics

Just uploaded a video of the DIY Dremel Accessories I made with salvaged parts from printers, scanners and old CD/DVD players. I show several ways to use these parts to make sleds and jigs to improve your wood and metal projects.

There is an Instructable guide being made for the video that includes detailed build and design steps for making your own versions.

Video of the DIY Dremel accessories I made using salvaged scrap arts out of old printers, scanners and CD players.

If you have lots of old printers and scanners sitting around, or even old computers and boom boxes, there are lots of useful parts inside them. The guide rods and sleds, the motors and rails are all strong, sturdy high quality stuff that will provide smooth mechanical movements for free.

Be sure to check out the video on YouTube and leave a comment.


Also find me on:

Wednesday, February 13, 2019

Fusing Glass with a Home Microwave

I need to clarify something. I do NOT create the glass in my illuminated glass jewelry. A friend does the glass, I just do the special effects. So, I hand write all the code from scratch as well as assemble the electronics along with most of the bindings, frames and mountings. But the glass, the real center-point, is done by someone else.

microwave kiln fused glass with LCD LED animated lights jewelry
The glass was done by a friend, all I did was add the lights and code.
However, I do know something about the process and would highly recommend it as a fun craft, whether you intend to animate it, light it, or just play to the glass.

My friend uses a budget friendly version of glass fusing that uses a microwave safe kiln to melt the glass, not an expensive specialized kiln. Yes, that's right - you heat up glass to the melting point in your basic home microwave oven. The process itself is simple and easy to get started with, but the fun comes from learning all the tricks and techniques for getting the look you want.


Thursday, December 20, 2018

Mimic Springs or Gravity in Fusion 360

Use the REST option in combination with JOINTS and CONTACT SETS to mimic the effect of gravity or a spring-return action in your Fusion 360 designs. Now your cam-followers will actually follow the cam surface for the entire rotation, latches can snap back into position, and you can more accurately model the actions of your mechanisms.

WHY?
Sure, even without utilizing the REST option you can use contact sets and make one object push another object out of the way. But the moved object stays in the new location. It does not return to its original position. If a cam pushes a rod up, the rod stays up and never returns to its lower position. A latch pin can be pushed out of the slot, but it will not automatically slide into the locked position

But when the REST option is used, the object does return to its original position. The REST option basically tells Fusion to always return that object to its original resting position. The REST option works with all joint types, so you can create a self-centering joystick, a slide that returns to bottom, a spring-loaded pin or a combination.

I've always used this technique in combination with contact sets, but it does work with basic joints too. I use the contact sets to create the interaction between the objects, then create a resting position to make sure the moved object returns to the desired position when the contact set's influence ends. However, you can create a joint without contact sets, a simple pendulum for example, and the object will return to resting position when you release the mouse after moving it. (Note: This changes the way the "Capture Position" option works.)

gravity and springs in fusion 360 joints and contact sets
Use the "REST" option in the "Edit Joint Limits" menu along with contact sets to apply, or at least mimic, the effect of gravity or springs in Fusion 360 models and animations.


SETTING the REST POSITION:
  • Open the JOINTS folder in the object browser
  • Find the Joint you want to have a Resting Position
  • Start the "Edit Joint Limits" dialog by:
    a) Right-clicking and selecting from the menu
    b) or hover over the joint and select the icon to the right of the joint name.
  • Select the REST check box
  • When selected, an option to enter the location of the REST or "home" position appears
  • The type of value changes depending on the joint type (ex: sliders use a distance, rotating joints (revolutes) use degrees
  • I try to design the model so that the object's original or current position is the resting position. But you can enter any functional positive or negative value.
  • Notice that you can drag the object using the triangle-flag icon that appears
  • Click OK


Now, the "Rested" component will try to return to the home-position whenever the contact surface stops pushing it out of the way. The affect happens quickly, much like having a spring applied to it.

The REST option is an excellent way to model assembly joints, but it does have limits.
  • Objects do not bounce.
  • There is no decay, so pendulums return instantly to center instead of swinging in smaller arcs
  • There is no acceleration/deceleration.
  • There is no friction or speed options that I know of.
  • It does not deform modeled springs or levers.

So it's definitely not a full kinematics modeler and the interaction is very simple. But overall it's a very useful technique that is worth remembering.

Check out all of our Fusion 360 Tips, Tricks and Tutorials


As an Amazon Associate I earn from qualifying purchases.
Shop through our Amazon links to help support this site.

Also find me on:

Wednesday, December 12, 2018

DIY Passive Solar Snow Melter

I had some leftover aluminum cans that I had spray-painted black for my DIY passive solar heater projects. When an early snow storm hit I decoded to do some experiments, more out of boredom that hope for results.

To my surprise, the aluminum cans had a significant melting effect. The first day I just tossed one on the snow without plugging up the vent holes. It worked well enough that I gave the idea some more thought. The next day, I plugged the holes and the results were much better.

The cans melted the snow so well they almost disappeared into the snow, which probably blocked most of the sun and decreased their effectiveness.

Melting an extra inch to 1-1/2" of snow on a 40 degree day seems like enough of a success that I might explore the idea even further.
black spray painted aluminum cans used to melt snow with a passive solar heater
With just three aluminum cans spray-painted black and plugged up with a napkin, you can melt an extra inch of snow on a 40f day. Might be worth exploring the concept a little further.
I didn't invent the beer-can solar collector, there are lots of tutorials on Instructables. But I haven't found any information about using them to melt snow. So my ideas need to be tested before I write any kind of tutorials.

First, I will need a lot more than three cans to melt much snow. Think hundreds of black aluminum cans.

Second, I need to cover the top so I don't lose so much heat back to the atmosphere.

I need a way to quickly deploy them and then put them back in storage. But enough cans to clear a walkway would take up my entire shop.

So right now, I'm thinking it might be better to duct the heated air from a traditional solar collector box and direct it under the walk or porch or driveway. That seems like a lot of work though.

But what if I knew the snow was coming and could attach a flexible plastic duct, almost like one of those dancing air-filled figures at the car lots but with internal bumps like bubble wrap to insure separation of the membranes and some air circulation.

I'm too tired from shoveling the driveway right now to give it much thought. But I am intrigued.

If you've got any ideas feel free to drop me a comment.


Also find me on:

Saturday, November 24, 2018

10 Gifts Under $10 for Makers and Crafters

Here are ten, inexpensive stocking stuffers that will please any tinkerer or maker. They are all small but very useful, the kind of thoughtful gifts everyone needs but not everyone would buy for themselves. Better yet, they are the kinds of items every maker would be grateful to have duplicates - one at each workstation.
top 10 gifts under less than $10 stocking stuffer for makers crafters
A guide of the top ten inexpensive gifts for makers and crafters. All these stocking stuffers are under $10 and all are the types of useful, thoughtful presents that every tinkerer needs at least one of, and would not mind a duplicate.


Monday, November 19, 2018

Putty, Primer or Paint - Finishing 3d Prints

I am learning how to smooth and finish 3d prints so I can cast molds from them. With single use prints I never needed to do more than a light sanding and maybe some paint. But when you start making expensive silicone molds from them, and then making multiple copies, well you want the printed object to look good. Having a hundred copies of a defective print isn't cool.

I did a lot of research and got lots of conflicting advice about what is the best way to finish prints. So I tried a lot of different materials and came to my own conclusions. I decided there is no one best solution, and I need to use the appropriate tool for the job. Jeesh, I should have known that to begin with. I use different hammers and saws for jewelry, carpentry and demolition - why would post processing 3d prints be any different?

Most of my prints are in PLA. So I do a lot of sanding - a LOT of sanding - then more sanding. Unfortunately, the sanding process removes so much material it also changes the dimensions and contours of the object. So now I'm learning to put back material after I sand.

In fact, all of these materials seem to actually increase, not decrease, the amount of sanding I do.

I still don't know much about the finishing process, but I wanted to post a little about my current preferences in materials. I think of these materials as falling into three categories: Putty, Primer and Paint. Each has its advantages and disadvantages, and I'm starting to use more than one material on a print to get the results I want.

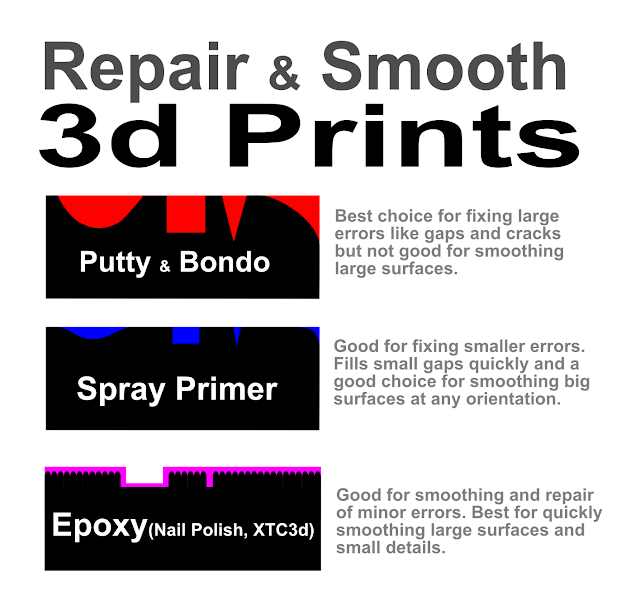
PUTTY: I call it putty if it is so thick that I have to spread with a trowel. Anything that sticks to PLA, does not shrink when it dries and is sandable to a smooth finish is okay for me. Bondo, epoxy putty, spackle, wood putty all seem to work. I mostly use putty to fill in large gaps, joints or depressions. I do not use it for smoothing large surfaces. It is also good for making detailed creases, folds and sharp edges. If you have lost the sharp corner due to sanding, putty can help get it back.

PRIMER: I mostly use spray primer. Regular, sandable auto-body primer is fine. It covers large areas quickly and can be sanded to a smooth finish. It can cover medium sized gaps and cracks. But it tends to float on top of small cracks, not sink into them. You can hide print lines quickly, but it does change the dimensions slightly. This is my favorite for large surfaces.

PAINT: On really good prints I can paint-sand-paint a good finish quickly. Auto body spray paint works well. However, I also use nail polish as paint, especially in highly detailed areas. And the XTC 3d product works very well. Even when I use putty or primer as the first coat, I often finish the print with a final coat of paint.
finish 3d prints with putty bondo spray primer paint epoxy nail polish xtc 3d
Every material has its own advantages and disadvantages. Putty fills big gaps but is bad for fine fishes. Spray primer covers large areas quickly but tends to ride on the surface without really filling the gaps. paints and epoxies like nail polish or XTC 3d are great for quickly covering print lines and for final finishes. Don't be afraid to combine the materials - and there is still going to be a lot of sanding involved.


No matter what you use there will still be a lot of sanding involved. And the techniques I use to make a master cast for molding might not be durable enough for something like a toy or case. But that's really why I'm starting to learn how to cast copies - durability and quick production.

I will post more about each of these materials as I learn how to use them better. I just wanted to post this to let people know you can use more than one material, there is not one perfect works-for-everything solution. Also, you can combine materials on the same project.

Right now, I'm experimenting with thinning nail polish and epoxies for "self leveling pours." I'm starting to get good results, and if I get it to work consistently I will definitely post about that.

Also find me on:
FACEBOOK -or- INSTRUCTABLES -or- YOUTUBE

Wednesday, November 7, 2018

Simple DIY Low Pass and High Pass Filters

I needed a simple way to filter some sound effects and pass the bass notes through to the next stage of the project. I could resample the sounds in software, or pass it through a through a commercial module. But I needed something small, simple and cheap - preferably something I could build myself and put on a breadboard as part of the project.

Found these two videos from Afrotechmods on YouTube. He always does a great job of explaining electronics, and these two videos gave me the info I needed to start designing and building my own low pass filters.


These are the simplest, passive style filters, But their simplicity is just what I needed, just cut off the treble and keep the bass, no need for an equalizer with sliders, no power supplies etc. Just two components per filter -  a resister and a capacitor - my kind of circuit.

 There are more detailed tutorials, like humanharddrive's, but these two videos gave me what I needed to start researching.

Also find me on:
FACEBOOK -or- INSTRUCTABLES -or- YOUTUBE

Friday, October 19, 2018

Luer Lock - Applicator Tips and Dispensers Have A Name

Those precision applicator tips for glue bottles, syringes and dispensers have a name. They are called LUER LOCK, or at least that's the famous brand name. (affiliate) Just searching for the name gets me better results for tips and bottles and syringes.


I used them all the time in college, but never knew their name until now. When I was making architectural models I used them to apply thin streams of glue to the foam-core walls and cardboard roofs. The precise tips let me get clean builds easily. Several shops in that town sold them in a variety of sizes. But it was a college town, so they sold hundreds every semester and the clerks knew what I was looking for when I described the tips or task that I needed them for.

When I moved to a non-college town, I could never find them. I asked for them, described them and offered to buy a case if the store could find them. But all I got was weird looks. Looking for "large bore syringes" or "applicator nozzles" on the net got me no closer. I thought I had Amazon, Ebay and Google trained well enough they would give craft-related items automatically, but no...

Then I forgot about them for years because I worked my way out of internship and because I also moved on to 3d printing and CNC. I no longer needed to do paper and foam mock-ups.

Recently however, I found Eric Strebel's excellent YouTube channel. He does wonderful tutorials on traditional model making and mock-up techniques. I started watching for the feel-good memories but kept watching because the techniques are still useful.

One of his videos described his favorite tools and LUER LOCK dispensers were one of them. (affiliate) So, I made a note of the name and wrote this blog post so I won't forget and because maybe you might find them useful also.

You can get adapters for existing syringes or as complete packages in a variety of sizes.


As an Amazon Associate, I earn from qualifying purchases.


Also find me on:
FACEBOOK -or- INSTRUCTABLES -or- YOUTUBE

Tuesday, October 16, 2018

Skin Safe Silicone Rubber for 3d Prints

I needed to find some skin-safe and food-safe silicone casting material for my projects. I knew about a food safe silicone putty for making chocolate molds, but it wasn't sturdy enough to make cases and jewelry with. If I wanted to make wearable electronic sensors and jewelry, then I needed to find a pourable liquid version that would be safe to wear next to the skin for hours.

Sure, I can design and 3d print a case - been doing it for a while. But the surfaces are rough, they aren't very flexible, and I don't trust the plastics. I've read too many stories about rashes and reactions to mystery plastics. I wanted something that I could wear and that I felt safe giving to other people to wear, something that wasn't rough or toxic or irritating to the skin.

Think of Fit-Bit cases, Swatch watchbands, Croc shoes or even that Cosplay costume that you wear to every convention. I'm okay with a few VOCs and weird plastics touching my skin occasionally. But if I'm going to wear a product all day, seven days a week then I want to know it's safe. And I want my customers to be safe. So, I did some research and wound up finding the same company I've used for years.

I've used Smooth-On casting plastics for years, (affiliate) but I found out they also make a huge line of other products including a wide selection of food and skin safe silicones. They all have special characteristics that make them good for wearing next to the skin and some for making food with. And they all make good molds for casting resin in, so I could always use them for producing other items.

So, I made a quick list of the various food/skin safe materials (NOTE: Food-safe and Skin-safe are not the same thing.)

Thursday, October 11, 2018

You Might Be An Old Drafter If

You might be an old drafter if: 
  • You remember the sounds of singing cables and pneumatics at crunch time
  • You can tell if it was a triangle or a compass being put down just by the sound
  • You nostrils still burn when you hear a vent fan come on
  • You remember dry fingers from folding binding strips for doc sets
  • You have scars from 2" staples from the same doc sets
  • Ever used a Sweets volume as a doorstop
  • Ever been tearfully grateful to both Ramsey and Sleeper
  • You still twirl your pencil
  • Still have a strong opinion about plastic vs paper
  • Saved your faulty Rapidographs for rendering
  • Felt both fear and joy when watching a large format plotter work for the first time

You might be an old drafter if

Also find me on:
FACEBOOK -or- INSTRUCTABLES -or- YOUTUBE

Friday, October 5, 2018

Find Retro Forrest Mims and 500-in-1 Manuals

Just found a great site that has the manuals from a lot of the 500-in-1 Electronics kits from Radio Shack. They bring back a lot of pleasant memories as well as frustrations.


I owned one of these kits twice, once as a very young child and then a second time after college. I was too young the first time and there was no one to help me troubleshoot the circuits. Anyone who has spent hours debugging a breadboarded circuit only to find out they have one resistor leg in the wrong slot or two leads touching can relate to my frustration.

I did learn a lot, but I would have learned more if I had been mentored in how to track down errors and correct them. The successes were sweet, but I had too many failures and I could not dependably make a circuit work, so the kit went into deep storage.

Radio Shack 500-in-1 electronics learnig lab kit manual
Yes I still have one of the manuals that came with my Radio Shack 500-in-1 Electronics Lab kit. I don't use it very often but the circuits are still valid today.


But the seeds for electronic tinkering had been planted. When the whole Arduino (and LEGO Mindstorms) thing exploded onto the scene I bought a second kit from Radio Shack. This time it went a lot better for me. I knew more about troubleshooting, both because of my experience with software design, and because I knew a few tinkerers who helped me identify the most common breadboarding errors.

I never went much beyond making basic sensors for my robots and UNOs, but exploring the wide variety of circuits helped cement some core concepts in my brain. These circuits are still fun and it's great to have them all in one place. Some days I don't feel like coding, so a nice, simple, all passives project might be fun.

They also have a lot of the Forrest Mims notebooks. These classic booklets started many a child's (or adult's) electronics journey. Still classics and still referenced by lots of people as inspiration. You might not know Mims work, but the people who run the companies you buy your kits from will know his name, and may (like me) still have an original booklet.


Also find me on:
FACEBOOK -or- INSTRUCTABLES -or- YOUTUBE

Wednesday, October 3, 2018

Tricked by Trigonometry

HYPOCRITE ALERT: I just wasted half a day of my life trying to code basic kinematics without making a single sketch, note-to-self or pseudocode. Bad idea!!!

Yet I blather on about planning and thinking ahead on this blog all the time. In my defense, I was figuring it out as I went along, watching YouTube and reviewing basic trig functions. I was doing okay until I hit a wall at the third joint and realized that I was still trying to base my calculations on the first joint because my brain was so muddy I was just blindly copying code instead of thinking about it.


I took a nice long break then came back and sketched it out complete with names and arrows and reminders. My brain might be mush, but paper and pencil are eternal.

Also find me on: