Disclaimer and Social

This page may contain affiliate links. As an Amazon Associate I earn from qualifying purchases.

Sunday, February 18, 2024

Orange Peels in DIY Home Decor

I accidentally recreated a 70s crafting fad. And I want to do it again, only this time on purpose. I used dried orange peels to make a coaster, some trays and a lampshade. The technique is much older, probably ancient, but I learned it from a faded "how to be a proper hippy" crafting book.

Two oranges had been left in my refrigerator's crisper drawer for way too long. You know those flavorless, dry, stringy oranges that you don't want to eat, but feel bad for throwing out so you save them until they are too wrinkled to eat? 


Dried orange peels holding beads
The tray and bowls are made from dried orange peels. The rinds are hard and leathery, so they are sturdy enough to stand on their own. But they are so small, they can only hold a few beads.

Saturday, February 10, 2024

Leather Stamp Alternatives

Our craft club just started working with leather. A handful of us are making our very first leather wallets and tool holders. Even though we have no idea what we are really doing, we started happily crafting away.

When the other members saw us, they were inspired to also try their hand at leather work. They weren't ready to cut and punch and stitch. But stamping their initials onto blank coasters appealed to them. Luckily when we made our initial leather purchase, we included a pack of coaster blanks for just such an event.

However, we hadn't purchased any stamping or carving tools. We thought our basic collection of bevelers and punches would be all the tools we needed for at least a few months. Although stamps and carving tools are not very expensive, we had just made a large purchase, and nobody wanted to spend more money right away. 

We'll likely purchase a set or two of "real" leather stamps (affiliate) in the future, but until then, we are having lots of fun finding alternative ways to make impressions on leather. A few of us had played with leather enough to know that you can make a mark or stamp it with objects we already had around the studio. The other members thought we were crazy, thought that you had to have the exact leather-specific tool in order to get good results. But us old timers gathered some items and proved to them that you can get good results using tools intended for other uses.

Everybody was happily surprised with the good quality of the results. But the combination of initial disbelief and eventual embracing of these alternative tools convinced us a blogpost was warranted.

Friday, February 2, 2024

First Leather Purchase

When our crafting group started leather work, we had no leather and no tools. We had to research and make a lot of decisions about which leathers and tools to purchase. We got a little overwhelmed with all the tutorials and new information. It took us a couple of weeks to make a decision, but eventually we placed our first order.

After realizing that we all wanted to make different kinds of projects, it was apparent that we would have to buy a selection of leather types, finishes and colors. Luckily, all of our projects were small. We all wanted to try something simple before attempting a luxury handbag or jacket. Our plans were to make standard beginner projects, things like a wallet, a tool holster, valet tray, bracelet or a drawstring pouch.

Basically, we needed a sample pack of the standard types of leather:

  • Something thick and durable that could be tooled, formed and used as a structural element.
  • Something a little more supple, already finished, but still thick and durable.
  • Something thin, with a variety of colors to make linings, covers, and flexible pouches.

That didn't narrow it down much, but just being able to define and articulate our needs was an accomplishment. We continued to refine our needs. Read about our decision-making process below or check out what we wound up buying and get something similar. 


Friday, January 26, 2024

Old Shoe Leather for Crafting

Q: Can you use old shoe-leather for crafting?
A: Yes, if you don't mind rough, rustic and simple.

Q: Is it worth it?
A: No, not financially, but yes if you have an emotional attachment to the idea.

Q: Have you ever actually done it?
A: Yes, and I got a good story for my trouble.

You can definitely cut up your old leather shoes and use the leather in craft projects. But if the shoes are so old and worn out that you are willing to sacrifice them, the leather is probably old and dry, scuffed and cracked and generally not very pretty. Plus, it's time consuming to disassemble the shoes, the amount of leather recovered is minimal, and you'll spend even more time reconditioning the leather into a workable state.

But if you have a deep-seated need to use every scrap of resources, there are a few projects where old shoe leather is appropriate.

Wednesday, February 15, 2023

Heart Shaped Box

"The passion play is over, the stage an empty box. The actors washed their faces, the guests all headed home. Memories of laughter and applause fade quickly as you sit in silence, smiling but alone."

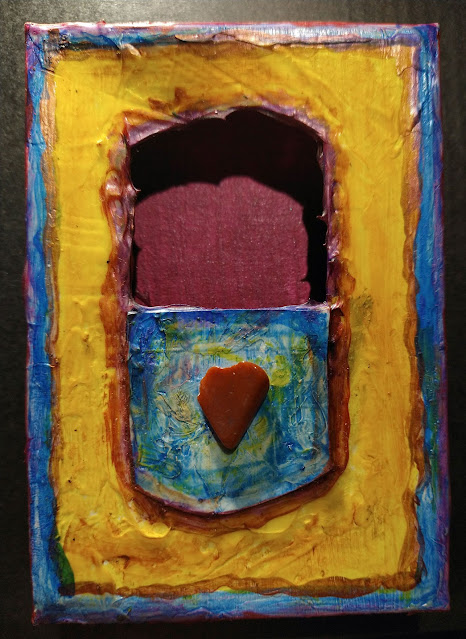
Found this "Altered Art" box the other day. It must be at least 20 years old. It had a completely different meaning for me when I created it. But trying to explain it seems silly now, so I went for the cheap thrill instead. Even I'm not jaded enough to post it on Valentine's Day though, so I waited until the day after.


Altered art box with heart shaped stone and painted surface
Made this "Altered Art" box at least twenty years ago. I did a whole series of these boxes as a way to blow off steam and express myself after working in a stressful, detail-oriented day-job. They helped me loosen up and, as you can tell from the sloppy finish, stop worrying so much about every little step of the process. Guess that was important somehow because I have saved several of them for all these years. And they have a different meaning to me every time I find them.


Sunday, January 29, 2023

Staggering Perfection

It was perfect. I had defeated the urge to be normal, taken the doors off a cabinet, and found a way to fit more storage containers on every shelf. The containers fit snugly together, the edges of their lids barely kissing. The stacks of identical standardized containers were very pretty and neat. I felt organized and smart.

Storage containers stacked tightly together
The storage containers stacked neatly onto the shelves with their lids just barely touching. It was pretty and perfect.

Then I tried taking one of the containers off a shelf, just one, and all the beautiful oragnization collapsed into a mess of random boxes.

Saturday, January 7, 2023

unSCREW the Rules

As a rebel and freethinker, I fearlessly mod, hack and repurpose everything that comes within easy reach. So, when I found myself hesitating to simply remove one unneeded part from a donated piece of furniture, I had to ask myself why. It gave me some insight, not very deep but still an insight, into how the minds of normal people work and how that discomfort can control their ability to mod, hack and repurpose disposable commercial items.

Monday, December 12, 2022

Smoke That Alarm

I just spent six hours on a frustrating search-and-destroy mission. It started when I awoke an hour earlier than usual to the beep of a smoke alarm with a low battery. The beep wasn't very loud, and it only chirped once every ten or fifteen minutes. But it was enough to prevent me from falling back asleep. So, I sighed, flung the covers off and stumbled to the kitchen.

Photo of smoke alarm with hammer and batteries. Shows frustration about changing batteries.
I never actually hit this, or any other smoke alarm with a hammer. However, the image does illustrate my frustration at trying to change the batteries in multiple smoke alarms that all seemed to be beeping at me all at the same time.

As I was making coffee, the alarm beeped again. Luckily, it was the kitchen alarm located directly above where I was standing - or so I thought. The beeping already had me so on-task that I replaced the battery before the coffee had finished brewing, As I poured myself a large mug of magic elixir, I congratulated myself on accomplishing an onerous task before I had even had my first sip of coffee. I was on point, and it felt good, surely a great start to a productive day

That should have been my first hint. Never, ever do anything that even remotely resembles thinking or deciding before caffeination. As I trundled towards my morning sipping and contemplation spot, it beeped. The new battery had not worked.

Sunday, April 3, 2022

Tool List for Cricut Maker

Our MakerSpace got an almost new Cricut Maker machine. But it came without the tools or mats, so we had to figure out how to provision it. Since the Cricut brand machines are new to us, we wanted to start with all original Cricut Equipment.

Basic Starter Kit:

We didn't fully understand all the different options, so we opted for Cricut's official Starter Bundle basic toolkit. (affiliate) It seemed like it had all the required tools and materials and we seemed to even save some money over buying each tool individually. 

The bundle includes a Fine Point tool and blade, a Deep Cut tool and blade, a Bonded Fabric tool and blade, plus a 3x mat selection and marking pens. Add some transfer-tape and you can start working with a huge variety of materials right away.


Transfer Tape 2-pk (affiliate)

Fine Point Tool w/Blade plus some Replacement Blades (affiliate)

Deep Cut Tool w/Blade plus some  Replacement Blades (affiliate)

Bonded Fabric Tool plus some Replacement Blades (affiliate)

Scoring Stylus (affiliate)

Friday, February 12, 2021

Sweep Command Twisting and Path Placement in Fusion 360

Fusion 360's Sweep command has a "Twist" option. The Twist option rotates the Profile as it travels along the Path. Using the Twist option can create useful shapes that would be difficult to create with any other tool. It can also create odd but interesting shapes that are great for decorative flourishes.

Although these shapes have few applications in basic mechanical design, they are seen frequently in ornate architectural columns and facades.

Fusion 360's Sweep with Twist command can produce amazing and complex shapes like spiral columns, springs and coils with just a few clicks. However, understanding where to place the path and profiles to get the desired effect takes some understanding as well as a bit of practice.

You can radically change the result of the Sweep/Twist command just by changing the location of the Path in relation to the profile. A slight change in the location of the path can dramatically alter the result and produce effects like a double twist or springy coil. When the path is more complex than a simple straight line, the results can be very dramatic.


Fusion 360 Sweep command with twist aligning path and profile for different effects
A collection of possible shapes using the same profile and path. Only the location of the path changes between each example.

The shape of the profile can also change the result. For instance, twisting a circle along a centered path does not produce any noticeable twist. But when the path is set at the edge of the circle, the result is a spiraling column.

Tuesday, October 20, 2020

Remove Galvanized Coating with Vinegar

You can strip galvanized coating off steel using regular household vinegar. I saw a video that used muriatic acid and another that used citric acid. Muriatic acid only took a few minutes of bubbling and smoking to clean the metal, but it required rubber gloves, eye protection and a respirator. The citric acid took several minutes long with less bubbling and less protective equipment required. 

But I don't have either of those substances, so I wanted to see if I could use a weaker acid like vinegar to accomplish the same thing.

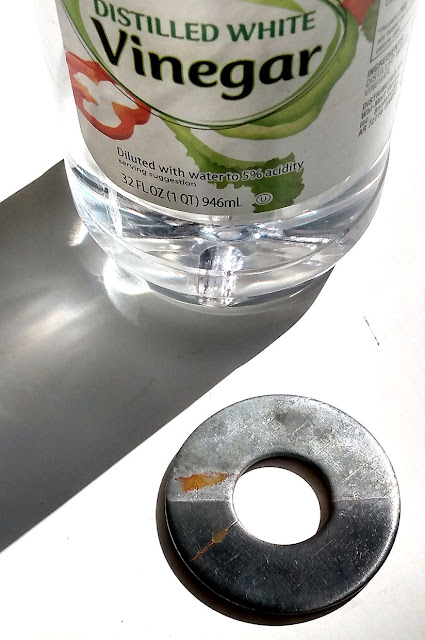
It worked. It took several hours instead of mere minutes, but it did work. Household vinegar removed all the galvanized coating off washers, nuts and screws down to the bare metal. And more importantly, I didn't have to wear rubber gloves or a respirator to use it.


Remove strip galvanized coating with vinegar acid
You can see the bare metal at the bottom of the washer. The top is still galvanized. All I did was submerge half the washer in regular 5% household vinegar for a few hours. This is a simple and safe way of making galvanized metal safe to weld and sand.


I already use vinegar for a lot of things, so I usually have a couple of gallons on hand. I use it as a weed killer, glass cleaner and rust remover. I use it to etch copper for my craft projects, and I've even made a circuit board by etching with vinegar.

Friday, September 25, 2020

Repair Stanley Fat Max Flashlight Reed Switch

After years of steady usage, my big powerful Fat Max rechargeable flashlight suddenly stopped working. I was bummed because it had been a dependable waterproof tool that had thrown a bright beam of light for a quarter mile or more; just the thing for checking the creek level during storms or to see what was making that noise along the fence-line.

The front lens and bumper screw off and the internal components slide out as a single unit. A plastic end is held in place with three screws. When you remove that end cap you can also remove all the internal components. 

I thought the rechargeable batteries had probably died so I took it apart to see if I could replace them. While taking it apart I accidentally triggered the light. It was still very, very bright. The batteries were obviously not the problem, so I started looking for for the real cause of the problem.

Thursday, August 27, 2020

Control a Bare LCD with Just an Arduino

Yes, you can control simple bare-bones LCD displays using just an Arduino. No driver boards or additional chips are required. If you have controlled a 7-segment LED display directly from an Arduino, you can do the same with an LCD. 

However, there are a few tricks to doing it correctly. It's easy really. But I was trying to do it with mystery, undocumented displays. As you might guess, much fun and hilarity ensued.

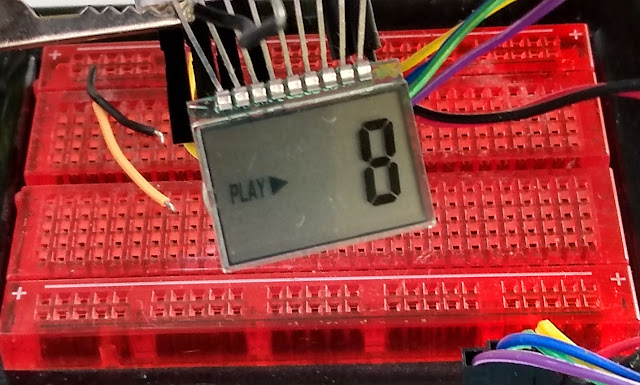
Power control and drive a bare LCD with an Arduino
This LCD is being controlled with just an Arduino. There are no additional chips or driver boards, just the bare LCD and an Arduino. The LCD was scavenged from an old CD player. It has a 7-segment display as well as icons and animations. Using salvaged LCD screens can lead to all sorts of surprises. This tiny display, with only nine pins, is actually quite complex to control. It has multiple layers of displays that are controlled by changing which pin you use as the common pin.


Why a Bare LCD

I have plenty of working LCD displays in all sizes and types. They are easy to hook up and simple to control with an Arduino. Why would I want to use a bare LCD instead? 

Well, because I have them and because I didn't know how to use them. It was a challenge.

Over the years I have scavenged a large collection of LCD displays out of broken electronic devices. They still worked when I salvaged them, but I had no idea how to