Disclaimer and Social

This page may contain affiliate links. As an Amazon Associate I earn from qualifying purchases.

Tuesday, June 26, 2018

EL-Wire plus 3d Printed Bracelet Project

Found some pics of an early jewelry experiment combining EL-Wire and 3d printing. This bangle, or maybe a bracelet, has got to be one of the simplest designs I've done with this combination of technologies, but it's still effective.

There is very little non-structural plastic in the design. That's not usually an important consideration in my jewelry making ---  in fact, I get way too elaborate with both structure and decoration.
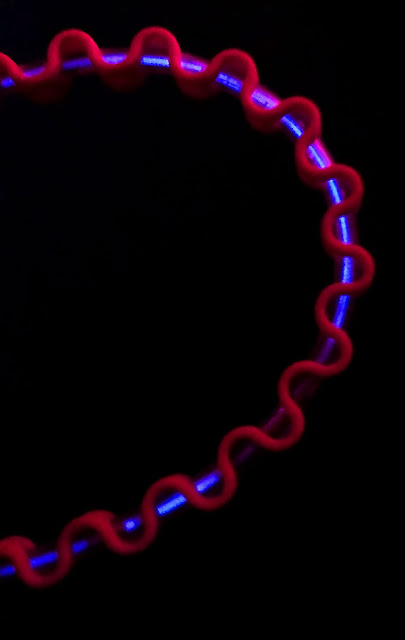
EL-wire and sine wave 3d printed jewelry bracelett
The EL-wire loses some of linear appearance thanks to the undulating repeating pattern

But when I design something as a 3d print I tend to think more like an engineer. So the simple design is pleasing to me because it means I found a basic concept that works. I like it when the most basic form works with no extra parts or decoration needed.

Or maybe I'm just happy because I like it even without a single gear or wing or key or even an antiqued brass raven skull. Not everything has to be Steampunk.

This first-test version is a simple sine-wave-shaped 3d print. The EL-wire runs through a series of holes in the center of the wave faces. This holds the EL-wire in place with friction. And it breaks up the linear shape of EL-wire visually.

EL-wire and sine wave 3d printed jewelry bracelet
The EL-wire runs down the center of the sine wave shaped 3d-printed bracelet.

It's also textured and bright enough (bright pink plastic) to look fun and read well in daylight. It's comfortable to wear and durable. Not bad for a first test of concept.

(Also check out my EL-wire party night light project)

I know these early devstage pics aren't the best, so I'll try to find the actual objects again and grab some better images soon.

Also find me on:
FACEBOOK -or- INSTRUCTABLES -or- YOUTUBE

Monday, June 4, 2018

Run an I2C Bus up to 100' on Ethernet

Here's something I didn't know I needed. It's new breakout boards from Sparkfun and another, slightly different version from Adafruit that lets you extend your Arduino's I2C bus up to 100' using Ethernet cable. 

The Sparkfun version uses a PCA9615 chip and their Qwiic connect system. The Adafruit version uses the LTC4311 chip and their STEMMA QT connector system. Both breakout boards also have breadboarding holes for connecting to power, ground and the I2C lines either by soldering wires directly or with pin headers.

The sensors and/or the microprocessor get connected via the Qwiic/STEMMA connectors. The two systems are interchangeable. The long-run signal is sent through the Ethernet line.

The Sparkfun version requires a board at both ends. It also has an Ethernet port built in. The board actually translates the signal and passes it to the other board where it is translated back into an I2C signal. This version also has the ability to send mixed voltages for power and signal, with the configuration selectable by jumpers.

The Adafruit board is more like a booster/active-terminator. Placed (usually) at the beginning of the cable (next to the microprocessor) it boosts and cleans the signal so that it can be sent farther. You can extend the range with a longer run using just the STEMMA port, but will need to connect the STEMMA port to an Ethernet cable for really long runs. A short video explains why.

Both boards work well, so choosing the best option depends on your needs and hardware requirements.

I just spent the last year learning how to create reasonably reliable data packets for Bluetooth and LORA. Now, I can place sensors and displays 100' feet apart and still use the reliable native I2c protocol instead. 

These hardwired boards provide several advantages over Bluetooth, LORA or even WiFi.
  • Power is transmitted over the Ethernet cable, so you don't need to have batteries or power at the remote location. (Unless you're driving devices like motors or solenoids)
  • You won't need to reset and pair your RF devices anymore. No more dropped BT/LORA/WiFi connections.
  • Only one processor is needed. With RF communication, you need a brain for the transmitter and another for the receiver. With these extenders, you only need the one main brain to send and receive signals.
  • Less likely to be hacked than RF communication
Two situations immediately come to mind:
  • Place the sensors, controllers, and MCU in the uncomfortable or hazardous environment, but have the data-display and control panel in a safe, comfortable location. Great for monitoring and controlling machinery from inside the office. Say a greenhouse where the fans, pumps and lights are in a hot. humid environment but you want to see the sensor data and machine-status inside your nicely airconditioned office. In this scenario, the main power supply would be near the MCU so you can pull power for relays and motor drivers easily. It powers the MCU and sensors also. Only the graphical display, inside that perfectly cooled office, is running off the Ethernet extender
  • Place just the sensors someplace like an attic or crawlspace. You can monitor the temperature, humidity or water levels from the display mounted on an Arduino inside your house. Since the power comes from the ethernet cable, you won't have to crawl under the house to replace batteries ever again. 

I2C range extender over ethernet
Let's say I want to monitor and control some lights and motor from a distance. Here's a simple topology that might work. I can read the sensor data off an I2c capable display, and give commands to the MCU with control buttons on the display. This could be great for controlling lights and fans in the greenhouse from the comfort of the air-conditioned office.


I2C range extender over ethernet
Or maybe I just want to put some sensors in a remote location (attic or crawlspace) while keeping my central MCU and command panel inside. I might never have to access that crawlspace again - unless the sensors tell me there's a problem.


Remember, the boards do send power over the ethernet cable, but not a lot. So you might need to provide a local power source if you want to drive relays, motor controller boards, or even a big display. But the docs make it look easy, just change a few jumpers to connect to local power.

I will still use RF in some of my projects. And since this uses the I2C bus, you can still use RF on the serial lines for a hybrid system. If you need to transmit data for a half mile, or a couple of kilometers, then LORA or XBee is still a good bet. Or if  you can't run cables or the remote location changes frequently, then Bluetooth and WiFi are still good options. 

But both of these boards look really interesting for anything I want to install permanently in a nasty or difficult to access environment.

As an Amazon Associate I earn from qualifying purchases.
Shop through our Amazon links to help support this site.

Also find me on:

Saturday, June 2, 2018

Go Outside and Make Something

Wrote an Instructable about getting outdoors and called it Water Walks for Mind and Fitness. The guide explains some of my motivations for getting outdoors, and some of the making activities I integrate into the excursions.

I even snuck a few paintings and drawings into the mix to illustrate how art can be mixed with other activities. This is usually a tech-centric blog, so I don't talk about the visual arts much, even though they are actually some of my favorite hobbies.

A quick landscape I painted. It's not great art but looking at the landforms closely enough to paint them helped me really see the environment around me. People are often surprised that I even know how to paint, but you can write code and paint, they aren't mutually exclusive.


I've noticed that some members of the local maker group tend to separate their outdoor activities from their maker activities. I used to do the same thing, and probably worse. I was kind of stuck in my mind all week as part of my job, and the occasional walking and hiking and camping were all very separate from the creating and designing parts of my life.


I try to talk about using your tech making skills outdoors, like the RC Airboat Instructable, or the welded cascade fountain downspout thingy. But I've never written about the motivational aspect before.

And I've noticed that there is a division between the artists and the tech people. It's like some people think that if you can code then you can't paint or draw - or vice versa. But that's not true. You can paint and draw and still be a good techno-citizen.


Made an RC airboat out of an broken quadcopter drone. Just wanted an excuse to get outdoors and get my make on at the same time. It's always good to get some of your inventions out into the wild.

Eventually, I discovered a way to integrate my designing and other intellectual interests with my outdoor adventures. When I did that, I discovered that both types of activities enhanced the other. Being outside makes refreshes my mind and body. My creative and intellectual side provides challenges and goals when I get outside.

I decided to write an Instructable guide to address these divisions and talk about how I brought several diverse interests together. So if you've been meaning to "get outside more" this summer, check out the guide and see if it might give you a extra motivation for some fun outdoor adventures.

Check out all of my Instructables for some fun projects to do, indoors our outdoors.

Also find me on:
FACEBOOK -or- INSTRUCTABLES -or- YOUTUBE